Eleven days after I finished a raised bed drip install on three 4×8 beds, I got a callback. The homeowner’s tomatoes were wilting under a system that was, by every visible measure, running fine. What I found that afternoon was not a clogged emitter or a bad fitting, and it changed how I close out every raised bed install I do now. This is a field story about that job, not a technical breakdown. If you want the actual setup steps and the seasonal check that came out of this lesson, both are linked near the end.
The Callback I Didn’t Expect
I got the call on a Tuesday morning. The homeowner’s voice had that controlled calm people use when they are more frustrated than they want to sound. Her tomatoes, planted three weeks earlier in a fresh raised bed, were wilting. The drip system was running. She had checked the timer herself before calling me, twice, because she did not want to waste my time on something obvious.
I drove over expecting the usual culprit on a raised bed install eleven days old: a clogged emitter, a kinked line, maybe a fitting that had backed out under pressure. Those are the calls I get most often, and most of them take fifteen minutes to fix once I am standing in front of the bed. This one was different before I even opened my truck door. The soil around her tomato plants was dry an inch down, and the drip line right beside them was clearly wet.
Three Beds, One Straightforward Install
The job itself had nothing unusual about it. Three 4×8 raised beds, municipal water with steady pressure, about 35 feet of run from the spigot to the first bed. After years of professional experience with drip systems, this was as straightforward as a raised bed install gets. The homeowner had done her research before I ever showed up. She knew the difference between drip tape and emitter line, she had picked her crops with spacing in mind, and she asked better questions during the walkthrough than most clients do.
By the time I left, the system ran exactly the way it was supposed to. Water came out of every emitter at the rate I expected. The pressure held steady across all three beds. I tested the flow at the far end of the run, checked every fitting for leaks, and watched the timer cycle through one full run before I packed up my tools. If you had asked me that afternoon whether this install would generate a callback, I would have told you no. That confidence is part of what makes this job worth telling.
What I Found Eleven Days Later
Standing in front of that bed eleven days later, I was not looking at a broken system. The water supply had not dropped, the timer had not reset itself, and nothing was leaking. I was looking at a system doing exactly what it had been set up to do, and that was the problem. I am not going to walk through the specific technical cause here. That kind of detail belongs in the actual setup breakdown, not in a story about a callback.
What I can tell you is this: one small missing part of the setup, the kind the kit instructions never flagged as critical, plus one assumption I made during the walkthrough that felt reasonable at the time, had quietly set the whole bed up to look successful while underwatering the root zone. I had seen pieces of this pattern before on other raised bed irrigation installs and underestimated how much they compound when they happen together.
I knelt down and dug a little deeper in two spots inside the bed. The surface showed clear water marks, but the soil at root depth was still nowhere near damp enough. The homeowner crouched next to me and looked at that same patch of ground, and that was the moment the conversation shifted from whether the system was running to whether the water was actually reaching where her plants needed it.
Field Note: A drip system can pass every visible test, steady pressure, even flow, a clean timer cycle, and still leave the root zone underwatered. Looking right at the surface does not always mean the water is reaching where the roots actually are.
What Actually Stuck With Me
It was not the callback itself that changed how I work. Callbacks happen. What stuck with me was the homeowner’s face when she described three weeks of careful planting undone by a watering assumption neither of us caught in time. She had done her research, asked good questions, and followed the kit instructions exactly as written.
She had done everything right on her end. The gap was on mine, in a decision made quickly during a routine walkthrough that I treated as settled instead of something worth testing. That is the part of this job that has stayed with me longer than any clogged fitting or pressure problem ever has. It is the kind of lesson you only learn after enough raised bed jobs go wrong in ways that looked impossible on day one.
How That Job Changed Every Install I Do Now
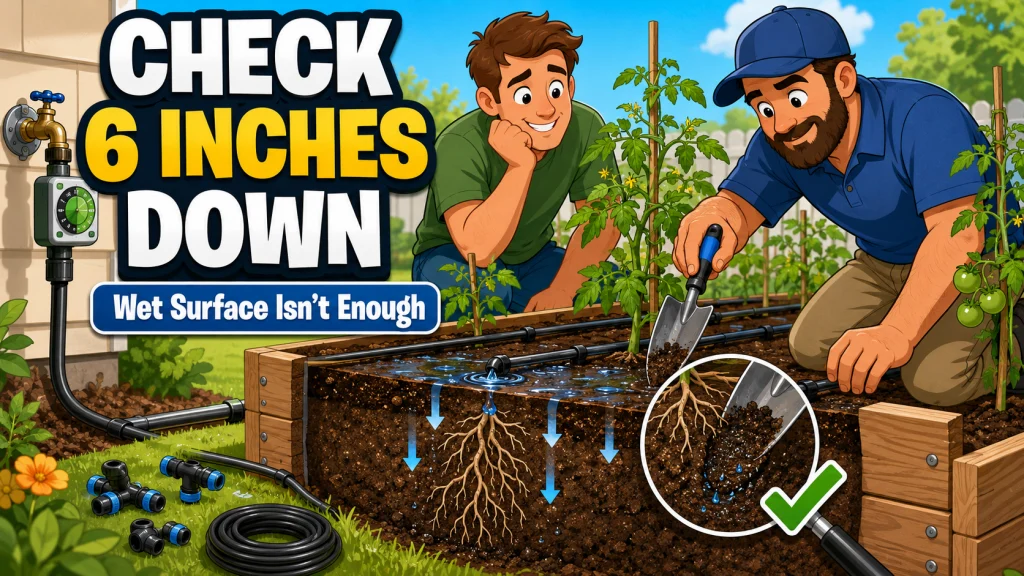
The biggest change is time. The walkthrough at the end of every raised bed install now takes about 20 minutes instead of 5. I do not hand over the timer and leave anymore. I watch the system run a complete cycle, and I test the soil 6 inches down in at least two spots per bed before I consider the job finished.
Confirm the system is running, check for visible leaks, hand the homeowner the timer instructions, and leave once the water is flowing.
Run a full cycle start to finish, dig down 6 inches in more than one spot per bed, and confirm the soil at root depth is actually wet before calling the install finished.
That extra time at the end of an install is the cheapest insurance I know how to offer. It does not cost the homeowner anything extra, and it has caught more problems before they became a wilting tomato plant than I expected when I started doing it.
- Mark where the water actually reaches compared to where the kit diagram assumes it does.
- Have the homeowner repeat the soil check back to me so the habit sticks after I drive away.
- Write down any on-the-spot decision from the walkthrough that I treated as final without actually testing it.
- Leave the homeowner with a simple way to check root-zone moisture themselves later in the season.
The callback rate on my installs dropped after I started doing this every time, not because the kits got better or the homeowners got more careful, but because I stopped trusting a system that looked right without confirming it actually was.
Final Thoughts: The Gap Between Instructions and What Actually Happens
Most raised bed drip irrigation problems I see are preventable. They are not caused by bad equipment, and they are not caused by gardeners who did not try hard enough. They come from the space between what the kit instructions say and what actually needs to happen during an install on a specific bed, with specific soil, specific crops, and specific water pressure. That gap is quiet. It does not show up on day one. It shows up eleven days later, in a homeowner’s voice on the phone, and that is the lesson this job left me with.
If you are setting up a system for the first time, the complete raised bed drip irrigation setup walkthrough covers exactly the kind of decisions that caused this callback, including the ones that look fine until they do not. And if your system has already been running for a season or more, what to check on a raised bed drip system before each new season walks through the same kind of root-depth check I now do on every install.
Sources and References
- Garden Basics with Farmer Fred on root depth and shallow watering programs in drip-irrigated raised beds
- Raised Gardening’s installation checklist covering root-zone soak depth and uneven raised bed watering
- UC Cooperative Extension Master Gardener Fred Hoffman on water movement patterns in raised bed soil mixes
FAQs
🤔 Why did the raised bed drip system look like it was working but the tomatoes still wilted?
A system can hold steady pressure and run on schedule and still fail to deliver water down to the root zone if the layout or run time does not match the bed’s soil and crop spacing. Visible function and actual root-zone moisture are not the same thing.
⏱️ How soon after a raised bed install should you expect a problem like this to show up?
Problems caused by layout or schedule issues often do not show up on day one. They tend to surface after a week or two, once the plants have used up the moisture that was already in the soil from planting.
🌱 Can a drip system run every day and still leave a raised bed underwatered?
Yes. Running frequently in short bursts can wet the surface without reaching the root zone, especially in the lighter, faster-draining soil mixes common in raised beds.
🔍 What should I check first if my raised bed drip system is running but plants look stressed?
Dig down 6 inches near a few different plants and feel the soil at that depth. If it is dry there even though the surface looks wet, the issue is more likely the layout or run time than a clogged emitter.
📋 Does every raised bed drip irrigation install need a final walkthrough before the installer leaves?
It should. Watching one full cycle and checking root-zone moisture before calling a job finished catches problems that are not visible from confirming the system is running alone.