Connecting drip irrigation to raised beds looks simple on the box: hose bib, tubing, done. In practice it depends on how many beds you have, how far the spigot sits from the first bed, and whether you are wiring up a brand new system or threading lines into a bed that is already full of plants. This guide walks through the connection itself, from a single bed all the way out to a yard with five beds spread sixty feet from the water source. I will cover how far a mainline can realistically run before pressure starts dropping, how to add beds later without tearing out what you already built, and what changes when you are retrofitting drip into an established planting instead of starting from bare soil.
From the Spigot to the First Bed
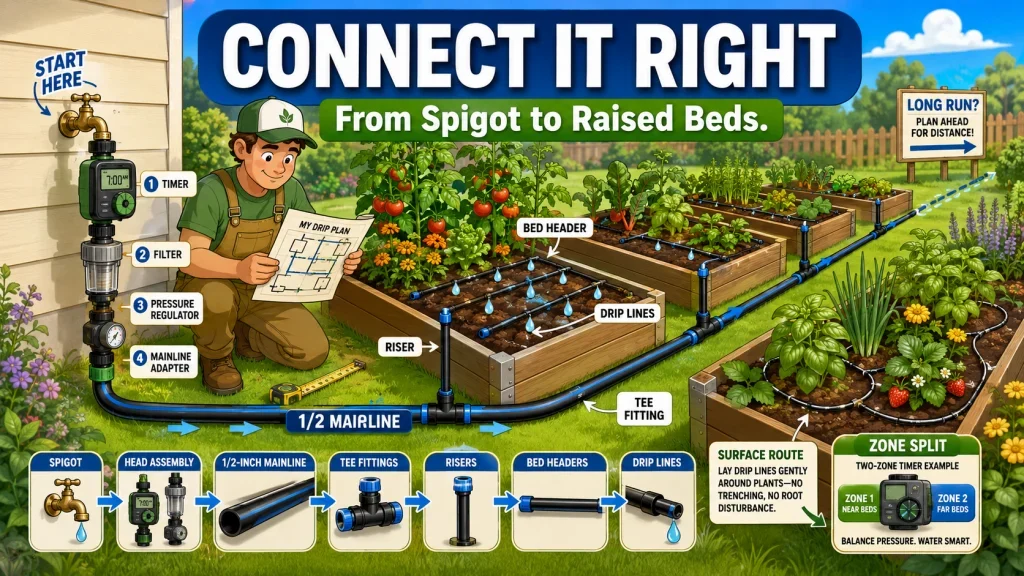
Running 1/2-inch mainline from a spigot to a single raised bed takes about fifteen minutes once the head assembly is on. Running that same mainline to five beds sixty feet away, with enough pressure left at the last bed to actually run the drip lines, takes planning. That is really the whole difference between a one-bed hookup and a yard-wide system, and it is where I see most of the confusion when someone asks me how to connect drip irrigation to raised beds beyond their first one.
The single-bed version is the shortest path between water and plant, and it is worth understanding well before you try to scale it up. Spigot to head assembly, head assembly to mainline, mainline to a riser at the bed, riser into the bed’s header line, and from there into the drip tape or emitter line running along the rows. Every piece after the head assembly exists to get water from point A to point B without losing the pressure regulation and filtration you set up at the start.
What the Single-Bed Hookup Actually Looks Like
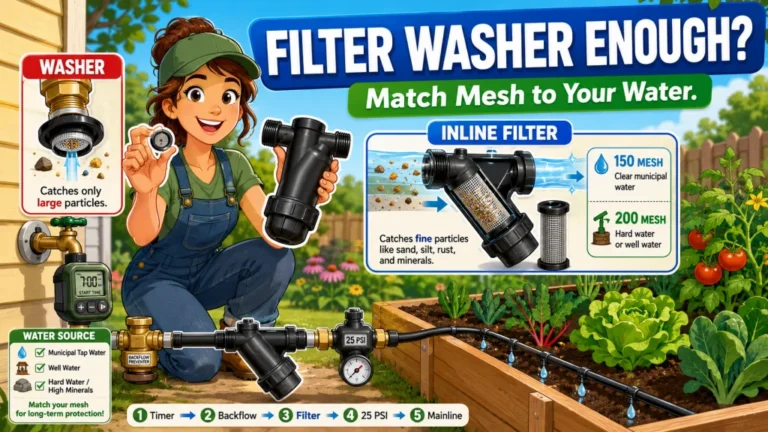
On a 4×4 or 4×8 bed sitting close to the hose bib, the run is short enough that distance barely matters. You thread the mainline along the ground or just under the mulch, bring it up through a riser at the corner of the bed, and connect it to the header that feeds your lines. The filter and regulator stay at the head assembly near the spigot, not out at the bed, so every bed downstream benefits from the same clean, regulated water.
Once you are comfortable with that single connection, extending it to a second or third bed is mostly a matter of distance and fittings rather than a different design. That is the part most kit instructions skip entirely, since they are written assuming one bed.

Designed specifically for standard 4 by 8 foot raised beds, this self-contained kit is available in five tiers covering 2 to 10 beds. Everything needed to connect to a standard outdoor faucet or garden hose is included, with all threaded parts requiring only hand tightening and tubing cuttable with ordinary household scissors. The fully modular design allows components to be expanded or customized over time without replacing the base system.
Check On AmazonIf you click this link and buy, we earn a commission at no additional cost to you.
How Far a Mainline Can Run Before Pressure Becomes a Problem
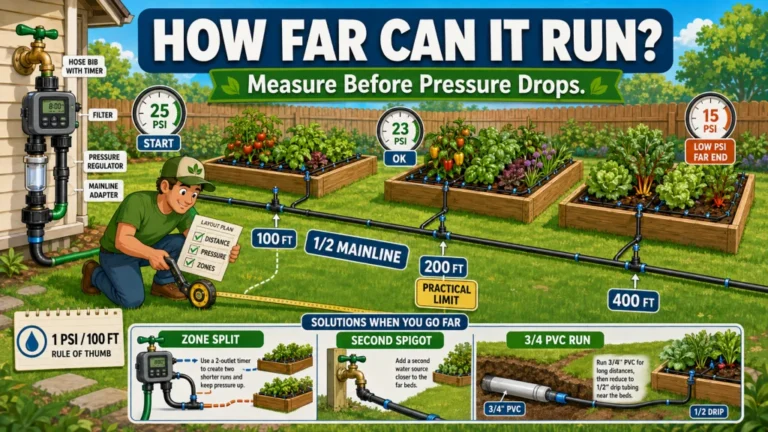
This is the question I get most when someone is planning a yard with more than two or three beds: how far can the mainline go before the beds at the far end start watering slower than the ones near the spigot? There is not one universal number, but there is a practical range. A run of 90 to 100 feet of 1/2-inch mainline tends to hold up fine in most home setups, which lines up with what Homestead and Chill has reported running without trouble in their own raised bed layout.
Past that, 200 feet is generally treated as the practical ceiling for 1/2-inch mainline before pressure drop starts showing up as weak emitters or slow drip tape at the last bed in line. If your yard genuinely needs a run anywhere near that length, especially with several beds and a decent plant count on each one, splitting the system into separate zones is usually the better move rather than pushing one long line to its limit.
| Mainline length | What I typically see |
|---|---|
| Under 90 to 100 feet | Pressure holds up across most home raised bed setups |
| Around 150 feet | Drop becomes noticeable on beds farthest from the spigot, especially with several lines per bed |
| 200 feet or more | Usually needs a zone split rather than one continuous mainline |
A timer with two zones is a common way to handle this. Instead of one mainline trying to serve every bed at once, each zone connects to its own group of beds and runs on its own schedule, which keeps pressure consistent within each group instead of starving the far end of one long line.
Field Note: the mistake I see most with long mainline runs is someone trying to add a fifth or sixth bed onto an already-long line instead of asking whether that bed should start a second zone. The line will technically still carry water, but the bed at the end is the one that ends up under-watered all summer.
Once you know roughly how far your yard’s mainline needs to travel, the next question is what happens when you want to add beds to a system you already built.

This upgraded hose timer features two separate programmable zones, letting you set custom start times and durations for healthier, water-efficient watering. Upgraded valves reduce flow resistance by 40%, and the IP65 waterproof housing has passed 20,000 cycle testing for long-term durability. It offers auto, manual, and rain delay modes with up to 72 hours of rain delay, plus a 2.5 inch LED display showing schedules, power status, and low battery alerts. The 3/4 inch interface fits most standard faucets, and the large button, rotating design makes setup easy for users of any age.
Check On AmazonIf you click this link and buy, we earn a commission at no additional cost to you.
Adding More Beds to an Existing Mainline
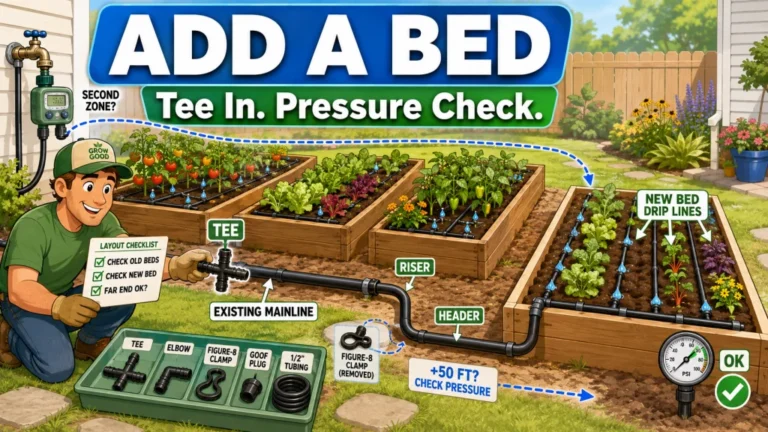
You do not need to rip out an existing mainline just because you are adding a bed. Tee fittings let you branch off the mainline at any point, so beds can be added in sequence as your garden grows. This is one of the more forgiving parts of drip irrigation for raised beds: the mainline itself is just a supply line, and a tee fitting turns one continuous run into a branch point for a new riser and header.
The part that actually requires thought is where that tee goes relative to the beds already on the line. Adding a bed near the spigot end rarely changes anything for the beds downstream. Adding one at the far end of an already-long run is exactly the situation from the section above, where you are now testing the practical distance limit with one more set of emitters pulling from it.
Why the Order You Add Beds In Matters
I usually plan tee locations with future beds in mind even if they are not built yet, since it is much easier to leave a capped tee in place than to cut into an active mainline later. A 4×8 bed with tomatoes and peppers pulls more water per line than a 4×4 lettuce bed, so when you are deciding where a new bed slots into the sequence, it helps to think about which beds are thirstiest and place them earlier in the run rather than last.
For a deeper look at running drip to several beds at once and how the branching pattern changes with bed count, see this guide on connecting drip irrigation to multiple raised beds, which goes further into line arrangement than is needed here. The connection method stays the same regardless of how many beds you eventually end up with; what changes is how you sequence the branches and where you decide pressure needs help.

A 25-piece pack of 17 mm barbed tee fittings for standard 1/2-inch drip irrigation tubing, designed to split irrigation lines securely in garden beds, greenhouses, landscaping, and other watering systems.
Check On AmazonIf you click this link and buy, we earn a commission at no additional cost to you.
When the Spigot Is Far From the Beds
Not every yard has a hose bib conveniently placed beside the garden. When the spigot sits across the yard from where the beds end up, you are choosing between burying the mainline for a clean look or running it along the surface, usually under mulch, which is faster to install and easier to repair later.
DripWorks recommends burying the mainline between beds for cleaner routing, and that approach works well if the layout is permanent and you are not planning to move beds around. Surface routing trades that tidiness for flexibility. If you are still adjusting where beds go, or you garden somewhere with hard or rocky ground that makes trenching a chore, running the line on top and covering it with mulch is the more practical option, even if it is not as invisible.
The tradeoff is mostly about how often you expect to change the layout and how much digging your soil makes you do for that decision. Either way, the mainline from a far spigot still answers to the same distance limits covered earlier, so a long surface run and a long buried run face the same pressure math at the far end.
Adding Drip Irrigation to a Bed That Is Already Planted
Connecting drip irrigation to a bed full of established plants is a different job than connecting it to bare soil, and it gets treated as an afterthought far too often. With an empty bed you can lay header and drip lines exactly where they belong before anything goes in the ground. With an established bed, you are working tubing and fittings around root zones you cannot fully see, which means the connection itself needs to happen with more care, not just a different layout.
I usually run the mainline connection to the bed exterior first, the same way I would on a new install, and only bring the header and drip lines into the bed itself once that supply connection is solid. That way any troubleshooting on the mainline side happens without disturbing soil that is already holding root systems. From there, laying lines along the surface and anchoring them lightly rather than trenching them in avoids cutting into roots you cannot see under the mulch.
Trenching a new header line straight through the middle of an established bed to get a tidy layout.
Running the header along the bed’s edge and bringing branch lines in from the outside, so root disturbance stays minimal while the connection still reaches every row.
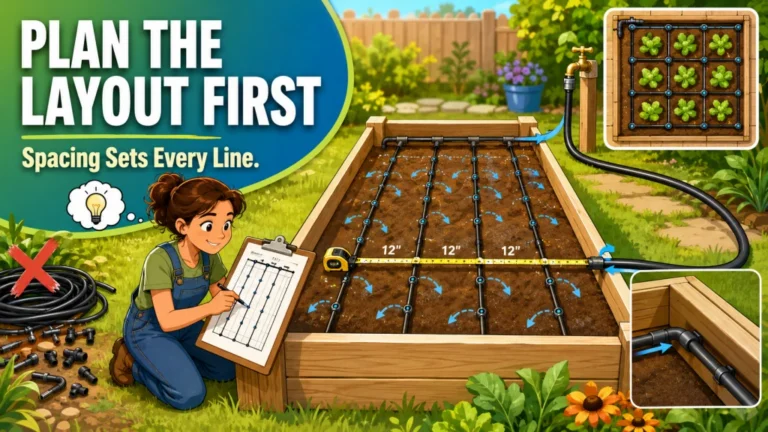
This is also where the layout decisions inside the bed start to matter more than the connection itself. Once water is reaching the bed reliably, how those lines are arranged among existing plants is really a layout question rather than a connection one, and it is covered in more detail in the guide to raised bed drip irrigation layout.
Measure These Before You Buy or Cut Mainline
Most of the connection mistakes I see do not happen during installation. They happen earlier, at the hose bib, when someone buys a roll of mainline and starts cutting it to fit without actually walking the route first. A few minutes with a tape measure before you buy anything saves you from coming up short on a run, or from cutting tubing so tight to the current layout that there is no room to branch off later.
Before you buy mainline, fittings, or a header line, walk the actual path the water will take and write down the real numbers, not estimates from memory. The goal is to know what you are dealing with before it is locked into the ground or under the mulch.
- The distance from the spigot to the first bed, measured along the route the tubing will actually follow, not a straight line across the yard.
- The distance from that bed to the next one if you are connecting more than one, since this is what adds up toward the 90 to 100 foot range where pressure starts to matter.
- How many beds will realistically be running on the same zone at the same time, since that affects how much total flow the mainline needs to carry.
- Which beds carry heavier drip line counts or thirstier crops like tomatoes and peppers, so those beds can sit earlier in the run instead of last.
- Whether you are likely to add another bed next season, since that changes where you leave a capped tee versus where you assume the layout is final.
- Buying mainline with a little extra length and a few spare tee fittings, rather than cutting everything to fit the beds you have today, since that is what makes adding a bed later a ten-minute job instead of a redo.
This is really the planning version of everything covered above. Once you have these numbers in hand, you already know whether you are looking at a simple single mainline or whether a zone split belongs in the plan from day one, and you can buy tubing and fittings that match the system you are actually going to end up with instead of the one you started with.

This multi-function kit connects 1/2 inch drip tubing to any 3/4 inch male threaded faucet or garden hose, helping ensure your drip irrigation system runs properly. It includes a backflow preventer, a 25 PSI pressure regulator, and a 150 mesh filter, along with a compression fitting that creates a leak-proof seal to 1/2 inch tubing. Built from UV and chemical-resistant materials for long-lasting durability, the kit can also be paired with a compatible Rain Bird hose-end timer for automated watering.
Check On AmazonIf you click this link and buy, we earn a commission at no additional cost to you.
Final Thoughts: Plan the Connection Before You Plan the Layout
The connection from your water source to your beds is the part of the system that decides whether everything downstream actually has enough pressure to work right. Get the mainline distance and zone decisions correct early, and the layout inside each bed becomes a much easier problem to solve. Skip that step and even a well-designed bed layout will fight you with weak emitters at the far end of the yard.
If you are still working out which components belong in the head assembly itself, filter, regulator, fittings, and tubing size, that piece is covered separately in the guide to raised bed drip irrigation components. Once the mainline and head assembly are sorted, the connection questions in this guide are usually the last thing standing between you and a system that waters every bed evenly.
Explore More on Connecting Drip Irrigation to Raised Beds
Each of the situations below comes up often enough on its own that it gets a fuller answer in its own guide, beyond what fits naturally in this overview.
| Guide | What it helps with |
|---|---|
| Drip Irrigation for Multiple Raised Beds | Branching one mainline out to several beds without starving the ones farthest from the spigot. |
| Drip Irrigation Mainline Distance for Raised Beds | Working out exact pressure drop expectations for longer runs and when a zone split is worth it. |
| Adding Beds to an Existing Drip Irrigation System | Where to place tee fittings and how to sequence new beds onto a system already in use. |
| Raised Bed Drip Irrigation for a Long Run From the Spigot | Choosing between burying and surface-mounting mainline when the water source sits far from the garden. |
| Adding Drip Irrigation to an Existing Raised Bed | Retrofitting drip lines around established plants without disturbing root zones. |
Start with whichever one matches the stage your garden is actually at right now, since the right next step depends more on where your beds and water source already are than on any single universal setup.
FAQs
🚿 How do I run drip irrigation from a spigot to a raised bed?
Connect a head assembly with a filter and pressure regulator directly to the spigot, then run mainline tubing from there to a riser at the bed, feeding into the header line that supplies your drip tape or emitter line.
📏 How far can a drip irrigation mainline run to raised beds?
Most home setups hold pressure fine up to around 90 to 100 feet of 1/2-inch mainline. Past roughly 200 feet, especially with several beds drawing water, a zone split usually works better than one long continuous run.
🌱 Can I connect multiple raised beds to one mainline?
Yes, using tee fittings to branch off the mainline at each bed. The limiting factor is total distance and how many beds are drawing from the same line, not the number of beds itself.
🔧 Do I need to replace my mainline to add another raised bed?
No. A tee fitting cut into the existing mainline lets you branch a new riser to the additional bed without replacing what is already installed.
⛏️ Should I bury the mainline between raised beds or run it on the surface?
Burying gives a cleaner look and works well for a permanent layout. Surface routing under mulch is faster to install and easier to adjust if you expect to change your bed arrangement.
🪴 How do I add drip irrigation to a raised bed that already has plants in it?
Connect the mainline to the bed exterior first, then lay header and drip lines along the surface around existing plants rather than trenching through root zones. Anchor lines lightly instead of digging them in.
⏱️ Should each raised bed group be on its own zone?
If your beds are spread across a long mainline run, splitting them into separate timer zones keeps pressure consistent within each group instead of one long line struggling to serve every bed equally.