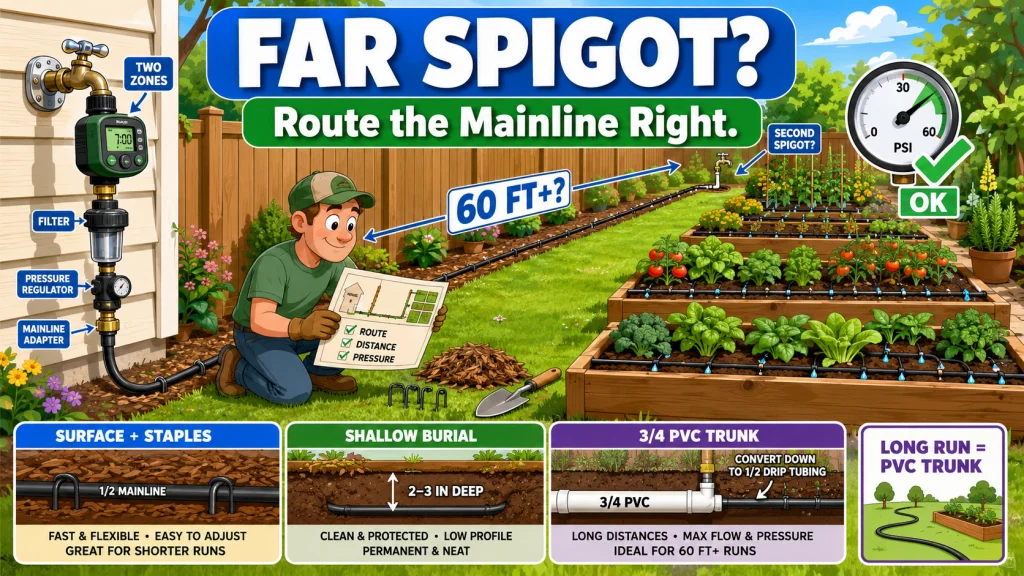
When raised beds sit 40, 60, or 100 feet from the nearest outdoor spigot, the drip system looks fine on paper until there are 80 feet of black tubing snaking across a patio that nobody wants to walk past. The routing decision matters as much as the pressure setup and the fittings. This article covers three practical options for getting mainline from a far spigot to the bed area without tripping hazards or pressure losses: surface routing with landscape staples, shallow burial, and upgrading to a larger-diameter trunk for longer runs. It also covers when a second outdoor spigot is the right long-term answer and when a 2-outlet timer solves the problem from the hose bib itself.
The Real Problem With a Far Spigot and Raised Bed Drip Irrigation
The most common raised bed drip complaint I hear from homeowners is not about pressure or emitters. It is about 60 feet of black tubing running across the patio that becomes a trip hazard and looks like a garden hose that gave up. The drip system works, but nobody wants to look at it all season. Raised bed drip irrigation with a long run from the spigot is a routing problem more than it is a hardware problem, and it is solvable with the right approach for the actual distance involved.
Before picking a routing method, measure the real path the tubing needs to follow: along the fence line, around a shed, across the lawn, or over a paved surface. A spigot that looks 30 feet away can easily require 70 or 80 feet of actual mainline once the route bends around corners and follows the perimeter rather than cutting diagonally across the yard. That measurement determines which of the options below fits the situation. For context on how total run length affects water pressure at the beds themselves, the drip irrigation mainline distance and pressure limits article covers that side of the calculation separately.
Surface Routing: The Right Starting Point for Flexible or Shorter Runs
For runs under 60 feet where the bed layout is likely to change, laying 1/2-inch mainline directly on the ground is the most practical starting point. It requires no digging, takes about twenty minutes to set up, and can be repositioned next season without any real work. The downside is that it needs to be managed to stay safe and reasonably invisible.
The method that works: route the mainline along a fence line, a raised bed edge, or the border of a path rather than diagonally across an open lawn or paved patio. Anchor it every 3 to 4 feet with landscape staples pressed into the soil. Where the tubing crosses a planted area or a mulched path, cover it with mulch or bark to conceal it and protect it from UV degradation. Leave exposed sections in paved areas tight against the edge of the surface rather than running them across the middle of a walkway.
Field Note: The trip hazard complaint almost always comes from one specific scenario: tubing laid in a straight diagonal line from the spigot to the beds across paved or open areas, with no staples, flapping around when the pressure cycles on. Tubing that follows the perimeter of the yard and stays anchored along the way does not create this problem. The extra few feet of mainline to follow the fence line instead of cutting across the yard is worth it every time.
One trade-off with surface routing is UV exposure over multiple seasons. Black polyethylene tubing handles sun reasonably well, but sections left fully exposed year after year will eventually become brittle. Where the tubing cannot be mulched, running it through a short sleeve of conduit or tucking it along the underside of a raised bed frame adds protection without the commitment of a buried line.

This pack of 100 J-shaped galvanized steel stakes secures half-inch, quarter-inch, and eighth-inch drip tubing firmly in place with a half-inch wide rounded top opening. Each stake measures approximately 5 inches on the long side and 2 inches on the short side, pushing easily into soil by hand. Rustproof and waterproof construction makes them suitable for permanent outdoor installation in gardens and vegetable beds.
Check On AmazonIf you click this link and buy, we earn a commission at no additional cost to you.
Shallow Burial: The Cleanest Option When the Bed Layout Is Settled
If the raised bed positions are not going to change and the run from the spigot crosses a lawn, a path, or a surface where visible tubing is genuinely not an option, burying the mainline is the cleanest solution. At 2 to 3 inches deep, the tubing sits below foot traffic, out of sight, and protected from both UV and physical damage. The work involved is a narrow trench that a flat spade can open and close in the same session.
The trench does not need to be wide. A flat spade pressed 3 to 4 inches into the soil and rocked forward opens enough of a channel to lay the tubing flat and backfill by hand. For a lawn crossing, the tubing can go under the sod by slicing along the edge of the cut, tucking the tubing in, and tamping the sod back down. Most lawn crossings like this heal in a week or two and disappear entirely.
- Bury only the long trunk run between the spigot and the bed entry point. Keep everything inside and around the beds above ground so it stays easy to inspect and adjust.
- Mark both ends of the buried section before backfilling so the entry and exit points are easy to find later.
- If the run crosses a paved surface, use a sleeve of rigid conduit through that crossing rather than trying to cut into the pavement.
- Avoid burying any connection fittings. Keep every joint, tee, and elbow accessible above ground where you can see it if it starts weeping.
The main limitation of shallow burial is that it is harder to change if the bed layout shifts later. A buried mainline with the wrong endpoint means re-digging. Before committing to burial, it is worth being confident about where the beds are staying long-term.

This 200-foot coil of half-inch poly tubing serves as main supply line or feeder line in drip irrigation systems, with an outside diameter of 0.620 inches and inside diameter of 0.520 inches for compatibility with standard drip fittings and emitters. Multi-layer construction uses 100% virgin poly on the inner and outer layers for UV and water resistance, with a recycled-content core for added strength. Suitable for trees, shrubs, raised beds, containers, and hanging baskets.
Check On AmazonIf you click this link and buy, we earn a commission at no additional cost to you.
Upgrading to 3/4-inch PVC for Long Trunk Runs
For runs over 60 to 80 feet, friction loss in 1/2-inch polyethylene mainline starts to create a real pressure problem at the far end. The tubing diameter is the limiting factor: the narrower the channel, the more pressure the water loses over distance to friction against the tubing walls. Running 3/4-inch PVC for the long trunk section from the spigot to the bed area, then converting back to 1/2-inch drip tubing at the entry point of each bed, reduces that friction loss significantly and keeps pressure consistent even on longer runs.
This approach requires burying the PVC section. Rigid PVC cannot be surface-routed the way flexible polyethylene tubing can without creating a different set of trip hazards. For a permanent garden with beds more than 60 feet from the spigot, a buried PVC trunk with above-ground drip connections at each bed entry point is often the most reliable long-term setup. The conversion from 3/4-inch PVC to 1/2-inch drip tubing happens at a fitting at the bed entry, and from there the installation follows the standard raised bed layout covered in the how to connect drip irrigation to raised beds walkthrough.
One point worth being clear about: the PVC upgrade addresses friction loss in the trunk section, not a low source pressure problem. If the hose bib is running weak before any mainline is attached, a larger trunk will help some but will not fully compensate for a low-pressure source. That is a separate issue from long-run routing.

This multi-function kit connects 1/2 inch drip tubing to any 3/4 inch male threaded faucet or garden hose, helping ensure your drip irrigation system runs properly. It includes a backflow preventer, a 25 PSI pressure regulator, and a 150 mesh filter, along with a compression fitting that creates a leak-proof seal to 1/2 inch tubing. Built from UV and chemical-resistant materials for long-lasting durability, the kit can also be paired with a compatible Rain Bird hose-end timer for automated watering.
Check On AmazonIf you click this link and buy, we earn a commission at no additional cost to you.
When Adding a Second Outdoor Spigot Is the Right Long-Term Answer
For beds that are 100 feet or more from the only outdoor spigot, the routing problem sometimes comes down to the spigot being in the wrong place. Running 100 feet of mainline across a yard introduces friction loss, routing complexity, and a long buried run that is inconvenient to modify later. A second exterior spigot added by a plumber, positioned closer to the bed area, typically costs $150 to $300 depending on where the nearest interior supply line runs. That cost eliminates the routing problem at the source rather than working around it.
This is not necessary for every setup. Plenty of raised bed systems run 80 or 90 feet without meaningful pressure problems, especially with a PVC trunk upgrade. But if the garden is permanent, the current spigot is genuinely far from where the beds sit, and the plumber quote comes back reasonable, a second spigot closer to the beds tends to pay for itself in saved tubing, time, and seasonal hassle across a few years. It is worth getting that quote before committing to a long buried run, particularly if a buried 1/2-inch run is already showing pressure loss at the far beds.
Using a 2-Outlet Timer When Beds Are Spread in Multiple Directions
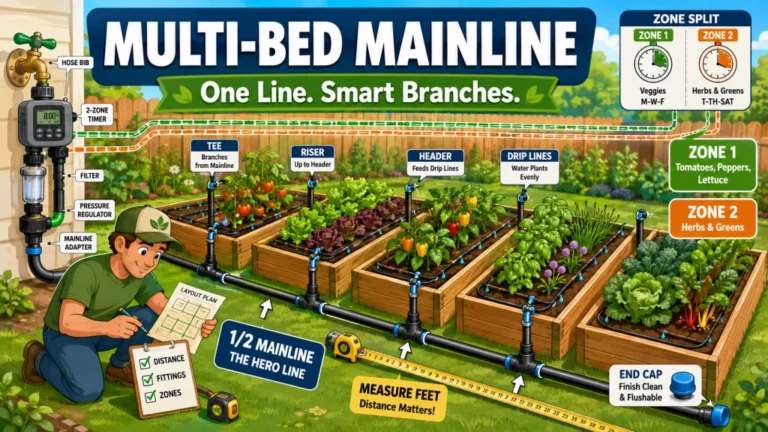
When raised beds are distributed across a large yard in different directions from a single spigot, a 2-outlet timer lets two separate mainlines run from the same hose bib. Each outlet gets its own pressure regulator and filter, and each zone covers part of the garden independently. Instead of one long mainline struggling to reach every bed, each zone handles a manageable section of the yard at a length that keeps pressure consistent.
This setup does not require a second spigot or any plumbing work. The timer connects to the existing hose bib and splits into two outlets that can be scheduled separately. If one section of the garden has tomatoes running on a longer cycle and another section has lettuce that needs shorter, more frequent watering, the two outlets handle that without any additional hardware. Each zone also has a shorter mainline run, which means less friction loss and more consistent pressure at the far emitters.
For a garden that is still being built out, starting with one outlet and expanding to the second zone as new beds are added is a practical way to grow the system without committing to a long single mainline from the beginning. The full base setup is covered at raised bed drip irrigation setup if the system itself is still being put together.

This battery-powered hose timer converts any standard faucet into a two-outlet automatic watering system with programmable schedules and adjustable watering durations. The clear LCD display makes programming straightforward, and a built-in rain delay feature pauses irrigation automatically during wet weather. Designed for outdoor durability and water-resistant construction, it backs its reliability with a six-year limited warranty.
Check On AmazonIf you click this link and buy, we earn a commission at no additional cost to you.
Comparing the Routing Options by Distance and Situation
The right choice depends on how far the spigot is, how permanent the bed layout is, and how much installation work makes sense for the setup. Before buying more mainline or committing to a buried run, a quick check saves a lot of backtracking.
Pro Tips: Measure the actual route to the beds along the perimeter, not the straight-line distance across the yard. Mark any paved crossings, lawn crossings, and bed entry points before buying tubing. Confirm whether the bed layout is likely to stay put for at least a few seasons before burying anything. Keep all fittings, tees, elbows, filter, pressure regulator, and transition points above ground and accessible. If burying a long trunk, plan for a flush or drain point near the bed entry so the line can be cleared at the end of the season.
The table below covers the main trade-offs at a glance.
| Routing method | Best distance range | Trench required | Layout flexibility | Main trade-off |
|---|---|---|---|---|
| Surface lay with staples | Under 60 feet | No | High; easy to reposition | UV exposure if not mulched; visible in open areas |
| Shallow burial (1/2-inch tubing) | Any distance | Narrow, 2 to 3 inches | Low; committed to current layout | Cleanest finish; harder to change later |
| 3/4-inch PVC trunk with drip conversion | 60 feet and over | Yes, buried | Low; permanent install | Lowest friction loss; more installation work upfront |
| Second outdoor spigot | 100 feet and over | Plumber install | High; fresh starting point | $150 to $300 upfront; cleanest long-term solution |
| 2-outlet timer, two mainlines | Beds in multiple directions | No additional digging | Medium; zones are adjustable | Each line stays shorter; pressure stays consistent per zone |
Most gardeners within 60 feet of the spigot are well served by surface routing with mulch cover and staples. The decision gets more considered at 60 to 80 feet, where burial or a PVC trunk starts making more sense for pressure and aesthetics. Past 100 feet, it is worth getting a quote for a second spigot before defaulting to a long buried run.

This all-in-one drip irrigation kit is designed specifically for standard 4 by 8 foot raised beds, with options covering 2 to 10 beds depending on the tier you choose. Everything needed to connect to a standard outdoor faucet or garden hose is included, and all fittings require only hand tightening. The tubing cuts easily with household scissors, and the fully modular design lets you expand or customize the system over time.
Check On AmazonIf you click this link and buy, we earn a commission at no additional cost to you.
Final Thoughts: Route It Once, Route It Right
The routing decision is easier to get right the first time than to redo after a season of trip hazards and dry beds at the far end. Surface routing is forgiving and adjustable. Buried runs are clean and permanent but commit you to the current bed layout. A PVC trunk solves the friction problem on longer runs but requires real trenching. A second spigot solves the problem at the source if the distance and plumber cost make it worthwhile.
In most setups I have worked with, the advice is the same: follow the perimeter rather than crossing open spaces, anchor anything that stays above ground, and avoid burying any section that might need to change in the next season or two. If the garden is still evolving, surface routing with careful staple placement and mulch cover handles most runs under 60 feet without the commitment of a buried line.
FAQs
📏 How far can drip irrigation mainline run from a spigot to raised beds?
With standard 1/2-inch polyethylene mainline, most raised bed setups start showing pressure loss at the far end somewhere between 100 and 200 feet, depending on emitter count and flow rate. For runs over 60 to 80 feet, upgrading to a 3/4-inch PVC trunk section reduces friction loss significantly and keeps pressure more consistent at the beds.
🌿 How do I hide drip irrigation tubing running from a far spigot to raised beds?
Route the mainline along a fence line or bed edge rather than diagonally across open space, anchor it with landscape staples every 3 to 4 feet, and cover exposed sections with mulch or bark where the tubing crosses planted areas. For a fully hidden run, bury the mainline 2 to 3 inches deep for the long section between the spigot and the bed entry point.
⛏️ How deep should I bury drip irrigation mainline between a spigot and raised beds?
Two to three inches is enough for standard 1/2-inch polyethylene mainline. That depth puts it below foot traffic and out of reach of typical lawn mowing. A flat spade is sufficient for opening a narrow trench at that depth. Keep all connection fittings and joints above ground where they can be inspected easily.
💧 Why is water pressure low at my raised beds when the spigot is far away?
Friction loss in the mainline tubing is the most likely cause. The longer the run and the narrower the tubing, the more pressure drops before it reaches the beds. For runs over 60 to 80 feet, switching to 3/4-inch PVC for the long trunk section and converting back to 1/2-inch drip tubing at each bed entry point reduces that friction loss significantly.
🔧 Should I add a second outdoor spigot for raised beds that are far from the house?
If the beds are 100 feet or more from the only outdoor spigot and a long buried mainline run feels impractical or is already causing pressure problems, a second exterior spigot added by a plumber typically costs $150 to $300 and eliminates the routing problem at the source. It is worth getting a quote before committing to a long buried run, especially if the bed layout is permanent.
⏱️ Can a 2-outlet timer help when raised beds are spread across a large yard?
Yes. A 2-outlet timer connects to one spigot and runs two separate mainlines, each with its own pressure regulator and filter. Instead of one long mainline reaching all beds, each zone covers part of the yard at a manageable distance. The two outlets can be scheduled independently if different bed areas need different run times or watering frequencies.