A raised bed drip irrigation layout has a specific physical logic: the water source feeds into a head assembly outside the bed, a mainline carries water along the outside of the frame, a riser brings it up and over at the corner, and driplines branch off a header running across the short end of the bed. This article describes that layout component by component, with positions specific enough to sketch. If you have ever looked at a drip kit and wondered where everything is actually supposed to go, this is where that picture comes together.

The Layout, Component by Component
Draw a rectangle for your raised bed. Now draw a small box at the top-left corner, outside the rectangle. That is your hose bib. Everything flows from there, and the layout follows a specific order: outside the bed first, into the bed second, across the short end third, and down the length of the bed last.
Here is the sequence, in order from the water source to the far end of the last dripline:
- Hose bib: The starting point. Sits outside and above the bed, typically on an exterior wall or post nearby.
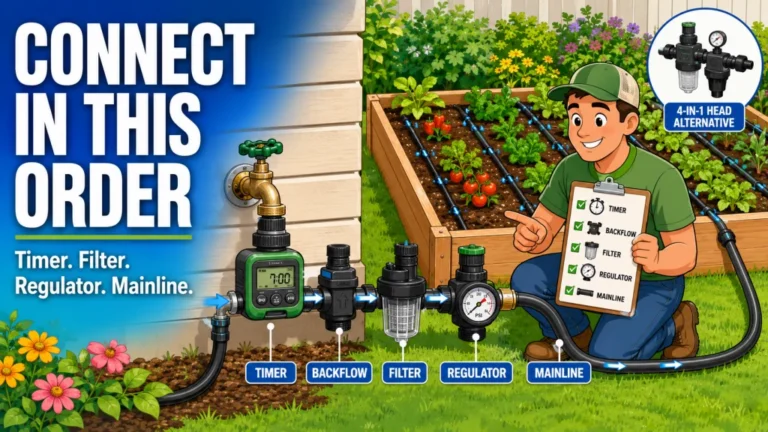
- Head assembly: Connects directly to the hose bib, outside the bed. Usually includes a timer, backflow preventer, filter, and pressure regulator in that order, all threaded together before the first piece of tubing.
- 1/2-inch mainline: Runs from the head assembly along the outside of the bed frame. It stays on the exterior of the bed, not through the soil. On a 4×8 bed oriented with the long sides facing you, the mainline runs along one of the short ends.
- Riser and elbow: At the bed corner, a short vertical section of 1/2-inch tubing, held by a stake or clipped to the frame, brings the mainline up from ground level to the top of the bed frame. An elbow fitting turns the line over the frame and into the bed.
- 1/2-inch header: Once inside the bed, a short length of 1/2-inch tubing runs across the short dimension of the bed, parallel to the short end wall. For a 4×8 bed, this header spans 4 feet across the width. Barb connectors punch into the header at regular intervals for the driplines.
- 1/4-inch driplines: Branch off the header at right angles, running the full length of the bed. On a 4×8 bed, each line runs 8 feet from the header to the far end. Lines run parallel to each other, spaced according to soil type and planting density.
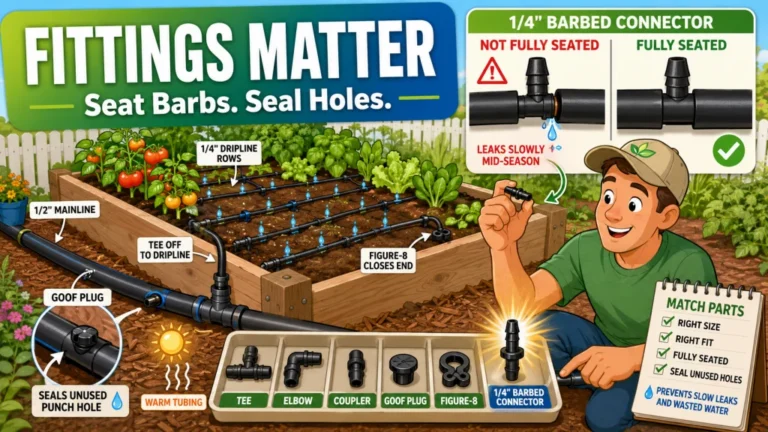
- End closures: Every dripline end gets a goof plug or figure-8 clamp to seal it. Unsealed ends bleed pressure from the whole system quietly and consistently until you figure out why coverage is uneven.
That is the complete layout. Every component is outside the bed until the riser, and everything inside the bed runs in one direction: across the short end first, then down the length. The shape it makes from above looks like a capital E, with the header as the vertical spine and the driplines as the horizontal branches.

This kit includes everything needed to water a raised bed up to 4 by 8 feet, with professional-grade components built for repeated seasonal use. It features 35 feet of emitter tubing with 70 built-in, pressure-compensating emitters spaced every 6 inches for even watering near the roots, plus 25 feet of easy-to-handle 1/4 inch distribution tubing. This low-volume design can save up to 80% on water while supporting healthier plants and better yields. Installation is straightforward thanks to an illustrated manual covering multiple layout options, and the system can be automated with a compatible Rain Bird hose-end timer sold separately.
Check On AmazonIf you click this link and buy, we earn a commission at no additional cost to you.
Where Each Component Sits
The table below maps each component to its position relative to the bed and explains why it sits there rather than somewhere more convenient. A few of these placements feel counterintuitive on first install, and those are exactly the ones most likely to be placed wrong.
| Component | Position | Why It Goes There |
|---|---|---|
| Head assembly (timer, filter, regulator) | Outside the bed, at the hose bib | Needs to be accessible for adjustment, winterizing, and troubleshooting without disturbing the bed |
| 1/2-inch mainline | Outside the bed frame, along the exterior | Keeps supply tubing out of the soil so replanting does not disturb connections |
| Riser | At the bed corner, exterior side | Lifts the mainline from ground level to the top of the frame cleanly, without bending the tubing |
| 1/2-inch header | Inside the bed, across the short dimension | Equal branch lengths from the header to each dripline end means consistent pressure across all lines |
| 1/4-inch driplines | Inside the bed, parallel, running the length | Covers the root zone evenly when spaced correctly for soil type and planting density |
| Goof plugs / figure-8 clamps | Every unused barb and every dripline end | Unsealed openings bleed pressure from the entire system, causing dry spots across all lines |
| Tee fitting (multi-bed setups) | On the mainline between beds, outside both | Allows the mainline to continue to the next bed without interrupting supply to the first |
The pattern across every placement is the same: anything that carries water to the bed lives outside it, and anything that distributes water across the root zone lives inside it. That boundary at the bed frame is where most layout mistakes happen.
Why the Header Runs Across the Short End
The header placement is a pressure decision, not an aesthetic one. When the header spans the short end of a 4×8 bed, all four driplines branch off it at roughly the same point and run the same 8-foot length to the far wall. Each line starts at the same pressure and ends at the same distance from the source. Coverage is even across the bed because the hydraulic conditions across every line are nearly identical.
If the header runs the long way instead, along one of the 8-foot sides, you have to decide which direction the driplines go. If they run across the 4-foot width, each line is the same length, but now the supply path along the 8-foot header is different for each branch. The first dripline off the header is close to where the water enters; the last one is 8 feet down the header from the supply. That distance means the far end of the header has lower residual pressure, and the driplines farthest from the entry point run at slightly lower pressure than the ones close to it. The result is uneven output across lines. Running the header across the short 4-foot end keeps the supply path to every dripline nearly equal, because all lines branch off close to the water entry point and run the same 8-foot length. That consistency is what the short-end header placement buys you.
The spacing between driplines is a separate decision from the header placement. If you want to think through how soil type and planting density affect dripline spacing in a 4-foot wide bed, the drip line spacing guide for raised beds covers that math without requiring you to rethink the header position.
The Mainline Belongs Outside the Bed
This is the layout mistake I see most often on first installs. The 1/2-inch supply line gets run through the soil inside the bed because it is a shorter path from the hose bib, or because the installer assumed it would be hidden more cleanly. Both reasons make sense until the first time the bed gets replanted.
Digging or troweling through a raised bed to pull out a tomato cage, break up compacted soil, or install a new transplant will find that mainline eventually. At best, a barb fitting comes loose. At worst, the tubing gets cut. Either way, the repair requires moving soil, pulling up connected driplines, and resetting a supply connection that should have been outside the bed from the start. Routing the mainline along the exterior of the bed frame adds a few extra feet of tubing and two more fittings, and it means the supply line is never under a trowel.
Field Note: The most common version of this I see is a mainline that enters the bed at the hose bib end, runs along the inside of the long wall, and then exits at the far end to reach a second bed. It looks tidy on install day. By year two, it has been disturbed two or three times during seasonal cleanup, and at least one barb connection has started weeping. Running the mainline outside the frame takes an extra few minutes during setup and saves that repair.
The correct path: mainline exits the head assembly, runs along the exterior of the bed frame to the near corner, connects to a riser that lifts it over the frame, and enters the bed at that corner only. Inside the bed, a short header takes over immediately. The mainline never lies in the soil.
What the Riser Looks Like at the Corner
The riser is a short vertical section of 1/2-inch tubing that solves a specific geometry problem: the mainline runs at ground level or along the bottom of the bed frame, and the header runs along the top of the soil inside the bed. Something has to bridge that height difference at the corner without kinking the tubing or stressing the fitting.
On most raised beds, the riser is 6 to 12 inches of straight 1/2-inch tubing, supported by a stake pushed into the ground beside the bed frame or clipped to the frame itself. An elbow fitting at the top turns the tubing from vertical to horizontal and sends it over the frame edge and into the bed. The connection from riser to header is usually a barb-to-barb coupling or a tee if the mainline is continuing to a second bed on the same run. The riser does not need to be hidden or buried. It sits at the corner of the bed, visible and accessible, which makes it easy to disconnect the supply line at the end of the season.
Goof Plugs and Open Line Ends
Every opening in a drip system that is not actively delivering water to a plant is a pressure leak. That includes unused barb connectors punched into the header, any test holes made to check tubing position, and every dripline end at the far wall of the bed. If these openings are not sealed, the system loses pressure from multiple points simultaneously, and the result shows up as dry patches across all the lines, not just near the open ends.
A goof plug is a small barb that pushes directly into a punched hole to seal it. A figure-8 clamp folds the end of a dripline back on itself and clamps it shut. Both work. The important thing is that every open end gets one before the system runs for the first time. I have traced dry-corner problems back to a single unsealed dripline end at the far wall of a 4×8 bed more than once. The rest of the system was fine. That one open end was draining enough pressure to leave the last 18 inches of two adjacent lines underwatering.
Leave the far ends of the driplines open. The water just drains into the soil at the end of the run, and you assume the rest of the line is watering normally upstream.
Seal every dripline end with a goof plug or figure-8 clamp before the first run. Check every barb connector on the header for unused holes and plug those too. Run the system for a few minutes, then walk the bed and check that each line is damp evenly along its full length.
This is one of the few steps in drip installation where there is no judgment call. Every open end gets sealed. No exceptions.

These polypropylene goof plugs feature two different sized ends to fit both one-eighth inch and one-quarter inch drip micro tubing, making them useful for capping line ends or plugging accidental holes in your drip system. Made from high-impact, UV-resistant plastic for long-term outdoor durability. A straightforward fix for correcting layout mistakes without replacing tubing.
Check On AmazonIf you click this link and buy, we earn a commission at no additional cost to you.
Connecting a Second Bed Without Interrupting the First
When a second raised bed is within reach of the same mainline run, the connection point is a tee fitting placed on the mainline between the two beds, outside both of them. The mainline enters the tee and continues forward toward the second bed on one side, while the third port of the tee connects to a riser that leads up and over the frame into the first bed. The second bed gets its own riser and header at its near corner the same way the first bed does.
What this means in practice: the mainline never branches inside either bed. Each bed has its own entry point at its own corner. Each bed’s internal layout is a self-contained header-and-dripline system that connects to the mainline only at that one corner riser. If you need to shut off or disconnect one bed for replanting, you can cap the riser at the corner without affecting the other bed on the same line.
The overall system layout, from hose bib through multiple beds, is covered in more detail in the raised bed drip irrigation layout overview, including how to sequence beds on a single mainline run and where to place shutoff valves if you want to control beds independently. If you are still deciding how many driplines each bed needs before you plan the layout, the drip irrigation line count guide by bed size covers that math with the dripline consumption numbers you need before buying.

This pack of four barbed tee fittings connects half-inch and five-eighths inch drip irrigation tubing, with barbed ends that grip tubing securely for a leak-proof hold. Compatible with any half-inch tubing measuring 0.580 to 0.700 inches in outside diameter, and rated for operating pressures up to 50 psi. Built from UV and chemical-resistant materials for reliable long-term outdoor use.
Check On AmazonIf you click this link and buy, we earn a commission at no additional cost to you.
Use Your Sketch to Check the Kit Before Buying
Once you have a rough sketch of the layout, use it as a checklist against whatever kit or collection of parts you are looking at. The box photo on a drip kit shows a tidy finished system. What it does not always show clearly is whether that kit actually covers the dimensions of your bed and your specific connection sequence. The sketch does.
Go through your layout drawing and confirm the kit or parts list covers each position:
- 1/2-inch mainline: enough length to run from the head assembly, along the outside of the bed frame, to the corner riser. Measure that path, not the inside of the bed.
- Riser tubing and elbow: one per bed entry point. If you have two beds, you need two risers and two elbows.
- 1/2-inch header tubing: enough to span the full width of the bed. For a 4-foot wide bed, that is 4 feet of 1/2-inch tubing inside the bed.
- 1/4-inch driplines: enough total footage to cover all lines at full bed length. Check this math against your line count before ordering.
- Goof plugs and end closures: one per dripline end, plus extras for any unused barb holes. Kits often include fewer of these than a first-time installer expects to need.
- Tee fitting: one for each additional bed on the same mainline run, positioned outside both beds between them.
The point is not to buy the most expensive kit or the one with the most pieces. It is to buy what actually matches the physical layout you sketched. A kit that covers a 4×4 bed will not cover a 4×8 bed at the same line count. A kit with no tee fitting will leave you short if you planned for two beds. The sketch makes that mismatch visible before the order ships.

This all-in-one drip irrigation kit is designed specifically for standard 4 by 8 foot raised beds, with options covering 2 to 10 beds depending on the tier you choose. Everything needed to connect to a standard outdoor faucet or garden hose is included, and all fittings require only hand tightening. The tubing cuts easily with household scissors, and the fully modular design lets you expand or customize the system over time.
Check On AmazonIf you click this link and buy, we earn a commission at no additional cost to you.
Final Thoughts: Sketch It Before You Install It
The layout of a raised bed drip system is simple enough to draw on a piece of paper before you touch a fitting. A rectangle for the bed, a line along the outside of the short end for the mainline, a vertical tick at the corner for the riser, a horizontal line inside across the short dimension for the header, and parallel lines running the length of the bed for the driplines. That sketch, even a rough one, will catch the most common mistakes before they become wet-soil problems or loose fittings.
The details that matter most are the ones that are easy to skip: mainline stays outside the bed, header spans the short end, every open end gets sealed before the first run. Getting those three right accounts for most of the problems a first drip install runs into. The full picture is straightforward once the positions of each component make sense. For the full setup process from hose bib through head assembly and into the first bed, the raised bed drip irrigation setup overview walks through each decision in order.

This robust hose-end timer works with sprinklers, drip irrigation, and soaker hoses, offering simple automatic programming with full 7 day scheduling for worry-free watering. An extra-large dial and readout screen make setup and schedule review easy, while one-touch buttons allow quick cancellation, a rain delay of up to 96 hours, or manual watering on demand. The display also shows the next scheduled cycle and time remaining on the current one.
Check On AmazonIf you click this link and buy, we earn a commission at no additional cost to you.
FAQs
📐 What does a raised bed drip irrigation layout look like from above?
From above, it looks like a capital E. The mainline enters at one corner via a riser, a short header runs across the short end of the bed, and parallel driplines branch off the header running the full length of the bed. The mainline itself stays outside the bed frame and is not visible from above inside the growing area.
💧 Where does the mainline go in a raised bed drip system?
The mainline runs along the outside of the bed frame, not through the soil. It enters the bed at one corner via a riser and elbow fitting, connects to the header just inside that corner, and never lies in the planting area. This keeps the supply line accessible and prevents it from being disturbed when the bed is replanted.
🌱 Why does the header run across the short end of the bed instead of the long side?
Running the header across the short end means every dripline branches off close to the water entry point and runs the same 8-foot length. Equal supply paths mean consistent pressure across all lines. If the header ran the long side, driplines farthest from the entry point would be drawing from a header that has already lost some pressure over distance, creating uneven output across the bed.
🔌 What is a riser in a drip irrigation layout?
A riser is a short vertical section of 1/2-inch tubing at the bed corner that lifts the mainline from ground level up to the top of the bed frame. An elbow fitting at the top turns it horizontal and routes it into the bed to connect to the header. It is usually supported by a stake beside the frame or clipped to it.
🧱 Do I need a goof plug at every dripline end?
Yes. Every open dripline end and every unused barb hole in the header needs a goof plug or figure-8 clamp before the system runs. Open ends bleed pressure from the entire system, not just locally, which creates dry patches across lines that otherwise look correctly installed.
🌿 How do I connect a second raised bed to the same drip system?
Use a tee fitting on the mainline between the two beds, outside both of them. One port of the tee continues the mainline to the second bed. Another port connects to a riser that feeds the first bed. Each bed has its own riser, header, and dripline layout. The mainline never branches inside either bed.
🛠️ What is the most common drip layout mistake in raised beds?
Running the mainline through the soil inside the bed instead of along the outside of the frame. It looks clean on install day, but the supply line ends up under a trowel during replanting, which loosens fittings and eventually causes leaks. Keeping the mainline outside the bed frame prevents that entirely.
📏 How long should the header be in a 4×8 raised bed?
For a 4×8 bed, the header spans the 4-foot width. It runs from the corner where the riser enters to the opposite short wall, with barb connectors punched in at the spacing intervals you have chosen for your driplines. The header length matches the bed width, not the bed length.