A raised bed drip system has fewer moving parts than most people expect, but the assembly order at the faucet matters more than the component list. Get the order wrong and the pressure regulator sits under full static line pressure every time the system is off, which wears it out faster than it should and shows up later as leaking fittings or uneven emitter output. This article maps every component in a standard raised bed drip setup, explains what each one does and why it exists, and walks through the assembly sequence that kit instructions often omit when a timer is added.
The Assembly Order at the Faucet
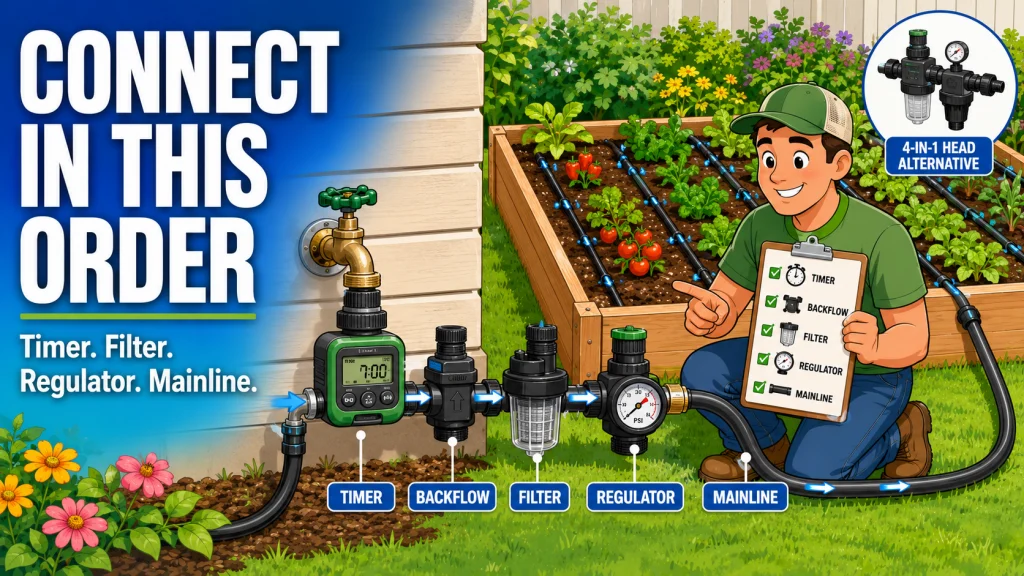
Before getting into individual components, the order they connect matters more than any single part. At the faucet end of a raised bed drip system, there are four components that must go on in a specific sequence. Swap two of them and the system either underperforms or damages itself quietly over the course of a season.
The correct order from the spigot outward is: timer, then backflow preventer, then filter, then pressure regulator, then the mainline tubing that runs to the bed. Each position in that chain has a reason.
The timer goes first, directly on the spigot threads, because of what happens to the pressure regulator when it is not. When the timer is off, the full line pressure from the hose bib, often 50 to 80 PSI on a residential supply, sits on the supply side of the closed timer valve. If the pressure regulator is placed before the timer, the regulator becomes part of that pressurized supply side and stays exposed to static pressure during every hour the system is not running. Pressure regulators for drip systems are designed to regulate flowing water down to 20 to 30 PSI. They are not rated to hold static line pressure indefinitely. Placing the timer first means the regulator only sees pressure when the timer opens and water is actually flowing, which is the condition it was designed for.
The backflow preventer follows the timer. Its job is to stop water from siphoning back from the drip lines into the household supply, which matters for any system where the emitters sit at or below ground level and the water source is a potable supply. Most municipalities require backflow protection on hose bib connections for this reason. The backflow preventer belongs downstream of the timer because the timer creates a closed circuit when it is off, and the backflow preventer handles the flow direction when the timer is on.
The filter comes next. It catches particulate from the supply line before that material reaches the small orifices in emitters and drip tape. A filter installed before the pressure regulator protects the regulator’s internal valve from sediment as well as protecting the emitters. Reversing filter and regulator is a common assembly error that shortens the life of the regulator.
The pressure regulator closes out the faucet assembly. By this point the water has passed through the timer, through the backflow preventer, through the filter, and is clean and ready to be regulated down to the pressure range the drip lines need. From the regulator outlet, the mainline tubing runs to the bed.
Warning: Many drip kits include a filter washer, which is a small rubber washer with a mesh screen pressed into it. That washer fits inside a standard hose fitting and provides minimal filtration. It is not a substitute for a real inline filter. If the supply line has any sediment, mineral deposits, or debris, a filter washer will clog within a season and is difficult to clean properly. A separate inline filter with a removable bowl or screen is easier to maintain and filters more effectively.

This inline filter protects downstream drip components from debris using a pre-installed 200 mesh stainless steel filter element rated to catch particles as small as 75 microns. The glass-filled polypropylene body handles up to 150 psi and fits any standard three-quarter inch irrigation valve via male pipe thread connections on both ends. The cap unthreads quickly for easy filter cleaning without tools.
Check On AmazonIf you click this link and buy, we earn a commission at no additional cost to you.
What Each Component Does
Once the assembly order is clear, each component is straightforward. The confusion usually comes from kits that combine some of these into a single unit, which can make it hard to tell what is handling which function. Here is each component on its own terms.
Timer
A hose-end timer connects directly to the spigot threads and controls when water flows to the drip system. For raised bed vegetable gardens, battery-operated hose timers are the most common option: they require no wiring, run on standard AA or 9-volt batteries, and let you set a daily or every-other-day watering schedule with a run duration in minutes. Most raised bed setups run 20 to 45 minutes per cycle depending on emitter flow rate, soil type, and season. The timer does not regulate how much water the emitters deliver during a cycle. That is the emitter’s job. The timer controls when the cycle starts and how long it runs.
Backflow Preventer
A backflow preventer is a one-way valve that allows water to flow from the supply into the drip system but not in the reverse direction. Without one, a pressure drop in the supply line can pull water from the drip lines back toward the household supply, which is a contamination risk if the emitters are sitting in soil that contains fertilizer, compost, or other material. Most hose bib connections for garden irrigation in the US are required to have backflow protection under local plumbing codes, though enforcement varies. Even where it is not required, it is practical to include. The backflow preventer adds minimal cost and is a small threaded fitting that goes between the timer and the filter.
For a dedicated look at when backflow prevention is legally required versus simply advisable, and how to choose the right type for a raised bed connection, the drip irrigation backflow preventer guide for raised beds covers the options in detail.
Filter
The filter removes particulate from the water before it reaches the emitters. Drip emitters have small orifices, typically 0.5 to 1 GPH flow rates, and those openings clog with sediment faster than the emitter body itself would fail. A 150-mesh or 200-mesh inline filter is the standard recommendation for drip systems on a residential hose bib. The mesh number refers to the number of openings per inch: higher mesh means smaller openings and finer filtration. Most residential supply lines benefit from 150-mesh filtration. If the water source has visible mineral deposits or runs through older galvanized supply lines, 200-mesh is worth considering.
The filter requires periodic cleaning, typically at the start and end of each growing season and once mid-season in areas with hard water. A filter with a clear bowl makes it easy to see when sediment has accumulated without disassembling anything. The drip irrigation filter guide for raised beds covers mesh sizing, cleaning intervals, and how to tell when a filter washer is insufficient for the water source.
Pressure Regulator
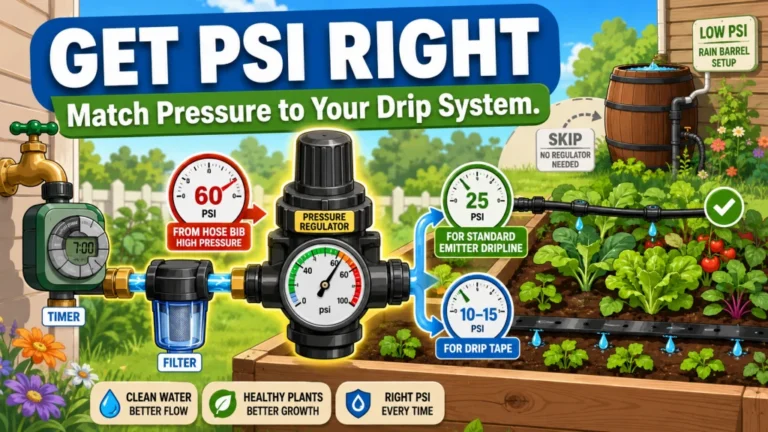
The pressure regulator reduces incoming line pressure to the range that 1/4-inch and 1/2-inch drip line and emitters are designed to operate within. Most residential hose bibs run 50 to 80 PSI. Most raised bed drip components are rated for 20 to 30 PSI. Running drip line at full hose bib pressure does not always cause an immediate failure, but it stresses the fittings, causes emitters to output more water than their rated flow, and shortens the life of the tubing and connections. The regulator reduces that pressure to a consistent working level regardless of what the supply pressure does during the day.
Pressure regulators for drip systems are rated by their outlet pressure: a 25 PSI regulator outputs 25 PSI regardless of inlet pressure, within its rated range. Choosing the wrong outlet pressure for the emitters and tubing in the system is a common mistake. The pressure regulator guide for raised bed drip irrigation covers PSI selection by component type, how to identify whether pressure is causing problems in an existing system, and what to do when the regulator outlet does not match the emitter specification.
The 4-in-1 Head Assembly Option
Some drip kits and standalone products combine the backflow preventer, filter, pressure regulator, and mainline adapter into a single compact fitting called a head assembly or faucet adapter. The appeal is simplicity: one connection at the spigot, everything in the right order, and a smaller physical footprint at the faucet. The tradeoff is that if one component in the unit fails or needs maintenance, the whole unit has to come off. With separate components, a clogged filter bowl can be cleaned without touching the pressure regulator or backflow preventer.
Whether a head assembly makes sense depends on how many beds are being watered and how hands-on the gardener wants to be with seasonal maintenance. For a single 4×8 bed on a simple timer, a head assembly is often the most practical starting point. For a system with multiple beds, zone expansion, or a timer that requires its own mounting position, separate components offer more flexibility. The raised bed drip irrigation head assembly guide compares the unit approach against separate components by setup size and maintenance preference.
Mainline and Drip Line Tubing
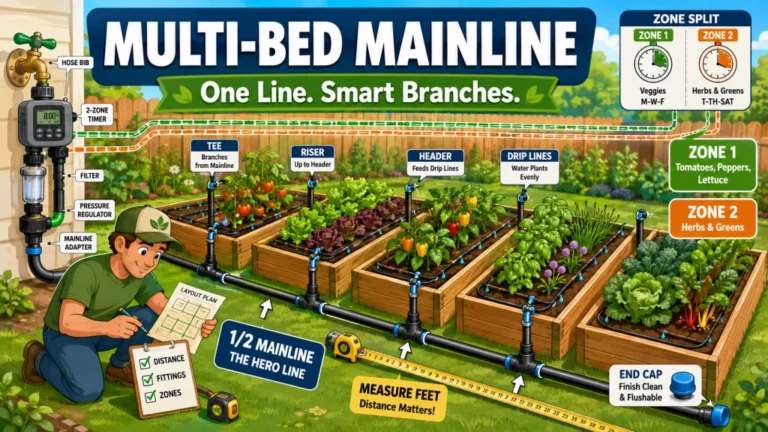
Mainline tubing is the 1/2-inch polyethylene line that carries water from the faucet assembly to the bed. It does not have emitters. Its job is to move water from the source to the zone without pressure loss from flow restriction. Inside the bed, 1/4-inch emitter drip line or drip tape branches off the mainline header and delivers water to the root zone through emitters spaced at intervals determined by the crop type and planting layout.
The distinction between mainline and drip line matters for planning: mainline can run longer distances and supply multiple beds without significant pressure loss at the low flow rates drip systems use. Drip line lengths are more sensitive to pressure and flow because the emitters are drawing from the same line pressure along the full run. A drip line that is too long for the available pressure will water unevenly, with emitters near the header flowing normally and emitters at the far end dripping slowly or not at all.
Fittings
Fittings connect the tubing sections and route the drip lines through the bed. The ones that come up most often in raised bed setups are barbed tees, barbed elbows, figure-8 clamps, goof plugs, and barbed couplings. Each has a specific job, and using the wrong one is the source of the most common installation failures.
A barbed tee splits one line into two or allows a branch line to connect off a running mainline. A barbed elbow turns a line at a right angle without kinking. A figure-8 clamp folds and clamps the end of a drip line to terminate it without a separate end cap. A goof plug seals a hole punched in the wrong location. A barbed coupling joins two cut ends of the same tubing diameter. All of these use a press-fit barbed connection: the barb is pushed into the tubing end, and the tubing grips the barb as it tries to spring back to its original diameter.
The fitting failures I see most often in raised bed systems come from two causes: tubing that is too cold and stiff to seat properly over the barb, and tubing that has been cut at an angle rather than square. Cold tubing does not stretch over the barb cleanly, which leaves a partial seat that weeps under pressure. A diagonal cut leaves a gap on one side of the barb that never seals. Both are easy to avoid: warm the tubing end briefly in hot water before seating a barb in cold weather, and always cut tubing square with a sharp cutter rather than scissors or a knife. The drip irrigation fittings guide for raised beds covers each fitting type, the failure modes by fitting, and how to seat and reseat barbed connections correctly.
Field Note: The goof plug deserves more respect than it gets. Every drip system I have set up on a raised bed has had at least one hole punched in the wrong spot, usually because the tubing shifted while marking or the layout changed after the first holes went in. Having a handful of goof plugs on hand before starting means a misplaced hole is a 10-second fix. Finding out you need one after the water is running and the soil is wet is more annoying than it sounds.

This robust hose-end timer works with sprinklers, drip irrigation, and soaker hoses, offering simple automatic programming with full 7 day scheduling for worry-free watering. An extra-large dial and readout screen make setup and schedule review easy, while one-touch buttons allow quick cancellation, a rain delay of up to 96 hours, or manual watering on demand. The display also shows the next scheduled cycle and time remaining on the current one.
Check On AmazonIf you click this link and buy, we earn a commission at no additional cost to you.
How the Components Connect as a System
Understanding each component individually is useful, but the system only works when they are connected in the right sequence and sized to work together. A pressure regulator rated for 25 PSI paired with emitters designed for 30 PSI will underperform. A filter with a 150-mesh screen paired with supply water that runs heavy with sediment will clog within weeks. The components are not interchangeable at any position in the chain; each one depends on what comes before it and determines what the next component receives.
For a standard single raised bed on a hose bib, the full component chain looks like this: hose bib threads → timer → backflow preventer → filter → pressure regulator → mainline tubing → bed entry point → 1/2-inch header inside the bed → 1/4-inch drip line branches → emitters at the root zone. Every connection in that chain uses a specific fitting type and tubing diameter, and the order is not optional.
| Position | Component | Why it goes here |
|---|---|---|
| 1: spigot threads | Timer | Upstream of everything; static line pressure sits against the timer, not the regulator |
| 2: after timer | Backflow preventer | Protects supply from contamination when timer closes and pressure drops |
| 3: after backflow | Filter | Cleans water before it reaches the regulator’s internal valve and the emitters |
| 4: after filter | Pressure regulator | Receives clean water and reduces it to operating pressure for the drip lines |
| 5: after regulator | Mainline adapter / tubing | Carries regulated, filtered water to the bed at the correct pressure |
| 6: inside bed | 1/2-inch header + 1/4-inch drip lines | Distributes water across the bed; emitter spacing and flow rate determined by crop layout |
Where a 4-in-1 head assembly is used, positions 2 through 5 are handled by a single unit. The timer still goes on the spigot first, upstream of the head assembly, for the same reason: the assembly’s internal pressure regulator should not sit under static line pressure when the timer is closed.
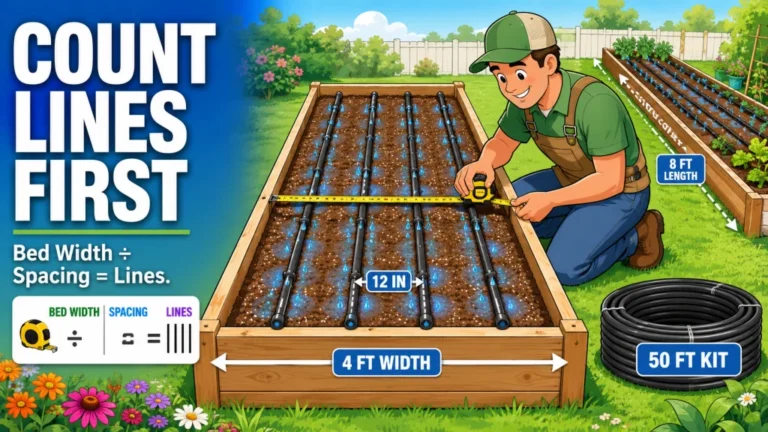
Layout decisions, how many drip lines run through the bed, what emitter spacing to use, and how to account for plant spacing and soil type, are separate from the component assembly question. Once the faucet assembly is correct and the mainline reaches the bed, those layout choices are covered in the raised bed drip irrigation layout guide. For the full system from hose bib to emitter in a single walkthrough, the complete raised bed drip irrigation setup guide covers the full sequence. For connecting to a water source, running mainline between multiple beds, and expanding an existing system, that is handled separately in the guide to connecting drip irrigation to raised beds.
Before You Buy Parts: Compatibility Points to Check
Most of the component sourcing for a raised bed drip system is straightforward, but a few compatibility points are easy to get wrong and harder to fix once the parts are in hand.
- Regulator outlet PSI must match the drip line and emitter spec. A 25 PSI regulator paired with emitters rated for 30 PSI will underperform. Check both specs before buying.
- Filter mesh should suit the water source. 150-mesh handles most residential supply lines. If the water runs hard or the supply line is older galvanized, 200-mesh filtration is worth the slight increase in cost. Also confirm the filter has a removable bowl or screen for cleaning, not just a replaceable cartridge that cannot be inspected.
- 1/2-inch fittings are not all the same ID. Barbed fittings for 1/2-inch polyethylene drip tubing are sized to the tubing’s inside diameter, which varies slightly by manufacturer. Fittings and tubing from different brands sometimes fit poorly. When possible, buy mainline tubing and its fittings from the same source to avoid connection problems at the barb.
- If using a timer plus a head assembly, check the clearance under the spigot. A timer followed by a 4-in-1 head assembly is a longer stack than most people expect. On a spigot close to a wall or close to the ground, the combined length can make the assembly difficult to attach or remove without tools.
- Have end closures, goof plugs, tees, and elbows before cutting any tubing. Once holes are punched and cuts are made, a missing fitting means the system cannot run until the part arrives. A small assortment of these on hand before starting means mistakes and layout changes are fixed in minutes.
- If the kit includes only a filter washer, plan to supplement it. A filter washer is not equivalent to an inline filter for systems running on a timer through a full season. Budget for a standalone inline filter from the start rather than replacing the washer after the first clog.
None of these require buying more than the system needs. They are decisions that take a few minutes to check against the component specs before purchase and prevent the kind of mid-season problem that is annoying to trace back to the original sourcing.

This assortment of UV-resistant, high-impact ABS fittings covers tee, elbow, coupling, and plug configurations for quarter-inch drip tubing. Precisely angled barbs grip tubing firmly to minimize leaks, and the fittings are compatible with quarter-inch blank distribution and emitter tubing from Orbit, Hydro-Rain, and other major brands.
Check On AmazonIf you click this link and buy, we earn a commission at no additional cost to you.
Final Thoughts: The Order Is the System
The component list for a raised bed drip system is short, and most of the parts are easy to source. What kit instructions often skip is the assembly sequence, specifically where the timer sits relative to the pressure regulator. Before attaching anything, lay the parts on the ground in order: timer first, then backflow preventer, then filter, then regulator, then the mainline out to the bed. That sequence is not a suggestion. It is what keeps the regulator working through a full season instead of failing quietly over the first few months.

This multi-function kit connects 1/2 inch drip tubing to any 3/4 inch male threaded faucet or garden hose, helping ensure your drip irrigation system runs properly. It includes a backflow preventer, a 25 PSI pressure regulator, and a 150 mesh filter, along with a compression fitting that creates a leak-proof seal to 1/2 inch tubing. Built from UV and chemical-resistant materials for long-lasting durability, the kit can also be paired with a compatible Rain Bird hose-end timer for automated watering.
Check On AmazonIf you click this link and buy, we earn a commission at no additional cost to you.
Explore More in This Section
Each component in the faucet assembly and the bed connection has its own set of decisions: the right PSI for the pressure regulator, when backflow prevention is required by code, how to match the filter to the water source, whether a head assembly saves time or creates maintenance headaches, and which fittings belong where. The guides below go into each one in full detail.
| Guide | What it helps with |
|---|---|
| Pressure Regulator for Raised Bed Drip Irrigation | Choosing the right outlet PSI for your emitters and tubing, and diagnosing pressure problems in an existing system |
| Backflow Preventer for Raised Bed Drip Irrigation | When backflow prevention is legally required versus optional, and how to choose the right type for a hose bib connection |
| Drip Irrigation Filter for Raised Beds | Mesh sizing, cleaning schedule, and when a filter washer is not sufficient for the water source |
| Raised Bed Drip Irrigation Head Assembly | Comparing the 4-in-1 unit against separate components by setup size, maintenance preference, and expandability |
| Drip Irrigation Fittings for Raised Beds | How each fitting type works, the failure modes to watch for, and how to seat barbed connections correctly |
If the faucet assembly is already sorted and the question is how the drip lines should run through the bed itself, the layout guide is the next step.
FAQs
⚙️ What order do drip irrigation components connect to the faucet?
Timer first on the spigot threads, then backflow preventer, then filter, then pressure regulator, then the mainline tubing that runs to the bed. The timer goes first because a pressure regulator placed upstream of a closed timer valve sits under full static line pressure when the system is off, which shortens the regulator’s life. Each position in the chain has a specific reason, and the order is not interchangeable.
💧 Do I need a pressure regulator for a raised bed drip system?
Yes, for almost every residential hose bib connection. Most hose bibs run 50 to 80 PSI, and most 1/4-inch drip line and emitters are rated for 20 to 30 PSI. Running drip components at full line pressure stresses fittings, causes emitters to flow above their rated GPH, and leads to early fitting failures. A pressure regulator downstream of the filter reduces the pressure to the correct operating range before the water reaches the drip lines.
🔍 What is the difference between a filter washer and an inline filter?
A filter washer is a small rubber washer with a mesh screen pressed into it, designed to fit inside a standard hose fitting. It provides minimal filtration and is difficult to clean properly once clogged. An inline filter is a separate fitting with a removable bowl or screen that can be opened, cleaned, and reseated. For any supply line with sediment, mineral deposits, or debris, a standalone inline filter is more effective and easier to maintain over a full growing season.
🔄 Is a backflow preventer required for raised bed drip irrigation?
Most US municipalities require backflow protection on hose bib connections used for garden irrigation, though enforcement varies by locality. Even where it is not actively enforced, it is practical to include: the fitting is inexpensive, small, and prevents supply contamination if pressure drops while the drip system is running. It goes between the timer and the filter in the faucet assembly.
🔧 What is a 4-in-1 head assembly and do I need one?
A 4-in-1 head assembly combines the backflow preventer, filter, pressure regulator, and mainline adapter into a single compact fitting. It simplifies the faucet connection and keeps everything in the correct order in one unit. The tradeoff is that maintenance on any single component requires removing the whole assembly. For a single bed on a simple timer, a head assembly is often the most practical option. For larger setups with multiple zones or planned expansion, separate components offer more flexibility.
🌱 Why do drip emitters clog and how does the filter help?
Drip emitters have small orifices, rated at 0.5 to 1 GPH, that are susceptible to sediment and mineral buildup from the supply water. A filter positioned before the pressure regulator removes particulate before it reaches the emitters or the regulator’s internal valve. Without filtration, sediment accumulates at the emitter orifice over time and reduces or stops flow. The filter requires periodic cleaning, but that is significantly easier than clearing individual clogged emitters mid-season.