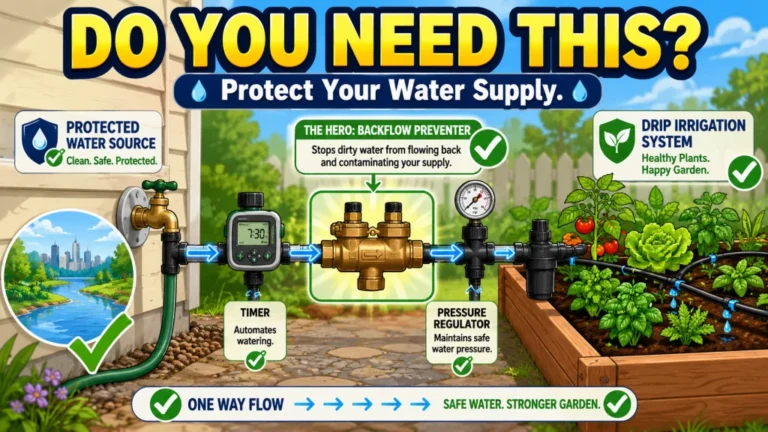
A pressure regulator is one of those components that looks optional until a fitting blows off a barbed connector at 60 PSI and lands in the tomatoes. US residential water pressure typically runs between 40 and 80 PSI, and most drip emitters are designed to operate between 15 and 30 PSI. That gap is why a regulator belongs in almost every raised bed drip system. There is one real exception, and it involves gravity-fed rain barrels and low-pressure well pumps. This covers which PSI to choose, where the regulator sits in the assembly, and how to tell if your setup is the case that does not need one.
Why a Pressure Regulator Is Almost Always Required
Every drip irrigation professional I know puts a pressure regulator on every residential drip system. The reason is not caution for its own sake. It is the gap between what a standard hose bib delivers and what drip components are rated to handle. A typical US residential hose bib runs between 40 and 80 PSI. Drip emitters, drip tape, and the small barbed fittings that connect them are designed for somewhere between 15 and 30 PSI depending on the product type. Run them above that range and the system does not just underperform: fittings blow off barbed connectors, emitters pop out of dripline, and the pressure difference between the first emitter and the last gets wide enough that the far end of the bed dries out while the near end sits wet.
The mismatch shows up slowly in some setups and immediately in others. A system connected to a 50 PSI bib with no regulator may look fine during the first few fill-and-drain cycles. The thin walls of drip tape hold together, the barbed fittings seat without leaking, and nothing dramatic happens on day one. What I usually see is a gradual failure: the weakest fitting starts weeping a week or two in, the tape develops a pinhole along a seam, or the emitters closest to the inlet run noticeably faster than the ones at the far end of the run. By then the gardener has already hand-watered twice because the bed looked uneven and had no idea the regulator was the missing piece.
If you are not sure whether your system is showing signs of pressure stress, these are the patterns worth looking for in an unregulated raised bed drip setup:
- Fittings or barbed connectors that drip or weep at the connection point, especially the one closest to the inlet
- Emitters or tubing end caps that have popped off or worked themselves loose without obvious physical damage
- Drip tape that has developed small pinholes along the seam between the emitter rows
- The near end of the bed consistently wetter than the far end during a normal run cycle
- Emitters that spray instead of drip, particularly those closest to the mainline inlet
Any one of those symptoms can have other causes, but in a setup with no pressure regulator and a standard hose bib, pressure is usually the first thing I check. A regulator preset to the correct PSI for your system type stops all of that before it starts.

This pressure regulator maintains an optimal 25 PSI to keep drip lines and emitters running at consistent flow, with a 20 gallon per minute capacity to support larger systems. It connects to any 3/4 inch male threaded faucet, garden hose, or component for easy setup. Built from UV and chemical-resistant materials, it offers durable, reliable performance season after season, and pairs well with a compatible Rain Bird hose-end timer for automated watering.
Check On AmazonIf you click this link and buy, we earn a commission at no additional cost to you.
The Two PSI Ranges That Actually Matter
The biggest mistake I see when someone buys a pressure regulator is picking one without knowing which system type they have. There are two different PSI targets for two different drip products, and using the wrong one is close to as bad as using no regulator at all.
Standard Emitter Dripline: 20 to 30 PSI
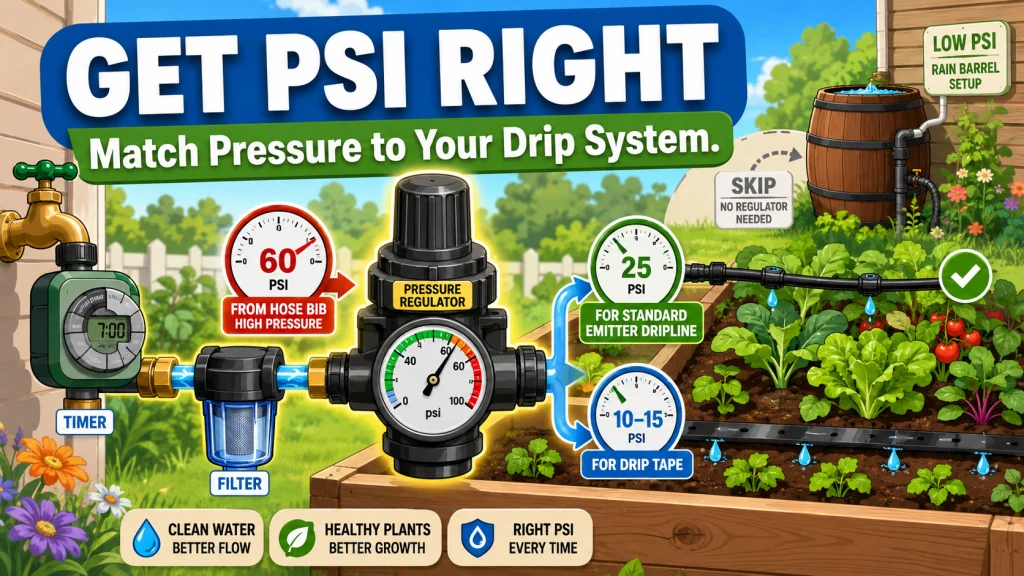
If your raised bed system uses emitter dripline or individual point-source emitters inserted into half-inch mainline tubing, the target operating pressure is generally 20 to 30 PSI. A 25 PSI preset regulator is the most commonly used option for this setup. At that range, the barbed fittings hold, the emitters deliver close to their rated flow, and the pressure stays consistent from the first emitter on the line to the last. A 4×8 bed with a single inlet and 12-inch emitter spacing at 0.5 GPH per emitter runs cleanly at 25 PSI. Try that same setup at 60 PSI without a regulator and the fitting at the inlet becomes the most stressed point in the whole system.
Drip Tape: 8 to 15 PSI
Drip tape is a different product with thinner walls and tighter tolerances. It is designed to operate at 8 to 15 PSI, which is lower than most people expect. A 25 PSI regulator, the most common option sold with standard drip kits, delivers too much pressure for drip tape. At 25 PSI, the thin wall seams of the tape can develop leaks or fail faster than they should. For drip tape in raised beds, use a regulator preset to 10 or 15 PSI based on the tape spec. Some gardeners running multiple beds from a single timer use one 25 PSI regulator at the head and then add individual 10 PSI regulators at the inlet of each drip tape zone. That is the approach I usually recommend when bed count goes above two or three and each bed uses its own tape run.
Warning: Do not use a standard 25 PSI regulator with drip tape. That pressure exceeds what drip tape is rated for and will shorten the life of the tape. Check the PSI rating on your specific tape before buying a regulator.
| System Type | Target Operating PSI | Regulator to Use |
|---|---|---|
| Emitter dripline or point-source emitters | 20 to 30 PSI | 25 PSI preset regulator |
| Drip tape | 8 to 15 PSI | 10 or 15 PSI preset regulator |
If you are not sure which product you have, look at the tubing when it is empty. Drip tape is flat and rolls from a spool. Emitter dripline is round, usually black, with emitters embedded at set intervals along the length. They look similar in photos but behave differently under pressure, which is exactly why the regulator PSI matters as much as it does.
Before You Buy: Match the regulator to the water source and the drip product, not just the kit name. A standard hose bib feeding emitter dripline needs a 25 PSI regulator. Drip tape needs a 10 or 15 PSI regulator. A rain barrel or low-pressure pump may need no regulator at all if source pressure is already below the target range. Check those three details before buying, because the wrong preset either overpressures the tape or restricts a system that was already running low.
When You Can Skip the Pressure Regulator
The exception case is real, but it is narrower than most people assume. A pressure regulator provides no benefit when the incoming water pressure is already at or below the target operating range for your system. Two situations produce that condition reliably: gravity-fed rain barrels and low-pressure well pumps.
A rain barrel connected to a raised bed through gravity alone typically delivers somewhere between 2 and 10 PSI depending on how full the barrel is and how far above the bed it sits. A regulator preset to 25 PSI placed downstream of a 6 PSI gravity source does not regulate anything. It just adds resistance that reduces flow further. In that situation, omit the regulator entirely and test emitter performance by running the system for a normal cycle. If some emitters run weaker than others, the problem is source pressure, not regulation, and a regulator will not fix it.
The same logic applies to a low-pressure well pump operating at 15 to 20 PSI. If the pump output is already within the target operating range for your emitters, adding a 25 PSI regulator introduces flow restriction without any benefit. The regulator needs at least 5 to 10 PSI of headroom above its preset output just to function correctly, which is what the next section covers.
Field Note: I had a homeowner install a full kit with a 25 PSI regulator on a rain barrel gravity setup. The system ran so slowly that the emitters barely dripped and the gardener assumed everything was clogged. Nothing was clogged. The regulator was pulling the already-low barrel pressure below the minimum the emitters needed to flow. Removing the regulator fixed the problem immediately. The kit instructions never mentioned that a regulator and a gravity source are not a good combination.
The Minimum Inlet Pressure Requirement
A pressure regulator does not simply pass water through at the preset PSI. It needs a pressure differential to function properly. The incoming pressure must be at least 5 to 10 PSI above the regulator’s preset output for it to regulate consistently. A 25 PSI regulator needs 30 to 35 PSI coming in. A 15 PSI regulator needs 20 to 25 PSI coming in. If the source pressure is already at or near the regulator’s preset, the regulator sits partially open and the downstream pressure becomes unpredictable, which is the opposite of what it is there to do.
For most US hose bibs running 40 to 80 PSI, this is not a concern at all. There is plenty of differential for either a 25 PSI or a 15 PSI regulator to function correctly. The minimum inlet requirement only becomes relevant at the low end: rain barrels, slow-fill holding tanks, or well pumps with weak output. That is also why the gravity-fed exception in the previous section is about more than just skipping a component for convenience. At low source pressure, the regulator actively causes problems instead of solving them.
If you are not sure what pressure your hose bib delivers, a simple pressure gauge that threads directly onto the bib costs a few dollars at any hardware store. Measure before buying components. It takes thirty seconds and removes all the guesswork about whether you need a regulator and which PSI to choose for your setup.
Where the Pressure Regulator Goes in the Assembly
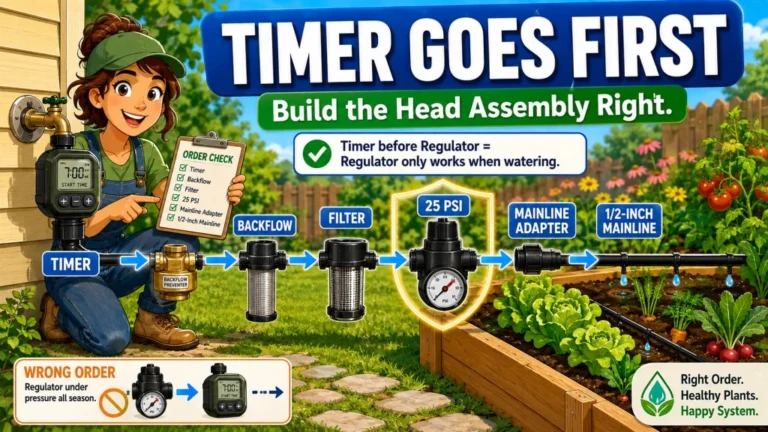
Placement matters because putting components in the wrong order creates the problems the components are supposed to prevent. The pressure regulator belongs after the filter and before the mainline tubing adapter. That order exists for a practical reason: keeping the filter before the regulator lets it catch debris before the water reaches the pressure-reduced side of the assembly, where a clogged mesh is harder to flush clean. If the regulator comes before the filter, the filter works at lower incoming pressure and tends to load up faster.
The correct head assembly order from hose bib outward is: timer (if used), then backflow preventer, then filter, then pressure regulator, then the adapter to mainline tubing. The regulator is near the end of the head assembly, not the beginning. I have seen kits where the printed instructions put the regulator before the filter. The filter ends up doing very little because the water pressure is already reduced before it reaches the mesh. Following the correct order protects both components and keeps the system running longer between maintenance cycles.
Note: If you are using a timer, it goes directly on the hose bib before everything else in the assembly. Do not place the timer after the pressure regulator. Timers have their own pressure requirements, and some are damaged by running below the minimum pressure they need to cycle correctly.
The full explanation of how each component fits together, including why the filter and regulator sequence matters as part of the complete head build, is in the raised bed drip irrigation head assembly. That covers the full connection order from the bib to the first section of mainline tubing, including which thread standards to watch for on common regulator fittings.

This inline filter protects downstream drip components from debris using a pre-installed 200 mesh stainless steel filter element rated to catch particles as small as 75 microns. The glass-filled polypropylene body handles up to 150 psi and fits any standard three-quarter inch irrigation valve via male pipe thread connections on both ends. The cap unthreads quickly for easy filter cleaning without tools.
Check On AmazonIf you click this link and buy, we earn a commission at no additional cost to you.
The Pressure-Compensating Emitter Option
There is one other way to handle variable or slightly elevated pressure without a dedicated regulator component: pressure-compensating emitters. These are point-source emitters with a small internal diaphragm that adjusts output to maintain consistent flow across a pressure range of roughly 10 to 30 PSI. Within that window, a 0.5 GPH pressure-compensating emitter delivers close to 0.5 GPH whether the line pressure is 12 PSI or 28 PSI.
The practical case for pressure-compensating emitters is a system where the incoming pressure is already within the 10 to 30 PSI range and the gardener wants to skip the separate regulator component entirely. They cost more per emitter than standard options, so the math on a single 4×4 bed with eight emitters is very different from a four-bed setup with forty emitters. For one small bed, the price difference is minimal. For a larger setup, the per-emitter cost adds up fast enough that a single pressure regulator at the head is usually the more economical choice.
Pressure-compensating emitters do not replace a regulator in a system running at 60 PSI inlet. They are rated to operate up to around 30 PSI, and inlet pressure above that still stresses barbed fittings and tubing connections regardless of what the emitters themselves can handle internally. Think of them as a tool for maintaining consistency within a regulated or already-appropriate pressure range, not as a workaround for skipping regulation entirely.
Installing pressure-compensating emitters at 60 PSI inlet pressure and assuming the emitters handle the excess. The fittings, barbed connections, and tubing joints are still exposed to 60 PSI even if the emitters compensate internally. Something upstream will fail before the emitters do.
Use a pressure regulator at the head to bring inlet pressure into the 20 to 30 PSI range for emitter systems, then use standard or pressure-compensating emitters downstream. The regulator protects the whole system. The emitters handle consistency within the regulated range.
Whether you use a regulator, pressure-compensating emitters, or both, the goal is consistent flow to every emitter in the bed without putting stress on the fittings and connections. Which approach makes sense depends on source pressure, system type, bed count, and how much you want to invest in components at the start of the season.

These self-piercing emitters deliver a consistent half-gallon per hour from the start to the end of a tubing run, allowing soil to absorb water slowly and thoroughly at the root zone. Compatible with quarter-inch drip tubing or insertable directly into half-inch and larger supply tubing. Large internal water passages and a self-flushing design reduce clogging, and UV and chemical-resistant construction ensures long-term outdoor durability.
Check On AmazonIf you click this link and buy, we earn a commission at no additional cost to you.
Final Thoughts: Three Questions Before You Buy the Regulator
Most of the pressure regulator mistakes I see come down to someone buying a component without first answering three basic questions. The component itself is simple. The decisions around it are where people go wrong.
First: what is your water source? A standard hose bib in a US home runs 40 to 80 PSI and almost always needs a regulator. A gravity-fed rain barrel or a weak well pump may already be at or below your system’s target range, in which case a regulator adds resistance without adding any benefit. Measure source pressure before buying anything if you are not sure.
Second: which drip product are you using? Emitter dripline and point-source emitters need a 25 PSI regulator. Drip tape needs 10 or 15 PSI. Putting a 25 PSI regulator on drip tape is one of the more common setup errors I see, and it shortens the tape’s life without any obvious warning sign until a seam lets go.
Third: where does the regulator go? After the filter, before the mainline adapter. That order keeps both components working as designed. Get those three right before the tubing goes in the ground and the rest of the setup becomes much more straightforward.
For a complete picture of how the pressure regulator fits alongside filters, mainline sizing, emitter selection, and timers, the raised bed drip irrigation setup covers the full process from hose bib to watered bed. And if you want to understand every component in a raised bed drip system before deciding how to build yours, the raised bed drip irrigation components is the right place to start.

This heavy-duty brass regulator maintains a steady output of 10 to 20 psi, with a nominal 15 psi, making it well suited for drip tape, soaker hose, and low-pressure drip systems. Rated for inlet pressures up to 120 psi, it connects via three-quarter inch female hose thread inlet and male hose thread outlet to any standard hose bib in the US or Canada. Solid lead-free brass construction withstands sunlight and higher inlet pressures better than plastic regulators and is compatible with timers, filters, and backflow preventers.
Check On AmazonIf you click this link and buy, we earn a commission at no additional cost to you.
FAQs
🚿 Do I need a pressure regulator for raised bed drip irrigation?
Almost always yes. US residential hose bibs typically run 40 to 80 PSI and drip components are designed for 15 to 30 PSI. Without a regulator, fittings blow off, emitters run unevenly, and drip tape fails early. The exception is a gravity-fed rain barrel or a low-pressure pump already delivering under 20 PSI, where a regulator restricts flow instead of helping.
💧 What PSI pressure regulator do I need for raised bed drip irrigation?
Use a 25 PSI regulator for standard emitter dripline systems. Use a 10 or 15 PSI regulator for drip tape. Using a 25 PSI regulator on drip tape delivers more pressure than the tape is rated for and can cause seam failures or shorten the tape’s useful life.
🌧️ Do I need a pressure regulator with a rain barrel drip system?
No. A rain barrel gravity-fed to a raised bed typically delivers 2 to 10 PSI, which is already below the preset output of a standard 25 PSI regulator. Adding a regulator in this setup restricts flow further instead of stabilizing it. Test emitter performance directly and skip the regulator when source pressure is already low.
📍 Where does the pressure regulator go in a raised bed drip assembly?
After the filter and before the mainline tubing adapter. The filter comes first so it works at higher pressure and catches particles more effectively. The full order from hose bib outward is: timer (if used), backflow preventer, filter, pressure regulator, then mainline adapter.
⚙️ Can pressure-compensating emitters replace a pressure regulator?
Only if incoming pressure is already in the 10 to 30 PSI range those emitters are designed for. They handle flow consistency within a moderate pressure window, but they do not protect fittings and tubing from inlet pressure above 30 PSI. At 60 PSI, a regulator is still needed regardless of emitter type.
🔧 What happens if source pressure is too close to the regulator preset?
The regulator does not work correctly. It needs at least 5 to 10 PSI of headroom above its preset to regulate consistently. A 25 PSI regulator needs 30 to 35 PSI coming in. If source pressure is already at or below the preset, the regulator sits partially open and downstream pressure becomes unreliable.