Putting together a drip irrigation head assembly for a raised bed takes about five minutes with the right components laid out in front of you. It can take most of a season to understand what went wrong if those components go in the wrong order. This article covers the correct sequence from spigot to mainline, explains why the timer position is the single decision most likely to shorten the life of your pressure regulator, and walks through what to check right after the assembly is connected. If you are setting up a new system or troubleshooting one that started performing inconsistently by midsummer, the component order is the first place to look.
The Component That Fails First, and Why the Assembly Order Is the Reason
The most expensive component in a raised bed drip irrigation head assembly is the pressure regulator. The most commonly damaged component in that same assembly is also the pressure regulator. In most cases, it is not a defective part. The regulator was installed in the wrong position relative to the timer, and it spent the season working under conditions it was never designed to handle.
I run into this pattern when gardeners call mid-season because the far end of a 4-by-8 tomato bed is staying dry while the near end looks overwatered. The system ran fine in spring, and now it does not. The pressure regulator gets blamed, sometimes the timer gets blamed, one or both get replaced, and if the assembly order is still wrong, the replacement fails on the same schedule. Knowing the correct sequence before the first fitting goes on saves you that whole cycle.
The head assembly for a raised bed drip system has a fixed, logical order. Once you understand why each component sits where it does, the sequence is easy to remember and hard to get wrong a second time.
The Correct Assembly Order from Spigot to Mainline
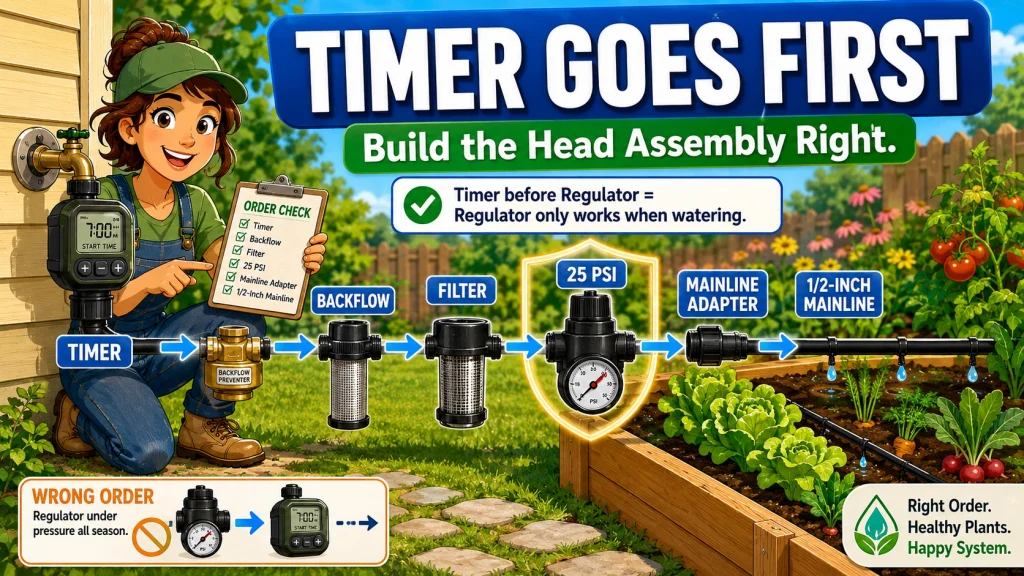
The sequence confirmed by DIG Corp, DripDepot, and GrowOrganic technical guides goes like this, starting at the faucet and working outward toward the bed: spigot, timer, backflow preventer, filter, pressure regulator, mainline tubing adapter. That is the standard faucet-side order for a raised bed drip setup.
| Position | Component | Why it belongs here |
|---|---|---|
| 1 | Spigot (hose bib) | Water source. Everything attaches downstream of this point. |
| 2 | Timer | Controls flow on and off. Must sit upstream of the pressure regulator for reasons explained in the next section. |
| 3 | Backflow preventer | Stops irrigation water from siphoning back into the household supply line. |
| 4 | Filter | Catches sediment before it reaches small-diameter emitter tubing and inline emitters. |
| 5 | Pressure regulator | Reduces line pressure to the range drip emitters are rated for, typically 20 to 30 PSI. |
| 6 | Mainline tubing adapter | Transitions from the threaded regulator outlet to 1/2-inch poly mainline tubing running to the bed. |
The filter sitting upstream of the pressure regulator is a detail worth noting. Some kits reverse these two and place the filter after the regulator. Either arrangement will filter the water, but putting the filter before the regulator protects the regulator’s internal diaphragm from particulate wear as well. If a kit ships with the filter and regulator in the wrong sequence, correcting that before the first run costs nothing and extends the life of both components.
The mainline adapter at position six is whatever fitting transitions from the threaded outlet of the pressure regulator to the barbed inlet of your 1/2-inch mainline. On most raised bed hose-end setups, this is a simple compression or barb fitting. Some pressure regulators include this outlet built in. If yours does not, confirm that the thread type matches the regulator outlet before threading anything together.
Why the Timer Must Come Before the Pressure Regulator
Drip irrigation pressure regulators are not rated for constant pressure. That is not a fine-print disclaimer. It is a design constraint confirmed by DripDepot’s technical documentation: a drip pressure regulator is built to regulate pressure only when water is actively flowing through it. When flow stops, the regulator is supposed to be at rest, with no load on the diaphragm.
When the timer is placed downstream of the pressure regulator, that rest never happens. A hose bib running at 50 to 60 PSI does not drop to zero when the timer shuts off the downstream side. The mainline pressure holds against the upstream face of the regulator continuously, between every watering cycle, for the entire season. The diaphragm is under constant static load every hour the timer is closed. Over months, the diaphragm fatigues, and the regulator stops holding its set pressure range.
Field Note: The clearest sign of a fatigued pressure regulator is inconsistency across the same bed on different days. If a 4-by-8 tomato bed watered fine two weeks ago and now shows dry corners on one end and soggy soil on the other, with no change in timer settings or emitter layout, I check the assembly order before touching anything else. A regulator that has been sitting under static mainline pressure for months produces exactly this pattern: it may still pass water, but it no longer controls pressure within a useful range.
Timer upstream of the regulator means the regulator only sees pressure when flow is active. When the timer closes, the regulator is no longer held under constant supply-side pressure between cycles, and any downstream pressure bleeds off through the drip line instead of loading the diaphragm all season. That is the condition the component was engineered for. Placing the timer first is not a setup preference; it is how the regulator is rated to function across a full growing season.

This robust hose-end timer works with sprinklers, drip irrigation, and soaker hoses, offering simple automatic programming with full 7 day scheduling for worry-free watering. An extra-large dial and readout screen make setup and schedule review easy, while one-touch buttons allow quick cancellation, a rain delay of up to 96 hours, or manual watering on demand. The display also shows the next scheduled cycle and time remaining on the current one.
Check On AmazonIf you click this link and buy, we earn a commission at no additional cost to you.
What Actually Happens When the Order Is Reversed
If the timer is placed between the filter and the pressure regulator, or anywhere downstream of the regulator, the failure unfolds in stages that are easy to miss until mid-season. Early on, the system looks normal. The diaphragm is new and still holds preset pressure. A regulator set for 25 PSI delivers close to 25 PSI, and the emitters run as expected. The mistake is invisible at this stage.
By midsummer, the regulator starts losing consistency. The diaphragm has been compressed and released each time mainline pressure pushes against it whenever the timer closes. What read 25 PSI at the mainline in May may read 35 or 40 PSI by July. Emitters near the start of the line push more water than they should. Emitters at the far end, already at the lower end of pressure due to line friction, start to underflow. The bed that looked evenly irrigated in spring develops wet and dry zones with no obvious cause.
Spigot → backflow preventer → filter → pressure regulator → timer → mainline. The timer closes, and 50 to 60 PSI of mainline static pressure holds against the regulator diaphragm continuously between every watering cycle.
Spigot → timer → backflow preventer → filter → pressure regulator → mainline. The timer closes, and the regulator sits at rest. No static load on the diaphragm between cycles. The component performs within its rated range across the whole season.
The frustrating part is that this failure does not announce itself with a leak or an alarm. The garden still gets watered. The timer still runs on schedule. The only signals are gradual unevenness and a regulator that needs replacing sooner than it should. Most gardeners replace the regulator, do not correct the order, and get the same result within a season or two.
For a closer look at how pressure regulators work, what PSI ranges apply to different raised bed setups, and how to select the right regulator for your line length and emitter count, the guide on drip irrigation pressure regulators for raised beds covers those decisions in full detail.
The 4-in-1 Adapter Option for Gardeners Who Want to Skip the Assembly Question
A 4-in-1 faucet adapter combines the backflow preventer, filter, pressure regulator, and drip outlet connection into a single pre-assembled unit. The internal component order is set correctly at the factory. You attach it directly to the spigot, place the timer between the spigot and the adapter, and connect the mainline to the adapter’s outlet. The sequence question effectively disappears because the three components that cause the most confusion are already arranged inside the unit.
This is what I typically mention to first-time raised bed gardeners who are looking at a handful of individual fittings and unsure whether they are connecting them in the right order. A 4-in-1 adapter reduces four separate decisions to one connection point. The timer still goes between the spigot and the adapter, for the same reason it always goes first in any drip head assembly. That part of the rule does not change.
Note: A 4-in-1 adapter is a practical fit for one or two raised beds on a single hose bib. If you are running four or more beds from one faucet, the adapter’s built-in filter mesh and regulator flow rating may not be adequate for the total emitter count and cumulative line length. In that situation, individual components give you better control over filter mesh size and regulator flow capacity. For a small raised bed setup, the 4-in-1 is a clean and reliable way to handle the assembly.
Homestead and Chill has used and documented this adapter configuration for raised bed vegetable gardens, and the setup matches the assembly logic covered here. If the product description says it combines backflow preventer, filter, pressure regulator, and drip connection, the internal order is pre-configured and you do not need to think about the sequence within the adapter itself.

This pre-assembled kit combines a backflow preventer, 150 mesh filter, and Senninger 25 psi pressure regulator into a single ready-to-use unit that connects any standard three-quarter inch faucet, hose bib, or spigot to a half-inch drip system in seconds. The leak-proof tubing connector fits any half-inch tubing with an inner diameter between 0.520 and 0.620 inches, including Rain Bird and Dig brands. If using a timer, this assembly installs directly after it.
Check On AmazonIf you click this link and buy, we earn a commission at no additional cost to you.
The One Situation Where the Assembly Order Has Room to Vary
If there is no timer in the system and the hose bib is opened and closed manually, the pressure regulator is not exposed to static mainline pressure between watering cycles. When you close the faucet by hand, pressure upstream of the backflow preventer drops to zero. The regulator is not holding a load. In this configuration, the assembly order can go: spigot, backflow preventer, filter, pressure regulator, mainline. The timer position concern does not apply because there is no timer in the assembly.
That said, I would still put the filter before the regulator even in a manual setup. Protecting the regulator diaphragm from sediment costs nothing extra and extends component life. The exception is a setup where space at the spigot is genuinely tight and the order has to be adjusted. A regulator upstream of the filter will still regulate pressure correctly; it just picks up more particulate wear across the season.
Manual faucet control is not the approach I usually recommend for vegetable and herb beds. Consistent watering timing and duration matters for yield, and even a basic battery-powered timer handles that automatically without requiring the gardener to be home. But if the setup is temporary, or the gardener is present and checking the bed every day, a manual arrangement works without the timer-placement concern. Just keep an eye on the regulator over time, because manual shutoffs do not deliver the same cycling consistency as a timer.
Testing the Assembly Before You Hand It Off to the Timer
After all components are connected in the correct order, turn the water on at manual setting and check every connection point before trusting the timer to run unattended. Connection leaks in a drip head assembly almost always show up immediately when the water first runs. They do not usually develop slowly over days.
Before running the test, it helps to work through a short checklist at the faucet:
- Confirm the timer is threaded directly onto the spigot, upstream of everything else.
- Check that the backflow preventer is hand-tight and that the flow-direction arrow (if present) points away from the faucet.
- Check that the filter is upstream of the pressure regulator, not downstream.
- Confirm the pressure regulator outlet is connected to the mainline adapter with a washer seated flat inside the fitting.
- Trace the mainline tubing from the adapter to the first tee or emitter and confirm no barb fittings are loose.
The connection point I check first under flow is the joint between the filter and the pressure regulator. A slow drip at that point almost always means the rubber washer inside the fitting is missing, folded against the inner wall, or seated at an angle. Unthread the fitting, reseat the washer flat against the shoulder, and reconnect. That resolves it in most cases without needing any replacement parts. On new fittings, the washer sometimes arrives stuck inside the other half of the coupling and peels off sideways when you thread the pieces together.
Pro Tips: Thread every plastic fitting by hand until the washer seats fully. If a joint drips, unthread it and check the washer before reaching for pliers or a wrench. Only add a very slight extra turn if the fitting manufacturer allows it. Over-tightening plastic drip fittings is one of the fastest ways to crack a seat or distort a washer, and a distorted washer often leaks more than a fitting that was only hand-tight.
After the visual check, let the system run a full manual cycle while you walk the mainline. If the pressure regulator is working correctly, the 1/2-inch mainline should feel firm but not rigid or close to bursting. A mainline that feels like it is under too much pressure usually means the regulator is not stepping down the line correctly, which is worth investigating before the timer takes over the schedule for the season.

This pressure regulator maintains an optimal 25 PSI to keep drip lines and emitters running at consistent flow, with a 20 gallon per minute capacity to support larger systems. It connects to any 3/4 inch male threaded faucet, garden hose, or component for easy setup. Built from UV and chemical-resistant materials, it offers durable, reliable performance season after season, and pairs well with a compatible Rain Bird hose-end timer for automated watering.
Check On AmazonIf you click this link and buy, we earn a commission at no additional cost to you.
Final Thoughts: Get the Order Right Once, and the Assembly Holds All Season
The drip head assembly for a raised bed is not a complicated build, but the component order is specific for a reason. Timer first, against the spigot, upstream of the backflow preventer, filter, and pressure regulator. That sequence protects the regulator from static mainline load and keeps pressure consistent across the full growing season. If you are putting together a new setup or troubleshooting one that started failing mid-season, correcting the assembly order is the first move, before replacing any individual component.
For a full picture of how each piece in the assembly connects to the broader system, including what to look for when selecting individual components for your bed count and hose bib pressure, the guide on raised bed drip irrigation components covers each part in detail. And if you are still working out the rest of the system beyond the faucet, the raised bed drip irrigation setup guide walks through mainline layout, emitter spacing, drip line selection, and timer scheduling from the ground up.

This multi-function kit connects 1/2 inch drip tubing to any 3/4 inch male threaded faucet or garden hose, helping ensure your drip irrigation system runs properly. It includes a backflow preventer, a 25 PSI pressure regulator, and a 150 mesh filter, along with a compression fitting that creates a leak-proof seal to 1/2 inch tubing. Built from UV and chemical-resistant materials for long-lasting durability, the kit can also be paired with a compatible Rain Bird hose-end timer for automated watering.
Check On AmazonIf you click this link and buy, we earn a commission at no additional cost to you.
FAQs
🔧 What is the correct component order for a raised bed drip irrigation head assembly?
Starting at the spigot and working outward: timer, backflow preventer, filter, pressure regulator, mainline tubing adapter. The timer must be the first component after the faucet so the pressure regulator is not exposed to static mainline pressure when the timer is closed between watering cycles.
⏱️ Does it really matter whether the timer comes before or after the pressure regulator?
It matters more than most kit instructions make clear. Drip pressure regulators are designed to regulate under active flow, not to hold static mainline pressure continuously. A timer placed downstream of the regulator keeps full hose bib pressure against the regulator diaphragm every time the timer closes. Over a season, this fatigues the diaphragm and the regulator loses its preset pressure range.
💧 Why is my drip system watering unevenly in midsummer when it worked fine in spring?
Mid-season unevenness that was not present at startup often points to a pressure regulator that has lost its set range. If the timer is downstream of the regulator, static mainline pressure has been loading the diaphragm all season. Check the assembly order first. Correct the sequence before replacing the regulator, or the replacement will fail on the same timeline.
🔩 What does a 4-in-1 drip adapter do, and does it fix the assembly order problem?
A 4-in-1 adapter combines the backflow preventer, filter, pressure regulator, and drip outlet into one pre-assembled unit with the internal order set correctly. You attach it to the spigot and place the timer between the spigot and the adapter. For one or two raised beds, this is a practical way to eliminate the assembly sequence question entirely.
🚿 Why does my drip head assembly leak at the filter-to-regulator connection?
A drip at that joint almost always means the rubber washer inside the fitting is missing, folded against the wall, or seated at an angle. Unthread the fitting, check that the washer is lying flat against the seat, and reconnect. Finger-tight is usually enough to seal the joint without cracking the plastic housing.
🌱 Does the assembly order change if I am not using a timer?
Yes, slightly. Without a timer, closing the faucet by hand drops the pressure on both sides of the assembly to zero, so the regulator is not under constant static load. In a manual setup, you can assemble in this order: spigot, backflow preventer, filter, pressure regulator, mainline. Still place the filter before the regulator to protect the diaphragm from sediment wear.