A parallel drip layout works well for beds planted in rows, but a 4×4 bed packed with 16 different plants in a square foot pattern is a different problem entirely. A grid layout runs drip lines in two directions through the bed, putting emitters within reach of every planting square. This article covers when a grid is the right call, how to physically build one in a raised bed, and where the simpler snake-pattern alternative makes more sense.
Why Parallel Rows Leave Dense Beds Dry
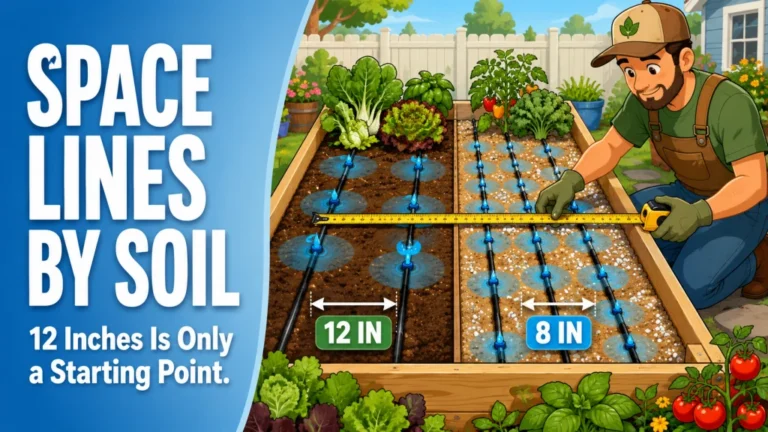
Parallel drip lines running the length of a bed are the standard layout, and for row crops they work exactly as intended. A bed of tomatoes in two rows, peppers in two rows, basil along one edge: you run a line beside each planting row, space the emitters at 12 to 18 inches, and the root zones are covered. The geometry lines up cleanly.
Square foot gardening breaks that geometry. A 4×4 bed planted in the square foot gardening (SFG) method has 16 individual squares, each with a different plant or plant count: a square of lettuce here, a square of carrots there, one square of a single pepper, four squares of bush beans. The plants are not in rows. They are distributed across the full surface of the bed in a grid of their own. If you run two or three parallel lines the length of that bed and space emitters at 12 inches, you will water the squares directly under those lines well and leave the squares between lines significantly drier. In my experience, the corner squares and the squares farthest from the nearest line are the first places a dense bed shows drought stress, especially once the canopy fills in and you can no longer see where the soil surface is wet.
Field Note: The most common complaint I hear from square foot gardeners who have installed a basic drip kit is that some squares dry out faster than others. They usually blame the emitters or the timer. Most of the time the layout is the actual issue. Parallel rows were not designed for this planting style.
What a Drip Grid Actually Looks Like
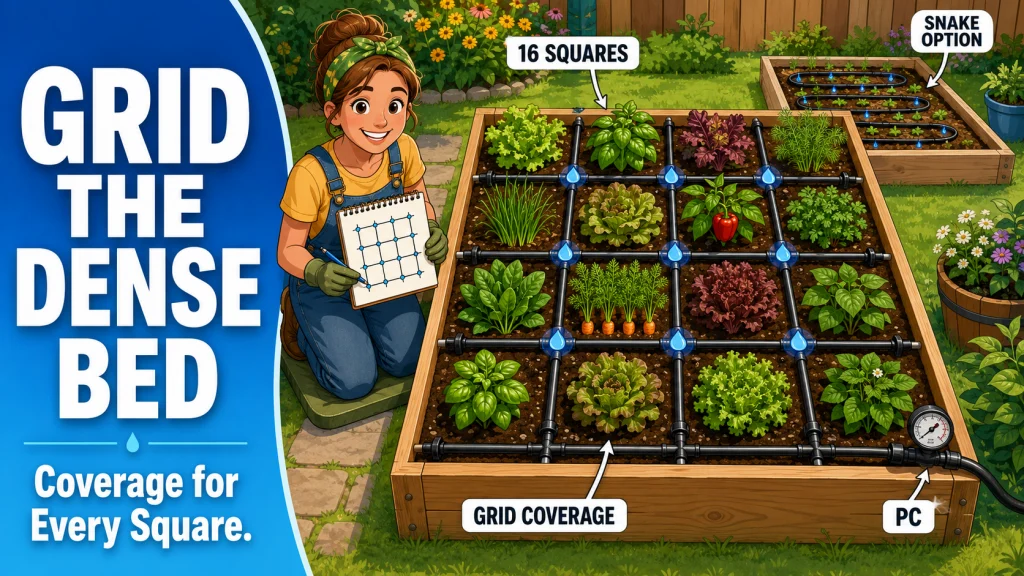
A grid layout runs drip lines in two directions through the bed instead of one. Lines run lengthwise, and additional lines branch off at right angles running crosswise. Where a lengthwise line and a crosswise line intersect, you have a coverage point. In a 4×4 bed with lines spaced 12 inches apart, those intersections land at roughly every square foot of planting area. That is the whole idea: coverage points that match the planting grid.
The mainline header is still placed at the short end of the bed, the same as any other layout. From that header, lengthwise lines run the full depth of the bed at 12-inch intervals. Tee fittings inserted into cuts in those lengthwise lines allow short crosswise segments to branch at right angles, spanning the 12-inch gap between adjacent lines. The result is a true grid of 1/4-inch dripline sitting inside the bed. Emitters are placed at the intersections, or at a consistent spacing along each line depending on how densely the bed is planted.
For a 4×4 bed, a basic grid with lines at 12-inch spacing uses four lengthwise lines and four crosswise lines, for a total of 16 intersection points. At each intersection, every square foot of the planting grid has an emitter within reach. For a 4×8 bed, the same 12-inch spacing produces eight crosswise lines, which gives you 32 coverage points across 32 square feet of planting space. The math follows the bed.
For more on how line spacing decisions affect coverage before you commit to a layout, the article on drip irrigation spacing for raised beds covers emitter spacing, line spacing, and the tradeoffs between them in more detail.
The 6-Inch Spacing Options for Maximum Coverage
There are two different ways to increase coverage density in a grid, and they are not the same thing. The first is tightening emitter spacing along each line from 12 inches to 6 inches. The lengthwise and crosswise lines stay where they are at 12-inch intervals, but each line now carries twice as many emitters. This puts at least one emitter within 6 inches of any point on that line and effectively fills in the coverage between intersection points. This option adds emitters but does not require any additional tee fittings or extra line runs, so it is relatively easy to configure with pre-spaced 6-inch emitter dripline.
The second option is a true 6-inch grid: line spacing reduced to 6 inches in both directions, with lines running every 6 inches lengthwise and crosswise. In a 4×4 bed, that means 8 lengthwise lines and 8 rows of crosswise segments instead of 4 each. The coverage is denser, but so is the fitting count and the total flow demand. For most raised bed vegetable gardens, a 12-inch grid with 6-inch emitter spacing gets close enough to full coverage without the complexity of a true 6-inch grid. A true 6-inch grid is worth it for beds where the plants are packed at 4-inch or 6-inch spacing across the full surface and every square inch of soil needs to stay consistently moist.
Either way, add up the total GPH before connecting multiple beds to one zone. Doubling emitter count per line or doubling line count both increase the zone flow demand proportionally. Staying inside the flow limit of your timer or valve is easier to check on paper before the fittings go in.

This drip tubing works like a soaker hose but without the clogging or maintenance, thanks to pressure-compensating emitters that water evenly from one end of the line to the other. Built-in 0.8 gallon per hour emitters are spaced 12 inches apart with dual outlets positioned 180 degrees apart for even coverage. The tubing measures 0.25 inches outside diameter and connects with 1/4 inch barbed fittings, operating across a wide pressure range of 8.5 to 60 psi. Its micro-porous construction creates a tight, reliable connection that holds up over time.
Check On AmazonIf you click this link and buy, we earn a commission at no additional cost to you.
When a Grid Layout Is the Right Call
Not every raised bed needs a grid. A bed with two or three crop types in defined rows is easier and cheaper to water with a standard parallel layout. A grid is the right layout when the planting pattern itself is a grid, or close to one, and the plants are distributed across the full surface of the bed with no consistent row structure to follow.
Specifically, a grid layout is worth setting up when:
- The bed uses square foot gardening, with 9, 16, or 32 individual planting squares depending on bed size.
- The bed is planted with 8 or more different crops arranged in a non-row pattern, where every square foot needs its own coverage point.
- The crop mix includes plants with shallow roots packed tightly together, like lettuce, herbs, carrots, and radishes, where each plant needs moisture nearby regardless of what is planted in the adjacent square.
- The bed layout changes each season and you want a fixed irrigation structure that does not need to be repositioned when the planting plan rotates.
- The bed is 4 feet wide or wider with irregular plantings, and a snaked soaker line leaves too many dry corners.
A bed that is 4 feet wide and planted entirely in lettuce with consistent 6-inch spacing does not need a grid. Two or three parallel lines with emitters at 6-inch spacing along each line will cover it. The grid approach is for the messier situation: a bed that has tomatoes in one corner, basil in the next, a cluster of bush beans, two squares of parsley, and a single zucchini on the end. That bed needs coverage everywhere, not just along the rows.

This kit includes everything needed to water a raised bed up to 4 by 8 feet, with professional-grade components built for repeated seasonal use. It features 35 feet of emitter tubing with 70 built-in, pressure-compensating emitters spaced every 6 inches for even watering near the roots, plus 25 feet of easy-to-handle 1/4 inch distribution tubing. This low-volume design can save up to 80% on water while supporting healthier plants and better yields. Installation is straightforward thanks to an illustrated manual covering multiple layout options, and the system can be automated with a compatible Rain Bird hose-end timer sold separately.
Check On AmazonIf you click this link and buy, we earn a commission at no additional cost to you.
How to Build a Grid in a Raised Bed
The physical build starts the same way as any raised bed drip layout: a water source, a filter, a pressure regulator, and a mainline running to the bed. What changes is what happens once the mainline reaches the bed.
At the short end of the bed, the mainline connects to a header, which is a length of 1/2-inch tubing running the full width of the bed. From that header, 1/4-inch dripline runs the length of the bed at 12-inch intervals, one line per planting column. These are the lengthwise lines. Each one is inserted into the header with a barbed elbow or tee fitting.
To add the crosswise lines, cut the lengthwise lines at the points where a crosswise branch will go and insert barbed tee fittings into the cuts. A short 12-inch segment of 1/4-inch tubing connects each tee to the matching tee on the adjacent lengthwise line, creating the horizontal rungs of the grid. Each crosswise segment only spans the gap between adjacent lengthwise lines, not the full width of the bed. In a 12-inch grid, that span is 12 inches per segment.
Emitters go at the intersections. If the dripline already has built-in emitters at 6 or 12-inch spacing, those emitters land at or near the intersections automatically once you cut the lines to the right length. If you are using plain 1/4-inch distribution tubing without built-in emitters, punch individual emitters at each intersection using a punch tool. Either approach works. Built-in emitter dripline is faster to set up. Individual punch-in emitters give you more control over flow rate at specific points in the grid if some squares are planted with heavier feeders than others.
Field Note: Barbed tee fittings are inexpensive and easy to underestimate. In my experience, the fittings that come with some budget drip kits use a softer barb than standalone fittings from a drip specialty retailer. For a grid with 12 or more branch points, I would rather buy separate tee fittings and know they are holding than find out one has pulled loose when the bed looks dry after a week of running.
Pressure and Flow Through a Grid
Each branch point in a grid reduces available pressure for all downstream emitters. A parallel layout with three lines has three pressure paths from the header. A grid with the same three lines plus crosswise branches connecting them adds pressure drop at every tee. In a small 4×4 grid, that pressure difference is usually manageable if you are starting with regulated pressure in the 20 to 25 PSI range, which is the typical recommendation for 1/4-inch dripline.
Where pressure variation becomes a real problem is in a grid with many branch points or in a larger 4×8 grid with long line runs. If one side of the grid receives 22 PSI and the far corner receives 14 PSI after losses through tees and length, emitters at fixed flow rates will deliver noticeably different amounts of water. Pressure-compensating emitters address this directly. They maintain a consistent flow rate across a range of inlet pressures, typically 7 to 45 PSI depending on the emitter. In a grid layout, especially one covering a 4×8 bed or a raised bed with more than 20 branch points, pressure-compensating emitters are worth the modest cost difference because they take the pressure variation out of the coverage equation.
Before laying out a grid, confirm that your hose bib pressure after the regulator is landing in a range that your chosen dripline or emitters can handle across the full grid. If you are not sure where your pressure is, a simple hose bib pressure gauge costs a few dollars and takes 30 seconds to read.
Key point: Before buying parts for a drip grid, work through these decisions first. Bed size and grid type determine everything else.
1. Bed size: 4×4, 4×8, or 2×4? This sets how many lengthwise lines and how many crosswise segments you need.
2. Grid type: 12-inch grid with standard emitters; 12-inch grid with 6-inch emitter spacing on each line; or true 6-inch grid with lines at 6-inch intervals in both directions. Each is a different material count.
3. Lengthwise lines: one per 12-inch column across the bed width. A 4-foot-wide bed needs 4 lines at 12-inch spacing, 8 lines at 6-inch spacing.
4. Crosswise segments: short 12-inch connectors between adjacent lengthwise lines. Count the rows across the bed length and multiply by (number of lengthwise lines minus 1) to get total segment count.
5. Tee fittings: two per crosswise segment, one on each lengthwise line where the segment connects. A 4×8 bed with a 12-inch grid needs roughly 48 tees.
6. Total GPH: emitter count times emitter flow rate. Check this against your timer or valve flow limit before running multiple beds on one zone.
7. Emitter type: fixed emitters for a small 4×4 grid at regulated pressure; pressure-compensating emitters for a 4×8 grid or any setup with more than 20 branch points.
| Bed size | Lines at 12-inch spacing | Grid intersection points | Emitter type recommendation |
|---|---|---|---|
| 4×4 | 4 lengthwise + 4 crosswise | 16 | Fixed or pressure-compensating |
| 4×8 | 4 lengthwise + 8 crosswise | 32 | Pressure-compensating preferred |
| 2×4 (narrow bed) | 2 lengthwise + 4 crosswise | 8 | Fixed emitters, low pressure drop |
The numbers in the table assume a true grid with lines in both directions and emitters at intersections. A narrower bed with a 2-foot width can often get away with a single lengthwise line and evenly spaced crosswise runs, which is closer to a comb pattern than a full grid, but provides the same directional coverage benefit.

This pack of 50 barbed tee connectors creates branch intersections in quarter-inch drip supply tubing or dripline with an internal diameter of 0.170 inches. Each fitting inserts and anchors securely with a single barb, handling pressures up to 50 psi. Made from UV-inhibited ABS plastic to resist cracking outdoors over time.
Check On AmazonIf you click this link and buy, we earn a commission at no additional cost to you.
The Simpler Alternative: Snake Pattern for Dense Beds
A grid with tee fittings and crosswise lines is the most uniform coverage option, but it is also the most time-consuming to set up and the hardest to reposition if your planting plan changes next season. For some densely planted beds, a snaked dripline in an S-pattern covers the same soil area with fewer fittings and less planning.
The snake pattern runs a single 1/4-inch dripline back and forth across the bed at consistent intervals, turning 180 degrees at each end with a 1/4-inch elbow fitting. A 4×8 bed snaked at 8-inch row intervals uses roughly 20 feet of dripline in a single continuous run, no tee fittings required. The coverage is not as perfectly uniform at every intersection point as a true grid, but for a mixed planting where you want consistent moisture across the full bed surface, it gets close enough for most vegetables and herbs.
The snake pattern works best when the dripline spacing is consistent and the planting fills the bed relatively evenly. It is less effective for a bed where half the plants are deep-rooted tomatoes and the other half are shallow lettuce, since those two plant types benefit from different emitter spacings and flow rates. In a bed like that, splitting into two separately controlled zones is a better answer than trying to serve both plants with one snaked line.
Fewer fittings, easier to reconfigure each season, good for beds where coverage just needs to be consistent across the whole surface. Dripline runs may not land emitters directly at every planting square. Works well for mixed shallow-root plantings like lettuce, herbs, and greens.
More fittings and more planning time up front, but puts a coverage point at every square foot of the bed. Best for SFG beds and intensive mixed beds where the planting positions are consistent season to season and you want the irrigation to match the grid exactly.
Neither layout is wrong. The snake pattern is where I would start if this is a first drip system and the bed does not follow a strict square foot pattern. The grid is worth the setup time when the bed is committed to SFG-style planting and you expect to run the same layout for multiple seasons without repositioning lines.

A 2.5-inch water pressure test gauge with a 0–200 PSI range, 3/4-inch female garden hose connection, and a red memory pointer for checking and recording peak water pressure in irrigation and outdoor plumbing systems.
Check On AmazonIf you click this link and buy, we earn a commission at no additional cost to you.
Final Thoughts: Match the Layout to the Planting Pattern
A drip grid is not a complicated system. It is two sets of lines running in perpendicular directions, connected at branch points, with emitters placed at the intersections. For a 4×4 SFG bed, that means 16 coverage points across 16 planting squares, and every square gets moisture from a nearby emitter without relying on lateral soil movement to do the work.
The pressure side of the setup deserves attention before you punch the first fitting. A grid with many branch points in a 4×8 bed benefits from pressure-compensating emitters. A small 4×4 grid at regulated pressure in the 20 to 25 PSI range usually runs fine with standard fixed emitters if the line runs are short. Know what your regulated pressure is before you choose the emitter type.
If the grid feels like more work than your planting style needs, the snake alternative covers a dense bed with far fewer fittings. Either way, the general principles for line spacing, emitter flow rate, and how layout decisions affect coverage are the same. You can find that full picture in the raised bed drip irrigation layout guide, which covers layout decisions across all bed types, or start from the beginning with the complete raised bed drip irrigation setup guide if you are still putting together the full system.
FAQs
🌱 Can I use a drip grid for square foot gardening in a 4×4 raised bed?
Yes, and it is one of the better layout options for SFG beds. A grid with lines at 12-inch spacing puts an emitter at each of the 16 planting squares. The setup requires barbed tee fittings to branch crosswise lines off the lengthwise runs, but for a 4×4 bed the total fitting count is manageable and the coverage is more consistent than parallel rows for this planting style.
💧 How many drip lines do I need for a grid in a 4×8 raised bed?
For a 12-inch grid in a 4×8 bed, you need four lengthwise lines running the full 8-foot length. The crosswise connections are short segments, each spanning the 12-inch gap between adjacent lengthwise lines, with three segments per row and eight rows across the bed length. Total dripline works out to roughly 56 feet: 32 feet for the four lengthwise runs plus 24 feet for the 24 short crosswise segments. If you want 6-inch emitter spacing on the existing lines rather than a true 6-inch grid, you add emitters but not additional line runs.
⚙️ Do I need pressure-compensating emitters for a drip grid?
For a small 4×4 grid at regulated pressure around 20 to 25 PSI, standard fixed emitters usually work fine. For a 4×8 grid with many branch points, pressure drop across the grid can cause uneven flow between the emitters closest to the header and those farthest away. Pressure-compensating emitters maintain consistent output across that pressure range and are worth using when the grid is larger or when you are running multiple beds on one zone.
🔀 What fittings do I need to build a drip grid in a raised bed?
You need barbed tee fittings to branch crosswise lines off the lengthwise runs, barbed elbows to turn the header at the short end of the bed, and end caps to close any open line ends. For 1/4-inch dripline, all of these are standard fittings available at most irrigation retailers. A punch tool is also needed if you are using plain distribution tubing and installing individual emitters rather than pre-spaced emitter dripline.
🥬 Is a snake pattern better than a grid for densely planted raised beds?
It depends on how consistent the planting layout is. A snake pattern uses fewer fittings and is easier to reposition between seasons, which makes it practical for beds where the planting arrangement changes. A grid provides more uniform coverage when the planting follows a fixed square foot pattern and you expect the layout to stay the same across multiple seasons. For most first-time dense plantings, starting with a snake pattern is a reasonable approach before committing to a full grid.
📐 What emitter spacing works best for a drip grid in an intensive planting?
For most vegetable and herb plantings, a 12-inch grid with emitters at 12-inch spacing along each line puts one coverage point per square foot, which is usually adequate. If the planting is denser, shortening emitter spacing on the existing lines to 6 inches adds coverage without adding more line runs or tee fittings. A true 6-inch grid, where lines are also spaced 6 inches apart in both directions, is more work to build and significantly increases flow demand, but delivers full-surface coverage for beds packed at 4-inch to 6-inch plant spacing throughout.