Drip irrigation pressure problems in raised beds come in two completely opposite forms: too much pressure causes misting, spraying, and fittings that pop off; too little causes weak or nonexistent flow at the far end of the line. Both get blamed on clogged emitters, and both end up getting treated the wrong way as a result. This article covers how to read the symptoms correctly, confirm which failure mode you are dealing with, and apply the right fix the first time.
Two Problems, Opposite Symptoms
The most useful thing to understand about a drip irrigation pressure problem in a raised bed is that high pressure and low pressure look nothing alike once you know what to look for. High pressure pushes too much force through small fittings and emitter orifices. Low pressure does not push enough. The symptoms run in opposite directions, and so do the fixes.
Both get misdiagnosed as clogging because the end result looks similar from a distance: some emitters are not dripping correctly. But the pattern and the associated signs are different. Before pulling any emitters or reaching for tools, check where the problem is happening and what else is going on across the system. A few minutes of observation tells you which failure mode you are dealing with and saves a lot of time on the wrong fix.
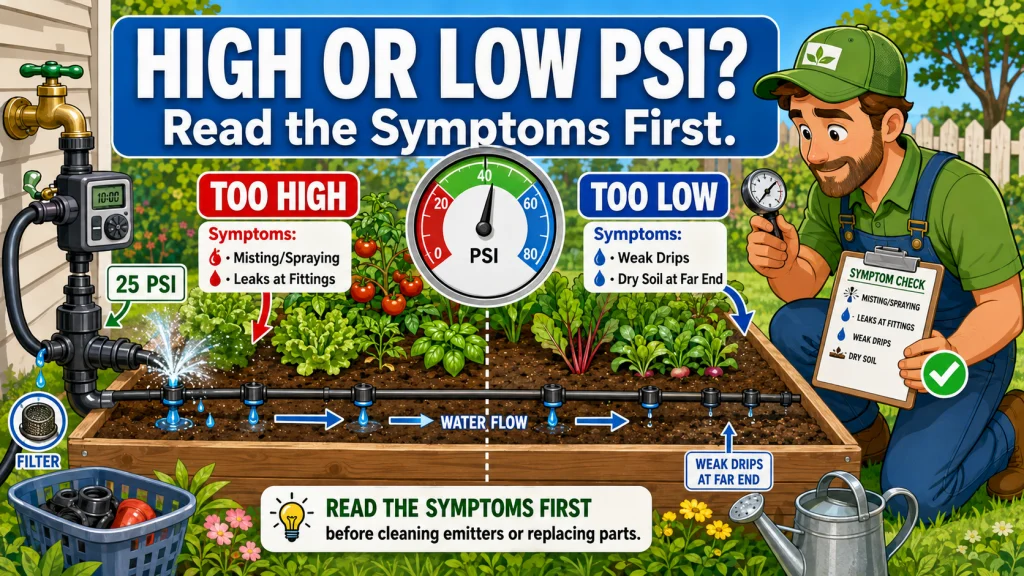
Emitters mist or spray instead of drip. Fittings pop off or weep at barbed connections. Hissing sounds at joints while the system runs. Emitters near the water source flow faster than those farther out along the line.
Emitters at the far end of the line barely drip or stop entirely. Emitters near the water source run normally. Plants at the far end of the bed show dry stress even with correct run times.
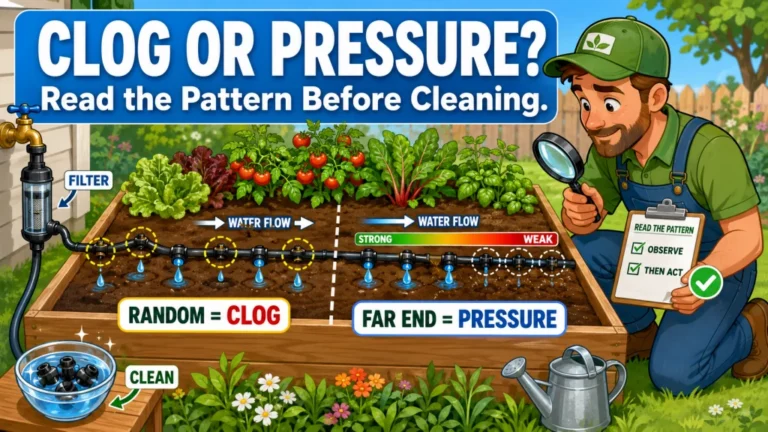
If you are seeing dry emitters scattered randomly across the bed with no tie to their position along the line, that points to clogging rather than pressure. The drip emitter clogging guide for raised beds covers that diagnosis separately, including the pattern test that distinguishes clogging from pressure loss.
High Pressure: What It Looks Like and Why It Happens
High pressure is usually obvious once you know the signs. Emitters rated for 0.5 or 1 GPH at 25 PSI push out more water than they are designed to when the system is running at 50 or 60 PSI. The higher the pressure above the rated range, the more the flow through the orifice increases, and instead of steady individual drops the emitter produces a fine mist or spray. This can look almost normal from a few feet away, which is why it gets missed until fittings start failing or plants begin showing signs of overwatering.
At the connections, high pressure shows up as weeping at barbed fittings, tubing pulling off at punch-in emitters, and sometimes an audible hiss at joints while the system is running. The first fitting to fail is usually the weakest connection in the line, often where 1/4-inch emitter tubing meets the mainline. What looks like a bad fitting is very often a pressure problem underneath it.
The Three Causes of High Pressure in a Raised Bed System
The most common cause is a missing pressure regulator. Some basic drip kits include one, and some gardeners skip it because the system appears to work without it for a season. Municipal water pressure often runs between 40 and 80 PSI. Most raised bed drip components are rated for 25 to 30 PSI. Running them above that range stresses the fittings and shortens the life of the emitter diaphragms.
The second cause is a failed regulator. Pressure regulators have a diaphragm inside that limits downstream pressure. When it wears out, the regulator passes full line pressure through without restriction. To test this, remove the regulator and press your thumb against the inlet side. A functioning diaphragm regulator has clear spring resistance. A failed one offers little to none and the housing may feel loose internally. If the regulator shows no resistance, replace it.
The third cause is a regulator installed in the wrong position in the head assembly. The timer must come before the pressure regulator. A regulator placed upstream of the timer holds full line pressure during the entire off cycle between watering runs. It is not rated for constant static pressure, and this shortens the diaphragm lifespan considerably. The correct order from the hose bib is timer first, then pressure regulator, then filter, then mainline.
Field Note: I have seen this wrong order on more than a few residential installs. The regulator is sitting right at the hose bib, the timer is downstream of it, and the homeowner cannot figure out why they keep going through regulators. The system runs fine for six months and then starts misting again. Flip the timer and regulator positions and the next regulator lasts as long as it should.
Low Pressure: What It Looks Like and Why It Happens
Low pressure in a raised bed system is position-dependent. Emitters near the hose bib run at a normal rate. Emitters toward the far end of the line slow down, drip unevenly, or stop entirely. Plants at the far end of the bed stay dry even though the rest of the bed is getting water on schedule. This is the low pressure signature, and it is directly tied to friction loss along the line length.
Water pressure drops as it travels through tubing. The longer the run and the more emitters drawing from the same line, the more pressure drops from the hose bib to the far end. In a single 4×8 bed with one emitter line, friction loss is rarely significant. In a setup with four 4×8 beds running off one mainline through 60 to 80 feet of 1/2-inch tubing and 40 or more emitters total, pressure at the far end can drop enough to affect flow consistency. UC Marin Master Gardeners note that 1/2-inch supply lines are generally limited to around 200 feet per zone; beyond that, friction loss becomes too significant for reliable emitter flow.
Diagnosing Low Pressure
The first test is at the hose bib. Partially close a shutoff valve to reduce flow for 30 seconds and watch whether the far-end emitters get worse. If reducing flow makes them worse and opening the valve fully improves them, the source pressure is adequate and the problem is line length or total emitter demand. The system is drawing more water than the line can deliver consistently over its full length.
If far-end emitters barely drip even at maximum hose bib pressure with a short line, the source pressure is genuinely low. This happens most often with well pumps running at low static pressure or with systems that run during peak municipal demand hours when neighborhood line pressure drops temporarily. Elevation also contributes: each foot of vertical rise between the water source and the bed reduces pressure by approximately 0.43 PSI, so a bed elevated two feet above the hose bib needs about 0.9 PSI more just to reach the start of the line.
Before assuming source pressure is the problem, check the filter at the head assembly. A clogged filter screen restricts flow in a way that looks exactly like low source pressure throughout the line. I have cleaned a filter and watched a sluggish far-end emitter recover to normal flow within seconds. It is the fastest thing to check and the most often overlooked before more involved troubleshooting starts.
Fixing High Pressure
The fix for high pressure is the pressure regulator: add one if it is missing, replace one that has failed, or correct the installation order if the timer and regulator are in the wrong sequence. A 25 PSI regulator installed correctly at the head assembly, downstream of the timer and upstream of the filter and mainline, brings most residential hose bib pressure into range for standard raised bed drip components.
After adding or replacing the regulator, run the system and check the emitters. Misting should stop within the first run cycle. Fittings that were weeping at high pressure should hold once the system is operating at 25 PSI. If fittings have already been damaged by repeated high-pressure stress, replace them while the system is apart rather than reseating them. A barbed fitting that has been blown loose and pushed back in under stress is more likely to fail again.
If the system ran at high pressure long enough for emitter diaphragms to wear, some emitters may still drip unevenly after pressure is corrected. Run two or three full cycles at the correct pressure, then check each emitter. Any that still flow inconsistently after pressure is stabilized should be replaced. Match the GPH rating of the original emitter when replacing.

This pressure regulator maintains an optimal 25 PSI to keep drip lines and emitters running at consistent flow, with a 20 gallon per minute capacity to support larger systems. It connects to any 3/4 inch male threaded faucet, garden hose, or component for easy setup. Built from UV and chemical-resistant materials, it offers durable, reliable performance season after season, and pairs well with a compatible Rain Bird hose-end timer for automated watering.
Check On AmazonIf you click this link and buy, we earn a commission at no additional cost to you.
Fixing Low Pressure
The right fix depends on the cause. Work through these in order before adding hardware or splitting the system:
- Clean the filter screen at the head assembly and retest. A clogged screen is the fastest fix and the most often missed.
- If the pressure regulator is set to 25 PSI and the source pressure is already at or below 25 PSI, remove the regulator entirely. It is restricting the already-limited flow rather than protecting the system.
- Check the total run length and emitter count. If the mainline exceeds 100 feet or the zone has more than 30 to 40 emitters, line friction is likely the cause regardless of source pressure.
- Look for kinked 1/4-inch emitter tubing at sharp bends along the line. A kink acts as a partial blockage and creates low pressure symptoms in one section while the rest of the system runs normally.
- Split the system into two shorter zones using a 2-outlet timer if line length or emitter count is the confirmed cause. Shorter lines with fewer emitters per zone bring pressure at the far end back into range without changes to the water source.
For kinked tubing specifically: straighten the affected section, support the bend with a landscape stake to hold a gentler curve, and run the system again to confirm flow is restored. If the tubing has been kinked long enough to hold a permanent crease, replace that section. Creased 1/4-inch tubing tends to kink again at the same point after straightening.
For well systems with genuinely low static pressure, a booster pump is the hardware solution. This goes beyond typical raised bed drip components and usually involves a plumber or pump technician, but it is worth knowing when the problem sits upstream of anything a drip kit can address.

This robust hose-end timer works with sprinklers, drip irrigation, and soaker hoses, offering simple automatic programming with full 7 day scheduling for worry-free watering. An extra-large dial and readout screen make setup and schedule review easy, while one-touch buttons allow quick cancellation, a rain delay of up to 96 hours, or manual watering on demand. The display also shows the next scheduled cycle and time remaining on the current one.
Check On AmazonIf you click this link and buy, we earn a commission at no additional cost to you.
When a Pressure Gauge Is Worth Using
Most raised bed pressure problems can be diagnosed by pattern alone, but symptoms sometimes overlap in ways that make the cause less obvious. An emitter misting near the regulator while far-end emitters drip weakly could indicate a failing regulator that reduces pressure unevenly rather than consistently. In cases like that, a simple inline pressure gauge removes the guesswork.
The most useful check is pressure at two points: first at the hose bib before any head assembly components, and second after the timer and regulator if the gauge can be installed there temporarily. If hose bib pressure is well above the rated range for the drip components and the regulator is downstream, the regulator is doing the work it should. If pressure after the regulator still reads high, the regulator is not functioning. If pressure before the regulator is already at or below 25 PSI, the regulator is restricting a system that does not need restriction.
A gauge is also useful when a well system behaves inconsistently at different times of day, when far-end emitters stay weak after the filter is cleaned and the zone has been shortened, or when a new regulator does not seem to resolve misting. In those cases, measuring actual operating pressure at two points in the line tells you more than any visual check can. For a small raised bed setup, a gauge is not essential equipment on day one, but it is the right tool when symptoms do not clearly fit one pattern or the other.

This irrigation pressure gauge features a metal case with a clear plastic face and precision internals, reading up to 200 psi. A durable brass fitting connects to any standard three-quarter inch hose faucet and can be installed permanently or used as a portable diagnostic tool when servicing a sprinkler or drip system.
Check On AmazonIf you click this link and buy, we earn a commission at no additional cost to you.
Final Thoughts: Read the Pattern Before Touching Anything
The most common mistake I see with drip irrigation pressure problems in raised beds is jumping to a fix before the diagnosis is clear. Replacing emitters when the real problem is a failed pressure regulator accomplishes nothing. Adding a regulator when the real problem is a long line with too many emitters on one zone also accomplishes nothing. The pattern tells you which direction to go: misting and fitting failures mean too much pressure; weak far-end flow means too little.
Check the pattern first. Confirm the cause. Then apply the correct fix. For a complete approach to raised bed drip troubleshooting across all the common failure types, the raised bed drip irrigation troubleshooting guide covers clogging, timer faults, and layout issues alongside pressure problems. For the setup principles that prevent pressure problems from developing in the first place, the raised bed drip irrigation tips guide covers head assembly order, filter placement, and zone sizing from the beginning.

This commercial-grade pop-up spray head features a 2-inch pop-up height, a heavy-duty stainless steel retraction spring, and a patented pressure-activated co-molded wiper seal that prevents water leakage around the stem. A pre-installed orange flush cap keeps the head protected after flushing and can be replaced with any Rain Bird MPR spray nozzle. The tapered pop-up neck aids smooth retraction every cycle.
Check On AmazonIf you click this link and buy, we earn a commission at no additional cost to you.
FAQs
💧 Why are my drip emitters misting instead of dripping?
Misting is a high pressure symptom. The water pressure at the emitter orifice is too high for the emitter’s rated flow, so water comes out as a fine spray rather than individual drops. Check whether a pressure regulator is installed and whether it is still functioning. If source pressure is above 30 PSI and no regulator is in the line, adding one rated for 25 PSI will stop the misting. If a regulator is present but not working, replace it.
🌿 Why do the drip emitters at the far end of my raised bed barely drip?
Weak far-end emitters with normal near-source flow is the classic low pressure pattern. The most likely causes are a clogged filter screen, a line that is too long for the source pressure, too many emitters on one zone, or a pressure regulator that is unnecessarily dropping already-limited source pressure. Clean the filter first, then check line length and emitter count before looking at the source pressure itself.
🔧 How do I test if my drip pressure regulator has failed?
Remove the regulator and press your thumb against the inlet side. A working diaphragm regulator has clear spring resistance. A failed one has little or none and passes full line pressure through. If the high pressure symptoms (misting, popping fittings) returned after the regulator was installed, that is a reliable sign the diaphragm has worn out. Replace it rather than trying to adjust it.
🧱 Does the order of components in the drip head assembly matter?
Yes, and it is one of the most common setup mistakes. The correct order from the hose bib is: timer, then pressure regulator, then filter, then mainline. The regulator needs to be downstream of the timer so it is not holding full line pressure during the off cycle. A regulator installed before the timer wears out faster and causes high pressure symptoms after the diaphragm fails earlier than expected.
⛰️ Does the height of my raised bed affect drip pressure?
Yes. Each foot of vertical rise between the water source and the bed reduces pressure by approximately 0.43 PSI. A bed elevated two feet above the hose bib needs just under 1 PSI more to reach the start of the line. This is a small number on its own, but it compounds with long line lengths in systems already running near the low end of their pressure range.
🛠️ My drip fittings keep popping off. Is that a pressure problem?
Almost certainly. Barbed fittings rated for 25 to 30 PSI are unlikely to pull loose at correct operating pressure. Fittings that repeatedly pop off, especially at punch-in emitters and 1/4-inch barbs, are a reliable sign of high pressure. Install or replace the pressure regulator before reseating the fittings, or the same connections will fail again at the next run.
🪴 Can I fix low pressure without splitting the system into two zones?
Sometimes. A clogged filter screen is the easiest fix and is worth checking first. If the pressure regulator is unnecessarily lowering already-limited source pressure, removing it can restore flow. Switching from 1/4-inch to 1/2-inch mainline tubing reduces friction loss and can help on longer runs. Splitting into two zones is the most reliable solution when line length and emitter count are confirmed as the cause, but it is not always the first step.