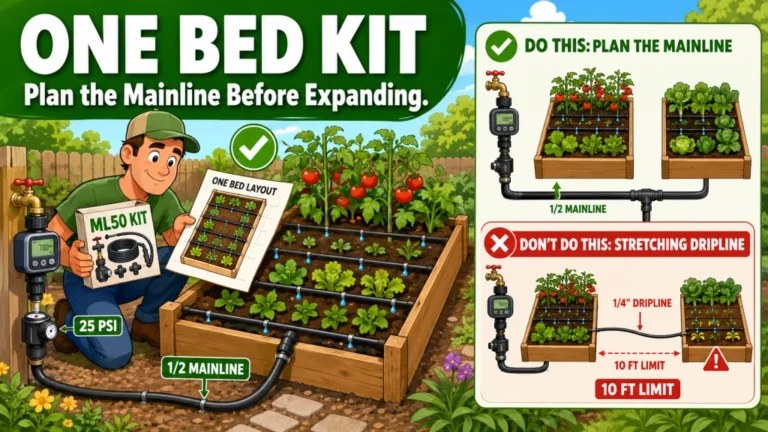
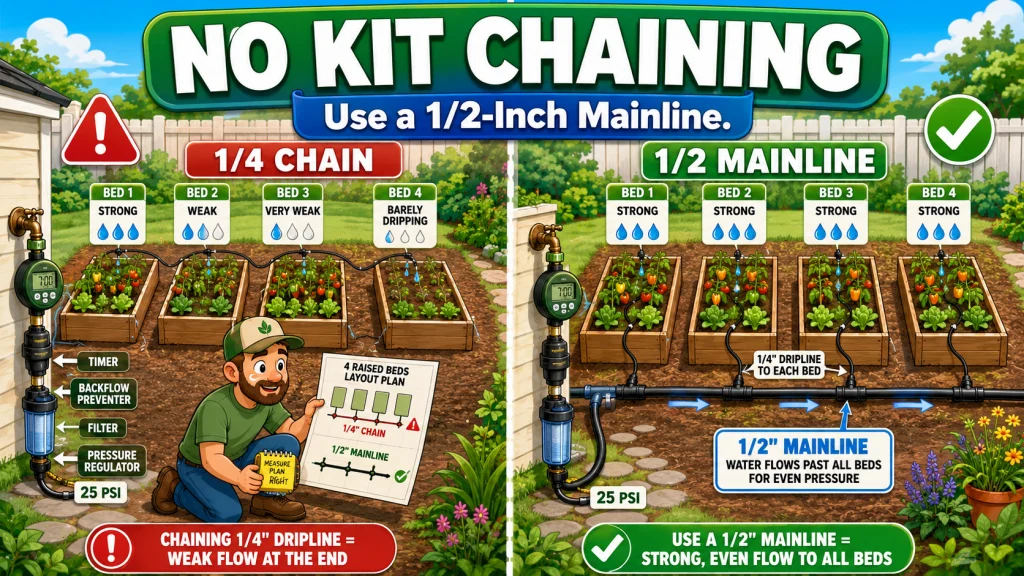
The most common multi-bed drip mistake I see is chaining single-bed kits together down a row of raised beds. The first bed gets water. The fifth bed gets almost none. This happens because 1/4-inch dripline has a real length limit, and connecting kits end-to-end multiplies the pressure loss rather than extending the reach. If you have three or more raised beds, the correct solution is a 1/2-inch mainline that runs from the hose bib past all the beds, with a fresh 1/4-inch dripline branching into each bed from the mainline. This article covers why chaining fails, what the right architecture looks like, how to measure for it, and what to look for in a kit that actually supports it.
Why the Single-Bed Kit Stops Working After Two Beds
Single-bed kits like the ones designed for a 4×8 or 5×8 footprint are built around a simple architecture: a head assembly at the hose bib, a short run of mainline tubing to the bed, and 1/4-inch driplines branching across the bed from there. That setup works well for one bed. Gardeners who try to extend it by connecting a second kit to the end of the first, or a third kit to the second, are using 1/4-inch tubing as if it were mainline tubing. It is not.
The 1/4-inch inside diameter creates significant friction loss as water moves through it. Every emitter along the line draws water from the same narrow channel. By the time you have run 30 feet of 1/4-inch line with emitters firing every 6, 9, or 12 inches, the pressure has dropped enough that the emitters at the far end deliver noticeably less water than the ones near the supply connection. Drip Depot’s own tubing buying guide puts the limit clearly: 1/4-inch dripline should not exceed 30 feet for a single run. DripWorks puts the limit at 34 feet for 12-inch spacing and 18 feet for 6-inch spacing, because denser emitters pull more water from the same channel and accelerate the pressure drop.
Chain two or three of those runs together and you are not doubling or tripling the capacity. You are stacking pressure losses. The first bed runs at design pressure. The second bed runs at reduced pressure. The third bed may barely drip at all by the time water reaches it through that narrow tube.
Field Note: The most common symptom I see when gardeners chain single-bed kits is a fourth or fifth bed where the soil surface stays dry an hour after the timer runs. The gardener checks the emitters, finds them unclogged, assumes the timer is broken, adjusts the run time upward, and ends up overwatering the first two beds while still underwatering the last ones. The problem is not the timer. It is the architecture.

This all-in-one drip irrigation kit is designed specifically for standard 4 by 8 foot raised beds, with options covering 2 to 10 beds depending on the tier you choose. Everything needed to connect to a standard outdoor faucet or garden hose is included, and all fittings require only hand tightening. The tubing cuts easily with household scissors, and the fully modular design lets you expand or customize the system over time.
Check On AmazonIf you click this link and buy, we earn a commission at no additional cost to you.
The Difference Between 1/4-Inch and 1/2-Inch Tubing in a Multi-Bed System
The inside diameter of tubing determines how much friction loss builds up per foot of run. A 1/2-inch mainline carries far more water with far less friction loss than 1/4-inch tubing at the same flow rate. Drip Depot’s buying guide cites the 200/200 rule for 1/2-inch poly mainline: maximum 200-foot run length and 200 GPH total flow before pressure loss becomes a concern. Compare that to the 30/30 rule for 1/4-inch: maximum 30 feet and 30 GPH. The difference in capacity is not incremental. It is the difference between a system that scales to multiple beds and one that does not.
In a properly designed multi-bed system, the 1/2-inch mainline does the heavy lifting. It runs from the hose bib past all the beds, carrying water at the full regulated pressure with minimal loss per foot. At each bed, a barbed tee fitting punched into the mainline branches off a short 1/4-inch dripline run that covers just that one bed. Each dripline starts from a pressurized point on the mainline, not from the tail end of the previous bed’s dripline. That distinction is everything.
| Tubing type | Max run length | Role in a multi-bed system | Limitation when misused as mainline |
|---|---|---|---|
| 1/4-inch dripline | 18 to 34 ft depending on emitter spacing | Short lateral runs inside each bed, branching off the mainline | Pressure drops sharply when run length or emitter count exceeds limit; far beds go dry |
| 1/2-inch poly mainline | Up to 200 ft | Carries water from hose bib past all beds; tee fittings at each bed feed the driplines | None for typical home garden setups; designed to carry flow for multiple zones |
This is also why simply buying more 1/4-inch dripline and connecting it end-to-end does not work. You are still running all the flow through the same narrow channel. The fix is not more 1/4-inch line. It is switching to 1/2-inch mainline for the runs between beds and reserving 1/4-inch dripline for the short runs inside each individual bed.
What a Correct Multi-Bed System Looks Like
The layout is simpler than it sounds once you see it as two separate jobs: moving water to each bed, and distributing it inside each bed. The mainline handles the first job. The driplines handle the second. They are not the same tubing, and they should not be treated as interchangeable.
The Mainline Run
Start at the hose bib with the head assembly: timer, backflow preventer, filter, pressure regulator, and the 1/2-inch mainline adapter. From there, run 1/2-inch poly tubing past all the beds in the garden, laying it on the ground along the outside edge of the beds or burying it a few inches if you want to keep it tidy between beds. Cap the far end. The mainline is now under pressure from end to end. At each bed location, punch a hole in the mainline with a hole punch tool and press in a barbed tee or barbed elbow fitting. That fitting becomes the supply point for that bed’s dripline. Each bed gets its own branch. Each branch starts from full mainline pressure.
Inside Each Bed
Inside each bed, run a short header of 1/2-inch solid tubing along one short end of the bed. This header connects to the mainline branch coming up from outside the bed. From the header, punch holes and insert 1/4-inch barbed connectors for each dripline row. For a standard 4×8 bed, three rows of 1/4-inch dripline spaced 12 inches apart run the 8-foot length of the bed and covers the planting area consistently. Each 8-foot dripline run is well under the 30-foot limit, so pressure stays even from the first emitter to the last. Cap the end of each dripline row with a goof plug.
For a 4×4 bed, two rows is usually enough. For a 4×12 or longer bed, keep each dripline row to the length of the bed and make sure no single run exceeds 30 feet. If the bed is longer than 30 feet, run the header down the center of the bed and branch driplines in both directions, keeping each half-run under 15 feet.
Key point: The total length of 1/2-inch mainline you need is the distance from the hose bib to the farthest bed, plus a few feet at each bed to go up the side and across the header. Measure that full distance before buying. Most garden setups fit within 50 to 100 feet of mainline. A setup where the farthest bed is 60 feet from the hose bib needs at least 65 to 70 feet of mainline after accounting for the header at each bed.
What to Look For in a Kit That Supports Multiple Beds
The key difference between a single-bed kit and a multi-bed kit is whether the mainline component is sized for the job. A kit that includes only 1/4-inch dripline and a short head assembly is designed for one bed. A kit that includes a substantial length of 1/2-inch mainline tubing, tee fittings for branching at each bed, and enough 1/4-inch dripline for multiple interior bed runs is the right architecture for three or more beds.
Before buying any multi-bed kit, answer four questions:
- How many beds? Each bed needs its own branch from the mainline and its own interior dripline runs. A kit rated for three standard beds includes components for three branches, not one long run chained together.
- What is the total mainline distance? Measure from the hose bib to the farthest bed. Add a few feet per bed for the header run inside each one. This is the minimum mainline length you need. If a kit does not include enough 1/2-inch tubing for that distance, buy the extra tubing before you start.
- What size are the beds? Each 4×8 bed needs roughly 24 to 32 feet of 1/4-inch dripline for three or four parallel runs at 12-inch spacing. A kit rated for three 4×8 beds should include at least 75 to 100 feet of 1/4-inch dripline plus the mainline.
- Does the kit include tee fittings for the mainline? Each bed connection requires a tee punched into the 1/2-inch mainline. Some kits include these; others require buying them separately. If you have five beds, you need at least five tee fittings for the mainline. Confirm before buying.
Multi-bed kits from irrigation-focused suppliers typically come in sizes labeled by bed count: two-bed, three-bed, five-bed, and so on. When the kit description says “for three 4×8 beds,” check that it means three separate mainline branches, not three sequential lengths of 1/4-inch line chained together. The latter is just the single-bed-kit chaining problem repackaged. The multi-bed kit comparison helps separate kits built around real mainline branches from single-bed designs stretched beyond their intended use.
Pro tip: When comparing kits, look at the 1/2-inch mainline length included. That number tells you more about whether a kit is genuinely designed for multiple beds than the “number of beds” label on the box. A kit that claims to cover four beds but only includes 25 feet of 1/2-inch mainline cannot reach four beds spread across a typical garden. A kit that includes 100 feet of mainline has the infrastructure to handle a real four-bed layout.

This 200-foot coil of half-inch poly tubing serves as main supply line or feeder line in drip irrigation systems, with an outside diameter of 0.620 inches and inside diameter of 0.520 inches for compatibility with standard drip fittings and emitters. Multi-layer construction uses 100% virgin poly on the inner and outer layers for UV and water resistance, with a recycled-content core for added strength. Suitable for trees, shrubs, raised beds, containers, and hanging baskets.
Check On AmazonIf you click this link and buy, we earn a commission at no additional cost to you.
Measuring Before You Buy: The Step Most Gardeners Skip
The single most common reason a multi-bed kit falls short is that the gardener did not measure the total mainline distance before buying. A kit that includes 50 feet of 1/2-inch mainline looks adequate until you realize the hose bib is 40 feet from the nearest bed, and the farthest bed is another 30 feet beyond that. That setup needs 70-plus feet of mainline before you have even run a single header inside a bed.
Measure the actual path the tubing will take from the hose bib to each bed. Do not measure in a straight line if the tubing has to go around a corner, a fence post, or a garden path. Measure the path. Add 3 to 5 feet per bed for the vertical rise up the side of the bed and the horizontal header run inside it. Add a few extra feet as buffer. That total is your minimum mainline requirement.
| Setup | Example distances | Minimum mainline needed |
|---|---|---|
| 3 beds in a row, hose bib at one end | Hose bib 10 ft from first bed; beds spaced 4 ft apart; each bed 8 ft long | 10 ft to first bed + 4 ft gap + 4 ft gap + 3 ft header x 3 beds = roughly 30 ft |
| 4 beds across a yard, hose bib at house | Hose bib 25 ft from first bed; beds spaced 6 ft apart; beds 8 ft long | 25 ft + 18 ft gaps + 4 ft header x 4 beds = roughly 60 ft |
| 5 beds, hose bib far from garden area | Hose bib 40 ft from first bed; beds in two rows | 40 ft run + inter-bed distances + headers = easily 80 to 100 ft or more |
Getting the mainline length right before buying avoids the most frustrating part of a multi-bed install: running out of tubing ten feet short of the last bed and having to order more before the system can be tested. Every irrigation-focused supplier sells 1/2-inch mainline by the foot or in 50-foot and 100-foot rolls. If a kit comes with less than you need, add the extra mainline to the order before it ships. Adding it later costs the same; waiting for a second shipment costs time in the middle of the planting season.
Pressure Regulation for a Multi-Bed Setup
One pressure regulator at the hose bib is the right approach for most home garden multi-bed setups. The regulator drops hose bib pressure, which typically runs 40 to 70 PSI, down to the 20 to 30 PSI range that 1/4-inch dripline and its fittings are designed for. From there, the 1/2-inch mainline carries regulated water to every bed without needing an additional regulator at each branch point.
Where gardeners run into trouble is skipping the regulator entirely or using a regulator rated for a single-bed kit on a much larger system. If the total GPH demand of all the driplines in the system exceeds what the regulator is rated to pass, the regulator becomes a restriction and pressure drops across the whole system. Check the regulator’s rated flow capacity against the total number of emitters in your layout. A system with five 4×8 beds and three dripline rows per bed at 12-inch spacing can have a much higher total flow demand than a one-bed kit, so the regulator needs to be sized for the full layout, not just the first bed.
Warning: Do not place the pressure regulator downstream of a manifold or splitter that divides the flow to multiple beds simultaneously. The regulator needs to see the full incoming pressure and drop it before the flow splits. If you install the regulator after the split, each branch gets an unpredictable share of the upstream pressure rather than a reliably regulated output.
For most garden setups, a regulator rated at 25 PSI with a flow capacity of at least 300 to 400 GPH covers three to five standard beds without restriction. Suppliers that specialize in drip irrigation list the GPH capacity alongside the PSI rating. Both numbers matter when sizing for multiple beds.

This pressure regulator maintains an optimal 25 PSI to keep drip lines and emitters running at consistent flow, with a 20 gallon per minute capacity to support larger systems. It connects to any 3/4 inch male threaded faucet, garden hose, or component for easy setup. Built from UV and chemical-resistant materials, it offers durable, reliable performance season after season, and pairs well with a compatible Rain Bird hose-end timer for automated watering.
Check On AmazonIf you click this link and buy, we earn a commission at no additional cost to you.
Building It Yourself Versus Buying a Multi-Bed Kit
There are two ways to approach a multi-bed drip system: buy a kit sized for your bed count, or source the components individually and build the mainline system yourself. Both work. The tradeoff is time versus money.
Buying a multi-bed kit from an irrigation supplier is faster. The kit is pre-sized for a specific number of standard beds, the components are matched to each other, and the instructions walk through the mainline-to-dripline architecture rather than assuming you already know it. The disadvantage is that the bed count and dripline length in the kit may not match your exact setup, and kits often include components you do not need alongside ones you do.
Building from individual components costs less if you buy only what the layout requires. The core shopping list for a three-bed system built from scratch is not long:
- 1/2-inch poly mainline tubing in the length needed to reach all beds
- Head assembly: backflow preventer, pressure regulator, filter, and 3/4-inch to 1/2-inch adapter
- Barbed tee fittings for the mainline at each bed (one per bed)
- Barbed elbow fittings and end caps for the mainline
- 1/4-inch barbed connectors to transition from the mainline to the dripline inside each bed (one per dripline row)
- 1/4-inch dripline with emitters in the correct spacing for your crop mix, at the length needed for all rows across all beds
- Goof plugs to cap each dripline row
- Tubing stakes to hold driplines in place inside the beds
- A 1/4-inch hole punch tool for inserting barbed fittings into the mainline
The hole punch tool is worth calling out because it is easy to overlook and impossible to improvise cleanly. It creates a clean, correctly sized hole in the 1/2-inch mainline that the barbed fitting presses into and seals against. A hole made with a nail, a drill bit, or a knife will not seal consistently and will drip at the connection point all season. The tool costs a few dollars and the problem it prevents is worth many times that.
For a first multi-bed install, a kit is usually the better choice because it includes the punch tool, the right fitting counts, and the instruction manual. After the first season, most gardeners have a good sense of where the kit’s components fell short for their specific layout and can supplement or replace accordingly with individual parts.
Final Thoughts: Build for the Whole Garden, Not Just the Nearest Bed
Every multi-bed drip problem I have fixed in the field came down to the same root cause: the gardener treated 1/4-inch dripline as the mainline. It is not built for that role. Once the mainline is 1/2-inch poly running to all the beds with short 1/4-inch driplines branching off inside each one, the system distributes pressure evenly and each bed gets similar pressure and flow. That architecture holds whether you have three beds or eight.
The work is upfront. Measure the full mainline distance before buying. Make sure the kit or component list includes enough 1/2-inch tubing for that distance. Confirm the tee fitting count matches the bed count. Get the hole punch tool. After that, the install itself is straightforward and the system will run reliably without the dry-far-bed problem that chained single-bed kits always produce. For a comparison of specific kits by bed count, including what each includes on the mainline side, the full raised bed drip kit guide covers the options across setup sizes and budgets.

This spring-loaded combination tool handles both hole punching for drippers and quarter-inch fittings and clean cuts through all sizes of drip tubing in a single tool. A hardened steel punch and surgical steel blade produce clean, square cuts and precise holes with no jagged edges or crushed tubing. The bright purple color makes it easy to spot if set down in soil, mulch, or grass.
Check On AmazonIf you click this link and buy, we earn a commission at no additional cost to you.
FAQs
💧 Can I use multiple single-bed drip kits chained together for multiple raised beds?
Not reliably. Chaining 1/4-inch dripline kits end-to-end stacks pressure losses across each connection point. The first bed gets adequate water; beds farther down the chain get progressively less. The correct approach is a 1/2-inch mainline running from the hose bib past all beds, with a fresh 1/4-inch dripline branching into each bed from the mainline. Each bed then starts from full pressure rather than from whatever is left at the tail end of the previous bed.
📏 How much 1/2-inch mainline tubing do I need for three raised beds?
Measure the actual path from your hose bib to the farthest bed. Add 3 to 5 feet per bed for the rise up the bed side and the header run inside the bed. For a typical layout with beds 4 feet apart and a hose bib 10 to 15 feet from the first bed, three 4×8 beds usually need 35 to 50 feet of mainline. Measure your specific layout before buying, not after, because coming up short at the last bed mid-install is the most common frustration with multi-bed setups.
🔧 How far can I run 1/4-inch dripline inside each raised bed?
The practical limit for 1/4-inch dripline is 30 feet per single run, with some sources citing 18 feet for 6-inch emitter spacing and up to 34 feet for 12-inch spacing. For a standard 4×8 raised bed, individual dripline rows are 8 feet long, well within the limit. Beds longer than 30 feet should have the mainline run down the center with driplines branching off both sides, keeping each half-run under 15 feet.
⚙️ Do I need a separate pressure regulator for each raised bed?
No. One pressure regulator at the hose bib is correct for most home garden multi-bed setups. The regulator drops incoming pressure to the 20 to 30 PSI range before the flow reaches any of the beds, and the 1/2-inch mainline carries that regulated pressure to every branch point with minimal loss. Check that the regulator’s rated flow capacity is sufficient for the total number of emitters across all beds running simultaneously.
🌱 How many dripline rows do I need per 4×8 raised bed?
Three rows of 1/4-inch dripline at 12-inch spacing covers a 4-foot-wide bed with rows running the 8-foot length. That gives you good coverage for most vegetable and herb plantings. For dense greens or root vegetables where you want tighter spacing, four rows at 12 inches or three rows at 9 inches work well. For widely spaced crops like tomatoes or peppers, two rows at 18 inches is usually enough, though the bed soil still benefits from consistent moisture across the full width.
🔑 What fittings do I need to connect driplines to a 1/2-inch mainline?
You need a barbed tee or barbed elbow fitting for the mainline at each bed location, inserted with a hole punch tool. From that fitting, 1/4-inch barbed connectors transition from the mainline or bed header into each dripline row inside the bed. Each dripline row also needs a goof plug at the far end to cap it. The hole punch tool is essential and should be included in any multi-bed kit; if buying components separately, add it to the list before ordering anything else.
❄️ Do I need to do anything special to winterize a multi-bed mainline system?
Yes, in any region with freezing temperatures. Disconnect the head assembly from the hose bib first. Then open the end cap on the far end of the 1/2-inch mainline to let it drain completely. Remove the goof plugs from each dripline row end so the 1/4-inch lines can drain as well. Store the head assembly, pressure regulator, and backflow preventer indoors. Water trapped in the mainline fittings or the pressure regulator housing will freeze and crack the plastic. The poly tubing itself is generally freeze-tolerant once drained.