Every raised bed drip repair is simple once you have the right part. The problem is almost never knowing how to fix something. It is not having what you need on hand when something fails mid-season. A small bag of spare components stored with the timer and filter is the difference between a 5-minute fix and a half-day trip to the hardware store, or a week waiting for a shipment. This article covers which parts to keep, what each one fixes, which tools belong in the kit, and how to store it so it is actually there when you need it.
Why a Spare Parts Kit Beats Any Repair Tutorial
Every raised bed drip repair that took me longer than 10 minutes in the field came down to the same problem: I did not have the right part. The repair itself was never the complicated part. Swapping a clogged emitter takes about 30 seconds. Patching a cut section of 1/4-inch dripline takes maybe 2 minutes. Sealing a stray punch point with a goof plug is even faster. None of these jobs require much skill. They all require having a handful of specific components within reach.
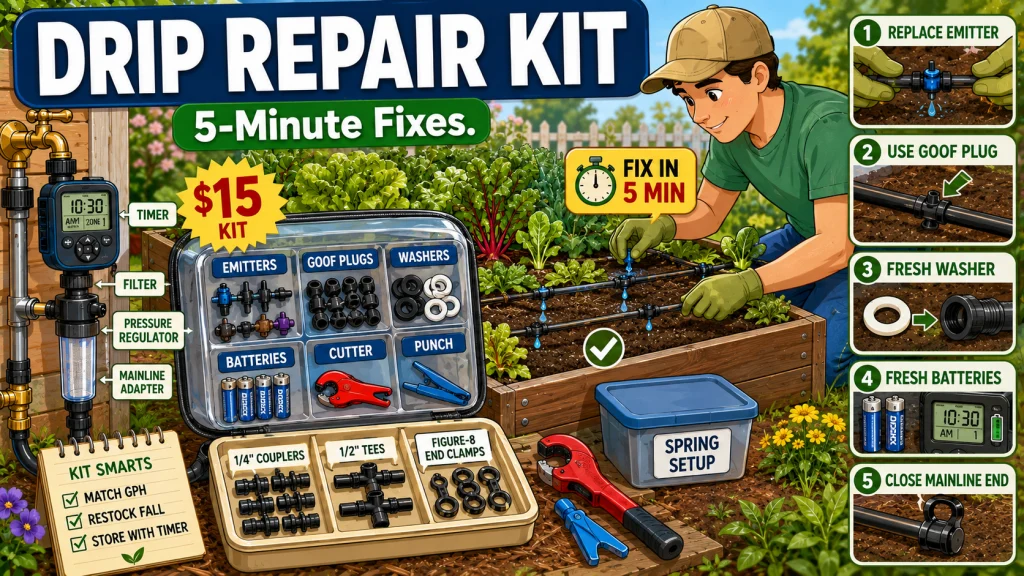
A complete raised bed drip repair kit costs around $15 to assemble from scratch and covers the five most common failure scenarios a home gardener is likely to face across a growing season. The components are small, they last several seasons in storage, and the whole kit fits in a labeled ziplock bag stored alongside the timer. When something fails at the hose bib in July, you want to fix it before the bed gets behind on water, not after a two-day shipping window.
The list below is based on what actually fails in residential raised bed drip setups: emitters, rubber washers, small fittings, line connections, and timer batteries. UC Marin Master Gardeners recommends keeping an emergency repair kit on hand that includes spare emitters of different sizes, straight and elbow connectors, line plugs, end caps, tubing, a cutting tool, a hole punch, and metal stakes for re-securing lines. The kit described here reflects that list and adjusts it for the specific failure patterns I see most often in raised bed vegetable setups.
Replacement Emitters: The Component You Will Use Most
Emitters are the part most likely to need replacement over the life of a raised bed drip system. They clog, they crack from UV exposure or a misplaced boot, and they occasionally pop off a barb connection when a dripline gets tugged. A pack of 10 replacement emitters in the same GPH rating as your installed emitters costs roughly $3 to $5 and makes any emitter swap immediate.
The GPH rating matters. If your system is laid out with 0.5 GPH emitters spaced 9 to 12 inches apart in a 4×8 vegetable bed, replacing a failed emitter with a 1.0 GPH unit from a different pack changes the water delivery at that plant location. A tomato or pepper that was getting a slow, consistent drip every cycle now gets twice the volume at that spot. In a short run time it may not matter much, but over a season of daily watering in a clay-heavy mix, that difference shows up in plant performance near the swapped emitter. Keep replacements that match what is already installed.
I usually keep at least one pack of replacements per GPH rating in use across my beds. If a setup runs two different emitter types, say 0.5 GPH near shallow-rooted herbs and 1.0 GPH at tomato locations, I keep a small supply of both. The cost difference between one pack and two is about $4. The difference between having the right emitter on hand and not having it is a plant that goes dry until the order arrives.
Field Note: The most common emitter failure I see in raised beds is not clogging from hard water. It is physical damage at the barb connection from the dripline being pulled sideways, usually when someone weeds around the plant or moves a support stake and catches the tubing with their foot. The emitter pops off the barb, the line drips directly onto the soil at that point, and the rest of the bed gets less pressure. A replacement emitter and 30 seconds fixes it completely. Without a spare, that spot runs as an open drip point until you find one.

These self-piercing emitters deliver a consistent half-gallon per hour from the start to the end of a tubing run, allowing soil to absorb water slowly and thoroughly at the root zone. Compatible with quarter-inch drip tubing or insertable directly into half-inch and larger supply tubing. Large internal water passages and a self-flushing design reduce clogging, and UV and chemical-resistant construction ensures long-term outdoor durability.
Check On AmazonIf you click this link and buy, we earn a commission at no additional cost to you.
The Fittings, Plugs, and End Clamps That Cover Most Other Repairs
Beyond emitters, most raised bed drip repairs involve the mainline, the small fittings connecting it, or the end of the line. A few specific components handle the majority of these situations without requiring a hardware store run or a full system replacement.
| Part | What It Fixes | Approx. Cost | Quantity to Keep |
|---|---|---|---|
| Barbed straight coupler (1/4-inch) | Rejoins a cut or cracked section of dripline without replacing the full run | $2 to $3 for a small pack | 2 to 3 |
| Barbed tee fitting (1/2-inch) | Adds a branch to the mainline or repairs a split at a tee connection | $3 to $5 for a pack | 1 to 2 |
| Goof plug (for 1/2-inch mainline) | Seals an unused punch point or a small hole punched in the wrong location | $2 to $3 for a pack of 10 | 5 to 10 |
| Figure-8 end clamp | Closes the end of 1/2-inch mainline when an end cap is lost, cracked, or missing | $2 to $4 for a small pack | 2 |
Goof plugs are the one component I always have more of than I expect to need, and I always end up using them. A mainline punch is a permanent hole. Once you punch a hole in 1/2-inch tubing, it is open until you seal it or replace the section. Punching in the wrong location while adjusting a layout, or discovering a punch point after removing an emitter that is no longer needed, are both common situations. Having 5 to 10 goof plugs on hand costs less than $3 and handles these immediately.
Figure-8 end clamps deserve a mention because end caps are one of the most frequently lost small components in a drip system. They get removed at the end of the season for flushing, set down on the bed frame, and disappear. A figure-8 clamp folds the mainline back on itself and holds it closed without threads to crack or a cap to lose. Two of them stored in the kit means the end of the season flush does not turn into a hardware store errand.

This portable kit packs 100 feet of self-dispensing quarter-inch blank distribution tubing alongside 40 pressure-compensating emitters in three flow rates, 0.5, 1.0, and 2.0 gallons per hour, plus 20 barbed couplers, 20 barbed tees, 10 tubing stakes with bug caps, and 10 tubing plugs. Rain Bird's patented emitter installation and removal tool is included, making it easy to punch in or swap out emitters and quarter-inch fittings. Everything stores in a compact plastic pouch with individually organized bags.
Check On AmazonIf you click this link and buy, we earn a commission at no additional cost to you.
The Rubber Washer: The $2 Fix for the Most Common Drip Leak
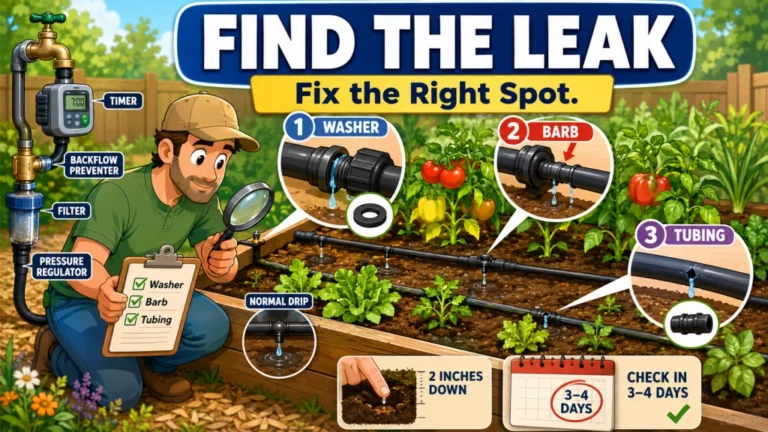
The 3/4-inch hose thread rubber washer is the smallest and cheapest item in the kit, and it is responsible for preventing the most common leak in a raised bed drip system. The connection point between the hose bib and the first component in the system, whether that is a timer, a filter, or a pressure regulator, relies on a rubber washer to create a watertight seal. When that washer is compressed, dried, cracked, or simply missing, the connection leaks. Not a spray, usually a slow drip at the fitting that runs onto the ground next to the hose bib and gets ignored until it becomes obvious.
A pack of 10 standard rubber washers costs about $2 at any hardware store and can be ordered online for less. DripDepot recommends replacing the hose thread washer annually as part of seasonal system startup. In practice, most people replace it only when they notice the leak, which means the system has already been dripping at the connection for part of the season. Keeping a few spares in the kit means the replacement happens during the spring setup walk rather than mid-season when something looks wrong.
Check the washer at the filter and at any garden hose adapter in the line. Systems with a timer, a filter, and a pressure regulator stacked at the hose bib have multiple washer points, and any one of them can be the source. A 5-minute spring inspection of all hose thread connections is faster than tracking down a slow drip in July.
Timer Batteries and the Two Tools the Kit Needs
A hose-end timer that runs out of battery mid-season does not fail obviously. It either stops running scheduled cycles entirely or gets stuck in a state where it requires manual operation. If you are away for a few days and the timer battery dies, the system does not water. By the time you return, a raised bed in summer heat may be significantly behind on moisture. Two sets of AA batteries stored with the kit, rotated out each spring, prevent that scenario.
DripWorks notes that cold weather depletes batteries faster than normal conditions, which matters both at the end of the season when temperatures drop and in early spring when nights are still cold and the system is first starting up. Starting each season with a fresh set of batteries in the timer and a backup set in the kit is a simple step that removes battery failure as a mid-season variable.
Key point: Batteries stored in a garage through a freezing winter may be partially depleted before they are ever used. Rotate stored batteries out each spring along with the fresh set you put in the timer.
Two tools belong in the kit alongside the spare parts. A sharp pair of tubing scissors or a dedicated tubing cutter makes a clean, square cut on 1/4-inch dripline or 1/2-inch mainline. A rough or angled cut at a barb connection is the main reason fittings leak after a repair. The second tool is a hole punch sized for 1/4-inch emitter tubing in 1/2-inch mainline. Most drip kits include one, but they are small and easy to lose. Having a spare in the parts bag means you can punch a new emitter location or adjust a layout without searching through last season’s kit components.
Neither tool is expensive. A tubing cutter runs $4 to $8. A replacement hole punch is typically $2 to $5. Together they complete the kit and make any of the repairs covered by the spare parts actually executable at the hose bib.

This spring-loaded combination tool handles both hole punching for drippers and quarter-inch fittings and clean cuts through all sizes of drip tubing in a single tool. A hardened steel punch and surgical steel blade produce clean, square cuts and precise holes with no jagged edges or crushed tubing. The bright purple color makes it easy to spot if set down in soil, mulch, or grass.
Check On AmazonIf you click this link and buy, we earn a commission at no additional cost to you.
How to Store the Kit So It Is There When You Need It
The kit is only useful if it is findable. A labeled ziplock bag stored with the timer, filter, and pressure regulator is the most reliable approach. When you bring the system out of storage in spring, the parts come with it. When you put the system away at the end of the season, the bag goes back in the storage container with everything else. No separate shelf, no second location to remember.
Label the bag with the contents and the season it was assembled. A bag labeled “drip kit 2024” with a marker on the outside tells you at a glance whether the batteries and rubber washers inside are fresh enough to use or due for rotation. It takes 10 seconds and saves the guesswork when you are kneeling at the hose bib in April trying to remember whether those batteries went through a winter in a cold garage.
- Replacement emitters matching the installed GPH rating, 5 to 10 pieces per rating in use.
- Barbed straight couplers for 1/4-inch dripline, 2 to 3 pieces.
- Barbed tee fittings for 1/2-inch mainline, 1 to 2 pieces.
- Goof plugs for 1/2-inch mainline, 5 to 10 pieces.
- Figure-8 end clamps, 2 pieces.
- 3/4-inch hose thread rubber washers, 3 to 5 pieces.
- AA batteries, one fresh spare set.
- A tubing cutter or sharp scissors.
- A hole punch for 1/2-inch mainline.
At end-of-season shutdown, add a quick inventory step before the bag goes into storage. Replace anything that was used during the season. A replacement emitter pack costs $4. Restocking the bag in October means you start next spring with a complete kit rather than discovering mid-setup that the goof plugs are gone. The full monthly and seasonal routine that connects the kit to the rest of the system, including when to flush, when to inspect fittings, and when to pull the line, is covered in the raised bed drip system maintenance guide.
If the system is coming out of the ground entirely for the winter rather than being left in place, the winterizing process itself involves a few of these components: end caps, figure-8 clamps, and a dry-storage location for the timer. The steps for doing that correctly are in the guide on winterizing a raised bed drip system, which covers the sequence from flushing through storage.
Final Thoughts: Assemble It Once, Restock It Each Fall
The goal of a spare parts kit is not to be ready for every possible failure. It is to be ready for the five or six things that actually go wrong in a raised bed drip system over a season: a clogged or failed emitter, a drip at the hose bib, a cut section of dripline, a stray punch point, a lost end cap, and a timer that stops cycling. The kit described here covers all of those for roughly $15 assembled from scratch.
For a broader look at how the kit fits into the overall setup, seasonal schedule, and layout decisions for a raised bed drip system, the drip irrigation tips for raised beds section covers the full picture in one place. The repair kit is one piece of a system that runs better when the pressure is regulated, the filter is clean, the schedule is dialed in, and the parts are within reach. Assemble the kit, label it, and store it with the timer. That is the only step most gardeners skip, and it is the one that turns a mid-season problem into a mid-season delay.

These thermoplastic rubber washers feature four outer locking tabs that grip the inside of any standard three-quarter inch hose fitting to stay in place when disconnecting hoses or changing nozzles. Measuring 1 inch outside diameter, five-eighths inch inside diameter, and one-eighth inch thick, they fit garden hoses, faucets, spray nozzles, splitters, and washing machine hookups. TPR construction resists hardening and cracking in extreme temperatures better than standard rubber or plastic washers.
Check On AmazonIf you click this link and buy, we earn a commission at no additional cost to you.
FAQs
🔧 What should I keep in a drip irrigation repair kit for a raised bed?
The core list is: replacement emitters matching your installed GPH rating, barbed straight couplers for 1/4-inch dripline, goof plugs for 1/2-inch mainline, figure-8 end clamps, 3/4-inch rubber hose thread washers, a spare set of AA timer batteries, a tubing cutter, and a hole punch. This covers the most common raised bed drip failures without requiring a hardware store run.
💰 How much does a raised bed drip repair kit cost to assemble?
Roughly $12 to $18 assembled from scratch, depending on where you buy the components. The most expensive items are the emitter pack and the tubing cutter. Rubber washers, goof plugs, and figure-8 clamps are typically under $3 each. If you already have a tubing cutter and a hole punch from the original installation, the consumable parts alone run around $10.
💧 What causes most drip irrigation leaks in a raised bed?
The most common leak source is the hose thread connection at the bib, almost always caused by a cracked, compressed, or missing rubber washer. A $2 pack of replacement washers fixes this immediately. The next most common sources are a barb connection that has worked loose on the dripline and a fitting that was not fully seated during installation.
🔌 What is a goof plug used for in drip irrigation?
A goof plug seals a hole punched in 1/2-inch mainline tubing. If you punch a hole in the wrong location, need to remove an emitter and close that point, or find a small hole from physical damage, a goof plug seals it in seconds. They are inexpensive and worth keeping 5 to 10 on hand because punch points are permanent until sealed.
🔋 Why do timer batteries matter as a spare part for drip irrigation?
A hose-end timer that loses battery power mid-season stops running scheduled cycles without any obvious warning. If you are away for a few days, the bed can fall significantly behind on water before you notice. Cold weather depletes batteries faster than normal, both in stored spares and in the timer itself. Starting each season with a fresh set and keeping a backup in the kit removes this as a failure point.
📦 Where should I store a drip irrigation repair kit?
In a labeled ziplock bag stored with the timer, filter, and pressure regulator. When the system comes out of storage in spring, the parts come with it. When the system goes away at the end of the season, the bag goes back in the same container. A label with the year helps track when batteries and washers need to be rotated.