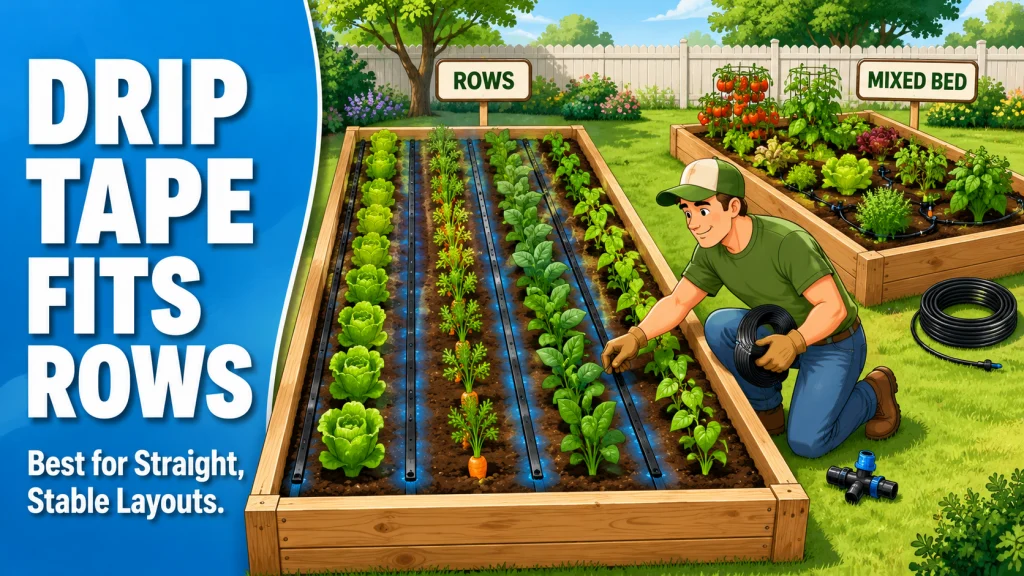
Drip tape is the standard watering method in commercial vegetable production, and it can work in a raised bed, but only under specific conditions. If you plant in straight rows and want the lowest cost per foot of drip line, drip tape is worth a close look. If you use square foot gardening layouts, mix crops across the bed, or replant in a different configuration each season, drip tape will frustrate you before the season is out. This article covers what makes drip tape different from emitter dripline, where it performs well in a home raised bed vegetable garden, where it consistently fails, and how to match the tool to your actual setup before buying.
A Commercial Tool That Sometimes Makes Sense at Home
Drip tape for raised beds comes up regularly in gardening forums, usually from someone who saw it used in commercial vegetable production and wondered whether it would scale down to a backyard setup. The honest answer is that it can, but the conditions that make drip tape effective in a commercial row crop setting are not always present in a home garden. Understanding that gap before you buy is the whole point of this article.
Commercial growers use drip tape because they plant in long, parallel rows, water the same crop across entire fields, and build tape replacement into their annual operating costs. A home gardener with two or four raised beds is working in a completely different context: smaller runs, mixed crops, seasonal layout changes, and a much smaller tolerance for replacing equipment every few years. Some of that context lines up with how drip tape works. A lot of it does not.
What Drip Tape Actually Is
Drip tape is thin-walled, flat polyethylene tubing. When the water is off, it lies flat against the soil. When pressure comes up, it inflates slightly and delivers water through emitters pre-installed at fixed intervals along the tubing wall. The most common emitter spacing options are 6, 8, and 12 inches, though other intervals exist depending on the product line.
That fixed spacing is the defining characteristic of drip tape, and it drives both its strengths and its limitations. Unlike emitter dripline, where you can position individual drippers where plants actually are, drip tape delivers water at every fixed point along its entire length. You cannot skip a section, adjust spacing mid-run, or reroute the tape around an obstacle. It goes in straight, it wets the soil along that line, and the layout stays fixed until you pull it out.
The wall thickness is the other key distinction. Drip tape is noticeably thinner than 1/4-inch emitter dripline. That thinness is what makes it inexpensive per foot, and it is also what makes it more vulnerable to punctures, UV degradation, and physical wear over time. For raised bed drip tape installation in a home garden, that tradeoff matters more than it does in a commercial field where the tape is being replaced on a planned schedule anyway.
Where Drip Tape Works Well in a Raised Bed
The raised bed situations where drip tape performs well share one feature: straight, consistent rows with the same crop in roughly the same position season after season. Beans, carrots, beets, and lettuce grown in parallel rows across a rectangular bed are a natural match. The fixed emitter spacing aligns with plant spacing, the tape runs straight from one end of the bed to the other, and there is nothing that needs to move or adjust.
On cost, drip tape is typically the least expensive drip option per linear foot. For a gardener with several long beds planted in consistent rows who wants to move away from hand-watering, drip tape gets water to the root zone at a lower upfront cost than emitter dripline. If the layout does not change much from year to year, that cost difference is real and the setup holds up.
Field Note: I have seen drip tape work cleanly in 4×8 beds planted with a full-row lettuce and spinach mix in early spring. The 6-inch emitter spacing matched the planting density, the tape ran straight across the bed width, and the gardener pulled it out at the end of the season, rinsed it, and stored it for fall replanting. That is about as clean a drip tape setup as I see in a home garden context. The key was that the planting layout was consistent and the tape never had to go anywhere unusual.

A 1,000-foot roll of 5/8-inch Irritec P1 drip tape with 6-inch emitter spacing, 15 mil wall thickness, and 0.25 GPH emitters for reliable row-crop, garden bed, greenhouse, and agricultural irrigation.
Check On AmazonIf you click this link and buy, we earn a commission at no additional cost to you.
Where Drip Tape Fails in a Raised Bed
Square foot gardening layouts are the most common source of drip tape frustration I hear about. When a bed has tomatoes in one corner, peppers beside them, basil scattered between, and lettuce filling the remaining squares, the fixed emitter spacing on a straight tape run cannot match that planting map. Emitters land where there is no root zone, or gaps between tape runs leave entire plant areas consistently dry. The problem is structural, not fixable by running more tape.
The second failure mode is seasonal replanting with layout changes. Drip tape is fixed. When you pull out spring lettuce and plant summer tomatoes in a different row configuration, the tape that worked perfectly in April is now misaligned for June. Emitter dripline with individual drippers can be repositioned. Drip tape cannot. Over multiple seasons with varied crop rotations, that inflexibility adds up to either wasted water or persistent dry spots that no timer adjustment will fix.
Beds with irregular shapes, curved edges, or corners where the layout does not follow a straight-line grid are also poor candidates. Drip tape is not designed to bend around corners or follow non-linear plant arrangements. Forcing it into those shapes creates kinks, uneven flow, and stress on the fittings at each bend.
Running drip tape through a mixed-crop raised bed, assuming it will water everything evenly because the tape covers the full bed length. The fixed spacing does not care where your plants are.
Using drip tape only in beds where crops are planted in straight, parallel rows with consistent spacing and the layout stays stable from season to season.
When drip tape is the wrong fit for your layout, the next step is straightforward. Emitter dripline lets you space drippers where plants actually are, reroute lines between seasons, and handle mixed plantings without leaving dry corners. If you are still sorting out the difference between your flexible drip options, the article on soaker hose for raised bed vegetable gardens covers where soaker hose fits versus where drip emitter systems hold a clear advantage.

This kit includes everything needed to water a raised bed up to 4 by 8 feet, with professional-grade components built for repeated seasonal use. It features 35 feet of emitter tubing with 70 built-in, pressure-compensating emitters spaced every 6 inches for even watering near the roots, plus 25 feet of easy-to-handle 1/4 inch distribution tubing. This low-volume design can save up to 80% on water while supporting healthier plants and better yields. Installation is straightforward thanks to an illustrated manual covering multiple layout options, and the system can be automated with a compatible Rain Bird hose-end timer sold separately.
Check On AmazonIf you click this link and buy, we earn a commission at no additional cost to you.
Lifespan: The Seasonal Replacement Reality
In commercial agriculture, drip tape is a consumable. Growers install it in spring and pull it at end of season, then order new tape the following year. That math works at scale when you are buying 5,000-foot rolls and running them across acres. In a backyard raised bed with two or three tape runs per bed, the replacement math feels different, and it is worth knowing before you commit to tape over dripline.
In a home raised bed with good mulch coverage over the tape, three to four seasons is a realistic lifespan. Mulch reduces UV exposure, which is the primary driver of early wall degradation, and a proper end-of-season flush, dry-out, and indoor storage routine extends that further. Without mulch, UV exposure shortens the window noticeably. The thin wall starts cracking and emitters begin losing consistency faster than most first-time tape users expect.
Emitter dripline at the same install will typically outlast drip tape by several years. If long-term durability matters more than upfront cost, that tradeoff is worth understanding before the purchase, not after the second replacement season. Drip tape is a lower-cost option that requires replacement planning. If you are comfortable with that going in, it is a reasonable choice for the right layout. If you were expecting it to run indefinitely like a heavier dripline, you will be disappointed.
The Flow Number That Helps You Set the Timer
One of the practical questions when planning drip tape in a raised bed is how much water the system is actually delivering per hour, so the timer settings mean something. Here is a concrete reference from a documented home raised bed drip irrigation install: in a 4×8 bed with tape rows laid roughly 9 inches apart across the bed width, each 8-foot run carries 15 emitters at 0.25 GPH, delivering 15 gallons per hour to the full bed. That figure comes from a verified raised bed setup with specific emitter specs, not a manufacturer range estimate.
That 15 GPH number gives you a real baseline for run time. If you know your soil type and have a sense of how much water a session should deliver, you can work backward from 15 GPH to figure out how long to run the timer. A bed filled with clay-heavy mix holds water longer and needs less frequent runs than the same bed in a light sandy mix. The emitter flow rate stays the same. What changes is how often you run the system and for how long.
The 0.25 GPH per emitter figure is on the lower end of common drip tape emitter flows. Some tape products run at 0.5 GPH per emitter, which would deliver 30 GPH to the same 4×8 layout. Check the spec sheet on any tape you buy before dialing in timer settings. The flow rate is printed on the packaging or available from the manufacturer, and it is the number your run time actually depends on.

This robust hose-end timer works with sprinklers, drip irrigation, and soaker hoses, offering simple automatic programming with full 7 day scheduling for worry-free watering. An extra-large dial and readout screen make setup and schedule review easy, while one-touch buttons allow quick cancellation, a rain delay of up to 96 hours, or manual watering on demand. The display also shows the next scheduled cycle and time remaining on the current one.
Check On AmazonIf you click this link and buy, we earn a commission at no additional cost to you.
Before You Buy: The 4 Specs That Actually Matter on the Package
Most drip tape packaging looks similar at a glance. The differences that actually change how a raised bed setup performs are in four specific numbers. If you are standing in front of a display or reading a product listing, these are the specs worth checking before anything else.
- Wall thickness (mil rating): Drip tape is typically sold in 4-mil, 6-mil, 8-mil, and 10-mil wall thicknesses. Thinner tape costs less and works for a single season. Thicker tape handles more physical wear, resists punctures better, and lasts longer through multiple seasons in a raised bed. For a home garden where the tape will be reinstalled each spring, 6-mil or 8-mil is worth the small price difference over 4-mil.
- Emitter spacing: The pre-installed emitters are fixed at 6, 8, or 12-inch intervals depending on the product. This number needs to match your row and plant spacing before you buy, not after. A 12-inch emitter tape running through a dense lettuce bed will leave gaps. A 6-inch emitter tape in a wide-spaced bean row delivers more water than the plants need. Match the interval to what you are growing.
- Emitter flow rate (GPH): The flow rate per emitter is printed on the packaging, usually 0.25 GPH or 0.5 GPH for most residential tape products. That number determines how long your timer needs to run to deliver a useful amount of water. Double the flow rate, half the run time for the same volume. Get this spec before you set a timer, not after a week of wondering why the bed is drying out faster than expected.
- Pressure rating and fitting compatibility: Drip tape runs at low pressure, typically 6 to 12 PSI at the tape inlet. If your hose bib is running 50 or 60 PSI, the tape needs a pressure regulator upstream rated to bring that down to the operating range. Check what fittings the tape requires at each end as well. Drip tape uses specific barbed fittings and end caps that are not always interchangeable between manufacturers.
None of these specs are hard to find, but they are easy to skip when the focus is on getting the setup in the ground quickly. A tape with the wrong emitter spacing or no upstream pressure regulator will not perform the way the package implies, and neither problem is obvious until the bed is already planted around it.

This pressure regulator maintains an optimal 25 PSI to keep drip lines and emitters running at consistent flow, with a 20 gallon per minute capacity to support larger systems. It connects to any 3/4 inch male threaded faucet, garden hose, or component for easy setup. Built from UV and chemical-resistant materials, it offers durable, reliable performance season after season, and pairs well with a compatible Rain Bird hose-end timer for automated watering.
Check On AmazonIf you click this link and buy, we earn a commission at no additional cost to you.
Who Drip Tape Is Actually Right For
Drip tape makes the most sense for gardeners who plant in straight rows, want the lowest cost per foot of drip line, and are realistic about periodic replacement. If you grow beans, carrots, beets, or row lettuce in consistent layouts that do not shift much between seasons, drip tape handles the job at a lower upfront cost than emitter dripline.
It is not a good fit for square foot gardeners, for anyone who rotates crops between significantly different configurations, or for gardeners who want a system that holds up for five or more years without replacement. In those cases, the flexibility and durability of emitter dripline justifies the higher cost per foot over time. The table below lays out the clearest match points between layout type and the right drip approach.
| Raised Bed Layout | Drip Tape | Emitter Dripline |
|---|---|---|
| Straight row planting (beans, carrots, beets, lettuce rows) | Good fit | Works but costs more per foot |
| Square foot gardening with mixed crops | Poor fit | Good fit |
| Same layout replanted each season | Good fit | Works, more flexibility than needed |
| Layout changes significantly between seasons | Poor fit | Good fit |
| Beds with curved edges or irregular shape | Poor fit | Good fit |
| Cost is the main priority, replacement accepted | Good fit | Higher upfront cost |
| Long-term durability is the priority | Plan for replacement | Good fit |
That table is a starting point, not a final verdict. The real question is whether your actual beds match the conditions in the left column consistently, not just for one season. If they do, drip tape is a practical, lower-cost option worth trying. If two or more of the “poor fit” rows describe your setup, the savings per linear foot will not cover the frustration of trying to make a fixed-spacing tape work in a layout it was not designed for.
- Row planters: beans, carrots, beets, and lettuce in parallel rows with consistent spacing across a rectangular bed.
- Cost-focused setups: gardeners who want the lowest cost per foot and are comfortable with planned replacement every few seasons.
- Stable-layout beds: beds that use the same general row configuration year after year without significant replanting changes.
- Short-season crops: spring and fall plantings where the tape goes in, does the job, and comes out at end of season for storage.
If most of those descriptions match your setup, drip tape is worth trying. If only one or two apply, emitter dripline will serve you better across multiple seasons without the layout mismatch and earlier replacement cycle.

This coupling connects two ends of 5/8 inch drip tape, making it easy to repair a nicked or cut section or to lengthen a row by joining two tape sections together. Large ridged nuts allow for easy, effective tightening, and their bright green color makes connections simple to spot among growing plants or when removing tape after harvest. An elongated tape barb lets more tape slide past the sealing point for an improved, leak-free seal that holds through the entire growing season.
Check On AmazonIf you click this link and buy, we earn a commission at no additional cost to you.
Final Thoughts: Match the Tool to the Layout Before You Buy
Drip tape is not a universal raised bed solution. It is a specific tool that works well under specific conditions and fails predictably outside of them. The gardeners who get the most out of drip tape in raised beds are the ones who plant in rows, plan for periodic replacement, and do not ask the tape to handle a layout it was not built for. The ones who end up frustrated are almost always running it through a mixed-crop or frequently rotated bed where the fixed emitter spacing never aligns with where the plants are.
Know the layout first. If your beds are row-planted and stable from season to season, drip tape is a cost-effective choice with a straightforward setup. If your beds are mixed, irregular, or change configuration regularly, the savings per foot will not make up for the dry spots and fit problems. The right drip irrigation product for your raised beds gets a lot easier to identify once you know what you are actually growing and how you plant it. For a broader look at how all the raised bed drip irrigation options compare, the best raised bed drip irrigation kit overview covers the full range and when each approach fits.
FAQs
💧 Can you use drip tape in a raised bed?
Yes, but it works best in raised beds planted in straight rows with consistent crop spacing. Drip tape delivers water at fixed emitter intervals along a straight run, which aligns well with row crops like beans, carrots, beets, and lettuce. It is a poor fit for square foot gardens, mixed plantings, or beds that change layout between seasons.
🌱 How long does drip tape last in a raised bed?
Commercial drip tape is often replaced after one or two seasons. In a home raised bed with mulch covering the tape and a proper end-of-season flush and storage routine, three to four seasons is a reasonable expectation. Without mulch, UV exposure shortens that window significantly and wall cracking shows up earlier than most gardeners expect.
🥕 What emitter spacing works best for drip tape in a raised bed vegetable garden?
It depends on what you are growing. For dense plantings like lettuce or spinach in rows, 6-inch emitter spacing covers the root zone without gaps. For crops with more space between plants, like beans or beets, 8 or 12-inch spacing is usually sufficient. Match the emitter interval to your row spacing and plant density before buying a specific tape product.
🔁 Can drip tape be reused between seasons?
Yes, if the wall is still intact and the emitters are not clogged. Flush the tape at the end of the season, dry it thoroughly, and store it out of direct sunlight. Before reinstalling, inspect the length for cracked sections or emitters that no longer flow consistently. Those are signs to replace the run rather than reinstall it.
📐 How much water does drip tape deliver to a 4×8 raised bed per hour?
One documented raised bed setup uses tape rows laid roughly 9 inches apart across the bed width, with each 8-foot run carrying 15 emitters at 0.25 GPH, which delivers 15 gallons per hour to a full 4×8 bed. Your actual flow depends on the emitter rating of the specific tape you buy. Check the spec sheet before setting timer run times, since 0.5 GPH tape at the same layout would deliver double that volume.
🔧 Drip tape or dripline: which is better for a raised bed?
Drip tape costs less per foot and works well for row plantings with stable layouts. Emitter dripline is more flexible, more durable, and handles mixed or seasonally changing layouts far better. For most backyard raised bed gardeners with varied crops and seasonal layout changes, dripline is the more practical long-term choice. Drip tape makes sense when row planting and lower upfront cost are both true of your situation. For a side-by-side comparison of these options, the article on drip tape vs soaker hose for raised beds breaks down the tradeoffs in detail.